Gate from the chain-link in 3 stages - simply, quickly and
Not everyone has the opportunity to order beautiful wrought iron gates, and it is not always necessary, sometimes gates from a chain-link look much more appropriate. Considerable savings on materials and the ability to do all the work on their own will make the production of the gate also a cost-effective event.
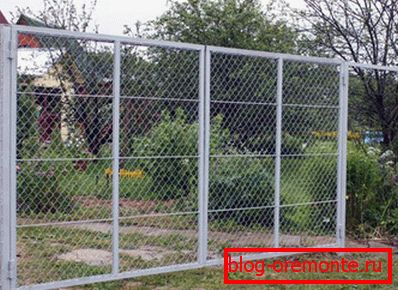
Gates from the net
We think over the design and select the material
For the manufacture and installation of the gate will need:
- profile tube - it forms the skeleton of the structure, rectangular or square section is convenient during assembly. For the external frame, you can take a pipe of a large section, approximately 50x40 mm or 60x40 mm, for internal bridges, you can take a pipe thinner - 20x30 mm. Alternatively, the frame can be made of wood, but the rigidity and durability of the structure will be lower than that of the metal;
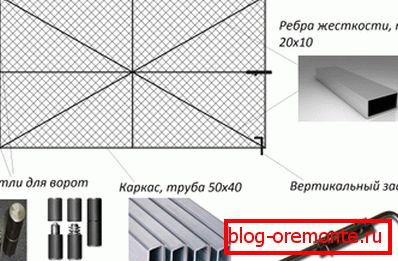
The main elements of the gate
Note! The gate must be rigid, but at the same time not very heavy, we don’t need an extra load on the hinges. Considering the fact that we will sheathe the frame with a net as a net, the weight of the structure should not exceed 70-100 kg.
- we will frame the frame with a net. If there is no chain-link, you can use anything from polycarbonate and metal tile to wood;
- need at least 4 sheds, swing gates will require 2 sheds on each leaf;
- also need at least the easiest lock / deadbolt.
Given the working conditions of the grid is best to buy galvanized. Sheeting protects it from corrosion. And it is best to paint the metal with protective paint right after the assembly, so rust is guaranteed not to find a loophole.
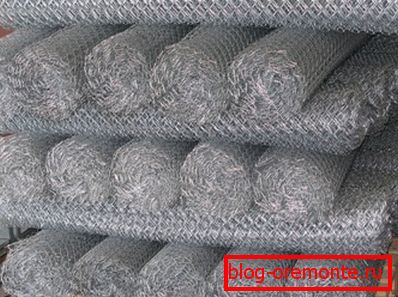
On a photo - the galvanized chain-link
As for the construction, there are no special difficulties, the sash base is a rectangle or a square, we will assemble it from a pipe of a large section. But by itself, such a structure will be fragile and if it is not strengthened, even a small wind load will cause deformation in the corners.
To avoid this, jumpers are installed from a pipe of a smaller section. As a result, when twisting the stiffness increases significantly. The best option is to put stiffeners diagonally and in the center of the frame.
Assembly and installation
Typically, these gates are positioned as a garden, cottage appearance they have an unpresentable, but in the country it is not necessary. Therefore, we will proceed from the fact that all work is performed by one person.
Frame assembly
The pipe can be cut even with a grinder, even with a manual hacksaw, the main thing is not to miss the size. The most difficult thing at this stage is to observe the geometry, you need to lay out the gate leaf contour on a flat surface and start welding.
Note! Laying the frame on the ground and weld in this position is not worth it. It is better to attend to the manufacture of the building berth, which consists of several small benches installed so that their surface is in the same plane.
Slipway and frame installed on it
There are no special secrets on welding, I would advise you, except perhaps to clear the place of the joint from paint. Gates for giving from the chain-link should be protected from moisture, and openings at the ends - a potential weak spot in the whole structure. If you simply brew them, the inner space of the pipe will not be ventilated, which may eventually create ideal conditions for corrosion inside.
Therefore, proceed as follows:
- in the upper part (where there is a risk of precipitation entering the inside of the pipe), the ends of the pipes are washed down at a 45% angle and butt-cooked;
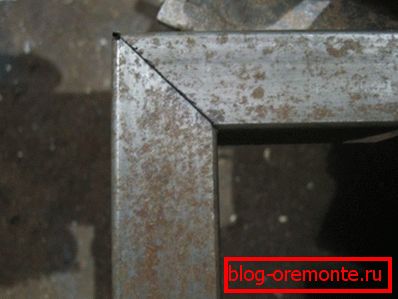
Top corners butt-weld at an angle of 45 °
- in the lower part, the openings are left open, and the internal space of the frame will be ventilated through them.
Before and after welding, be sure to control the sash geometry. It is enough to measure up to 0.5-1.0 cm of its diagonal. The skew will be visible immediately.
Gate hinges
Must be strong enough to withstand the load from the valves. The gates for giving from the netting of the chain-link, though they weigh little compared to forged counterparts, but a few tens of kilograms will still act on the hinges throughout the entire life cycle.
From the correct selection of hinges and their installation depends not only the durability of the gate, but also the angle at which they will open. Not so long ago, my neighbor just made a similar mistake - due to improper installation of hinges, the gate he opened even less than 90 °, given that he made them not very wide, leaving the area was not very convenient.
Doors from the netting of the chain-link do-it-yourself are good because they have very low windage, especially in comparison with the gate with solid sheathing. From here and lower load on the hinges compared with the gate with a solid lining. And if for solid plating, I would recommend not to save on hinges and take garage (on support bearings), then for the grid you can use simpler hinges.
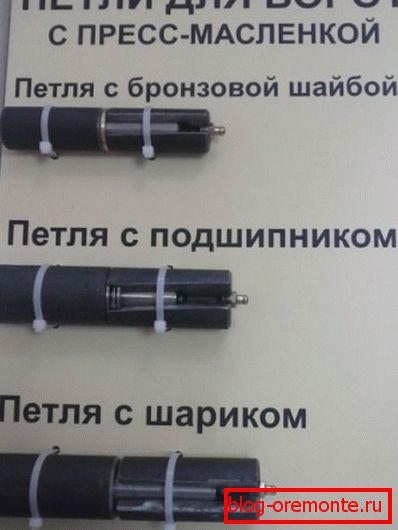
Different hinge options
The opening angle depends on how the loop will be located. The only correct option is in the direction of opening the swing gates, are the hinges attached to the very edge of the frame so that about? diameter she protruded beyond the frame. This avoids the gaps between the frame of the gate and the post, and the opening angle will be more than 100 °.
As for fastening, it is necessary to fasten the hinge frame at the time of its collection (i.e., on the slipway), we pay special attention to the alignment of the upper and lower hinges. When cooking loops, fitting will be needed, so it is best to do this even before welding stiffeners to the frame.
Covering the frame and installing constipation
The most reliable option of fixing the mesh is its welding around the perimeter of the frame. Some solve this issue differently, for example, using plastic ties or wire - the net is simply tied around the perimeter. But such an attachment is unreliable, the ties can easily break, and the wire will rust.
That is why I would advise to dwell on the mesh welding to the frame. The only problem is that the welding machine will easily perezhuet the wire of the net itself, therefore along the perimeter of the frame a metal bar is passed through the grid, which is welded to the shaped tube. You can do the same with stiffeners.
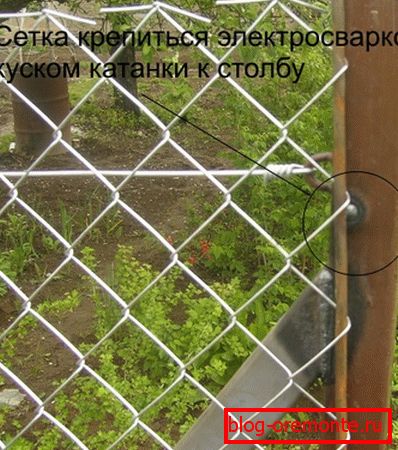
The rod is welded to the frame
Constipation choose the simplest - padlock and bolt on the inside. If the sash turned out to be long enough, then you can put a pair of vertical bolts in the bottom. Loops are welded to the frame, and pipes with an inner diameter slightly larger than the bolts diameter are concreted into the ground; the tubes are then cut off flush with the ground.
The final stage is the thorough processing of welds and their painting with protective paint.
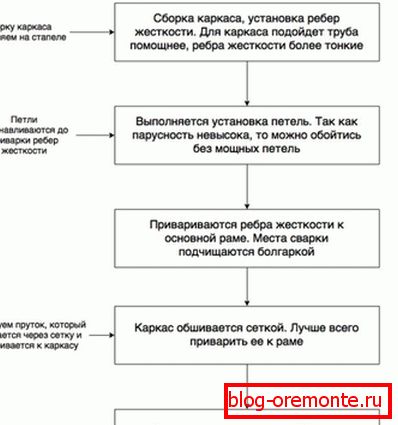
The main stages of the work
Conclusion
The price of three-meter swing gates with paneling is about 2500 UAH (6-8 thousand rubles). If we exclude welding from the list of works, then all other operations can be performed by any person, even without experience in working with metal, so there is no particular reason to pay for the finished gate. It is better to try to make them yourself, it will save time and money, even taking into account the fact that you have to pay a certain amount to the welder.
The video in this article shows an example of the welding of the frame under the swing gates.
In the comments you can share your experience with the metal and design / create swing gates from the chain-link mesh.