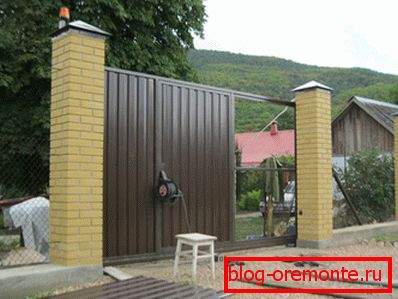
Gate from a professional flooring with a gate, a right

In the photo there is a profiled door with an integrated wicket
For each owner of a country estate, called a summer residence, there is an acute need for the improvement of his plot. After all, every weekend we come to the country and want to take a break from the bustle of the city with comfort.
By landscaping our farm, we, first of all, protect our territory from outsiders. But today we will not talk about building a fence for your site, but about a more important element. Our article will be a little wider, and we want to discuss the fence of corrugated flooring with a gate and a wicket in general.
Plan and draw up a plan.
Any building construction requires a preliminary calculation and necessarily a drawing. Even with the construction of the fence, not such a complicated structure, it is necessary to have a drawing. But the fence, but we need to know exactly where you will have the entrance and, accordingly, the entrance.

Exemplary Gate Design
We suggest you not to shelve this question, but to take and plan the future construction, and we will help you.
What you need, first of all, consider:
- Entry Location - This is the most important moment in drawing up a drawing. It is from where you install the gate and will continue to depend on the ease of operation of the gate.
Try to think in advance about how the car will enter the courtyard, how it will leave. Is it planned to build a garage in the future? All these nuances need to be considered.
- Log to the cottage - definitely, according to your plan, there is a gate from a professional sheet with a wicket. But you need to decide which gate will suit you, built into the gate itself, or remote, standing separately. In these two different cases there will be different sizes and drawings.
- Entry width - it depends on the size of the entrance space, how in the future you will travel and call in to your dacha. There is no need to save centimeters, do so that you feel comfortable.
- Gate construction - you should know how the gates will open and close. The simplest system is to make swing sections opening inwards or outwards. But it happens that the place does not allow and it is necessary to change the design, for example, to make sliding gates.
Taking into account all these points, you can independently sketch on paper the future plan of your new gate.
We do the built-in design
What is convenient option for the execution of the entry? First of all, the doors of corrugated flooring with built-in wicket save space.
If you have limited entrance space, this design will fit into your size. In fact, you get the gate and gate in a single design.

On this drawing, the width of the gate reaches five meters.
When installing sliding gates, the built-in gate is simply a necessity, but if space allows you, you can make an entrance alongside with such a device.
Consider the option with a wicket, which will be located in the door leaf, or in the sliding section.
You can make such gates with your own hands, relying on our advice.
- The first thing we need is, as we have already said, a drawing, in which exactly the location of the opening and the dimensions of the entrance are definitely defined.
- The second equally important step will be the installation of support pillars, they will hold the sash fence, so the pillars must be strong and well fixed. It is recommended to connect the bearing columns with the main structure of the fence, this will add rigidity to the supporting columns, and protect them from inclinations and distortions.
- Putting the frame, exactly according to the drawing that you made. We divide the width of the entrance opening and get two halves of the entrance gate. Do not forget to take into account the width of the metal when measuring the dimensions, we recommend using a profile tube. It is lighter in weight and more convenient to assemble, respectively, the price of this material is lower than the usual metal corner.
- One door, in which the gateway is not planned, can be assembled immediately and set aside. In the other shutter you need to assemble an opening to which the door of the gate will be attached.
Important! Do not forget that the guides for fixing the door trim should be at the same level, on two half sections. Otherwise, when you install the trim you will tighten the mounting screws at different levels and lose symmetry. On the front of the fence it will be evident and spoil the aesthetic appearance of the gate.
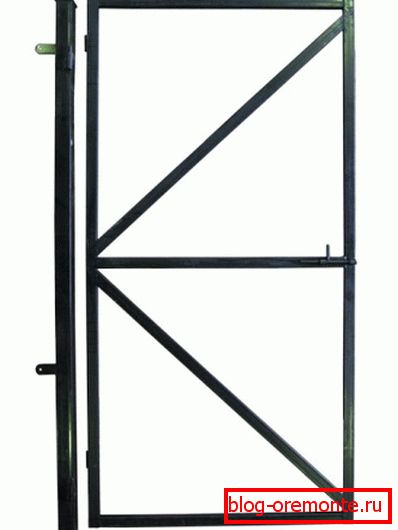
In the photo, the finished wicket frame
- After the toga as the opening of the gate is ready, proceed to the assembly of the door itself. We already have finished dimensions and it remains for us to assemble a rectangular frame. When installing this product you will be greatly helped by instructions that require: measure seven times, cut once. In this meticulous matter the main thing is not to hurry.
- Stiffness on the door is desirable to do in the level with the guides on the doors, thus achieving the same location of the mounting screws on the front.
We install hinges on the door and the sash fence
When the frame construction assembly, you can proceed to the installation of hinged hinges on the gate. To do this, take the doorway and put it in the finished box on the sash.
Requirements for mounting hinges are a flat plane in which the sash frame should be the gate itself. Only in this way you will protect the door from distortions, and it will close and open without interference.
Important! From where you mount the hinges will depend on which way the door will open in or out. Accordingly, if the hinges are welded inside the sash, then the door will open inwards, if outside, then everything is exactly the opposite.

Weld the hinges on the goal posts
If everything is easy and simple when mounting hinges on the gate, the installation of hinges on the goal posts and the frame itself is slightly different.
- To begin with, mark the height of your sash on the pole, so it will be easier to mark the location of the hinges. The bottom of the markup will be the lower part of the sash, so note that the lower part should not touch the ground.
- Now back away from the marks twenty-five centimeters below and above.
- According to the marks you can fasten half of the loop, fitting. You can weld the mounting bar to the loop in advance, it will facilitate the installation of the hinges and reduce the load on them when you hang up the swing gates with a wicket door.
- After it is possible to note the size on the frame of the leaf, minus the size of the half loop, in this case internal. You can also set the frame in place and immediately grab the loop by welding.
Tip! Do not worry if you do not have everything at once, it turns out, fix all knots on easy tacking. In case you have to redo something, they are easily removed by the grinder, while all the nodes remain without damage.
The trim panel and gate are ready
Well, that's the last thing left, you need to sheathe the doors of the gate with a professional sheet, and it's done. Start immediately refining the doors themselves, cut the opening in the sheet with a grinder, for the future gate and secure with screws, fasten the sheet.
Close the profile frame gate
Recall that this stage is best done when the door structure lies on a plane. It is recommended to remove all the parts beforehand and continue installation on the ground. It should be noted that if you want to make a sectional garage door with a wicket, then the principle of their installation is almost similar to the installation of swing.
Finally
As you could understand, it is possible and even necessary to equip a fairly good entry to your dacha. Of course, this will require some tools and, above all, a step by step sequence of actions.
We hope that our article will help you in this task. And in the presented video in this article you will find additional information on this topic.