Garage swing gates - a step-by-step guide to
If you are building a garage in the courtyard of the house or in another territory where there are no strangers, then it makes no sense to build capital gates from sheet steel. It is much more reasonable to make garage swing doors of corrugated flooring, as they are easier to build and weigh much less. I will tell you how to make a structure on your own with minimal time and effort.
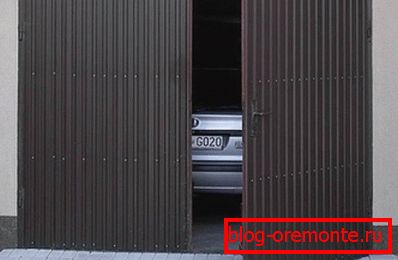
In the photo: these gates look very attractive.
Workflow Description
As for the work, it can be divided into several stages in order to understand the process as best as possible. It is important to do everything in order, then the difficulties in the manufacture of the gate you will not have.
Preparatory stage
First you need to carry out the preparatory work, they include several important events:
- It is necessary to determine the optimal size of the opening. If you are building a garage, the distance to the sides of the car should be at least 30 cm, the height in the standard version is 200-210 cm, and the minibus needs a door taller - about 250 cm. to determine the size of the gate, which you will do;
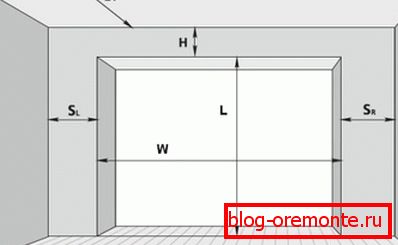
Remember that from the edge of the opening to the wall should be at least 80 cm, this is important for structural strength
- Then you need to make a design drawingIt is very important for further work. If you have a sketch on hand, you can accurately calculate the right amount of materials. In addition, you will clearly represent the final result, which will greatly simplify the workflow and allow you to clearly understand what needs to be done at a specific point in time;

Example of a 4x2 meter gate, simple and clear drawing
- If you decide to make metal swing garage doors with a wicket, you will have to make the frame much stronger and strengthen it with longitudinal and transverse struts. Personally, I have never made such an option from corrugated boarding, but I think that the work will not be more difficult than in the case of ordinary sheet metal.

The gate requires a very high quality reinforcement, which significantly weights the structure.
When you have a finished sketch, it’s easy to calculate the necessary amount of materials and components:
| Profile pipe for the frame | For the frame, it is better to take a solid pipe with a cross section of 50x50 or 60x60 mm, these options will ensure reliability and will not be deformed even under high loads. The right amount is calculated in running meters, many sellers can even cut the material into pieces of the right size, which is very convenient |
| Shutter Pipe | In my opinion, it is best to use a 40x20 mm pipe for the frame of the valves, and for bridges that are responsible for stiffness, the best solution would be the 60x40 or 40x40 option. The number is again calculated in meters |
| Decking for door trim | This material can have a wide variety of colors and textures, which allows you to design a garage door in a single style with a common environment. As for quality, choose a material with a thickness of at least 0.5 without any damage to the surface. Any scratch is a potential center of corrosion in the future, remember this. |
| Loops and constipation | It is impossible to imagine a good gate without strong hinges, which ensure a clear position of the structure and make it easy to open and close sash. It is better to choose options with bearings or at least a ball, simple products are not the best solution. As for the upper and lower constipation, you can buy a ready-made version, it is much easier than doing them yourself |
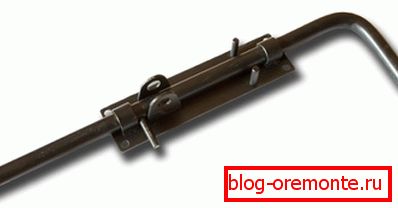
Vertical bolts - an important element for reliable gates
Important! When choosing decking, pay attention to the condition of the protective film; if it is damaged, then most likely the metal is scratched. This is the easiest way to check the surface for damage.
Of course, to work without a specific tool is unlikely to work out, let's figure out what should be at hand:
- Welding machine - do not need an industrial version, enough of the compact version of 220 volts. Naturally, the electrodes must be 3 mm thick, it is enough for the welding of profiled pipes. If there are no skills to work with welding, then it is better to involve a specialist or a friend, if one exists, to practice at the gate is not the best option;
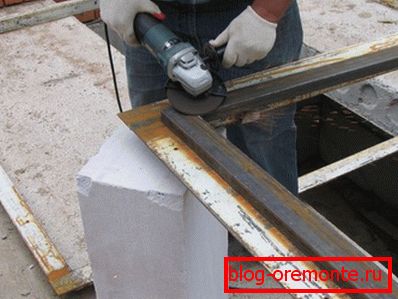
- Nowadays, almost no metal works are complete without an angle grinder or, as the people call it, grinders. To it should be at least several cutting wheels corresponding in diameter and one grinding disc, with which you can quickly and easily align the welds;

With the help of the grinder metal cutting will pass quickly and efficiently
Important! Never use the grinder without a protective casing, and during work, always use safety glasses and gloves made of thick leather or textiles, so you will protect yourself as much as possible.
- For measurements, a tape measure is needed, for accurate marking - a square and a special marker pen, which can be used to make clear, clearly visible marks on the metal. To control the position of the structure at hand should also be building level;
- In no case do not use the grinder for cutting profiled sheet, this is the worst option, as the metal overheats and begins to rust with time along the cutting line. Better buy ordinary metal shears, with which work can be done quickly and efficiently;
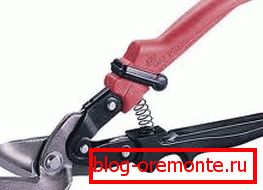
The low-profile professional sheet is perfectly cut by hand-held metal shears.
- The sheet will be attached to the frame with aluminum rivets, so you need to purchase a special gun. Choose a durable version with massive handles, cheap riveters bend after hundreds of connections, believe my experience.
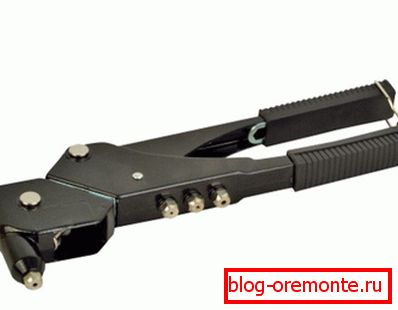
Rivet gun must be reliable
Working stage
Now we will understand how to assemble the swing gates for the garage with all your hands:
- First of all, it is necessary to cut pieces of the profiled pipe for the framework of the structure, the elements can be smooth, then you will need to weld their joints, and can be cut at a 45 degree angle, this option is somewhat stronger, but also much more difficult to implement. For inexperienced craftsmen it is better to choose the first method, do not forget to take away the thickness of the two side pillars from the length of the crosspiece, because it will be located between them;
Important! There is no need to make double boxes in the form of profiled pipes with corrugated sheeting as in the sheet metal version, as the weight of the structure is small and the load on the walls will be small.
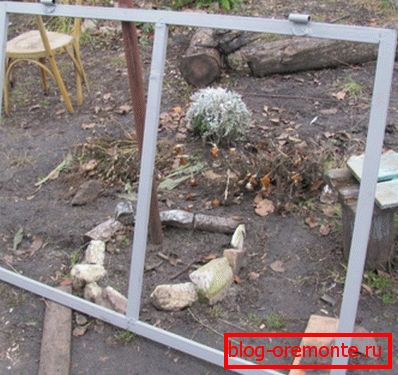
- All elements are laid out on a flat surface, it is important to ensure the ideal geometry of the structure, so take this part of the work with full responsibility and prepare a place under the frame. You can adjust the position of the elements by placing chips and other improvised objects under them;
It is important to even lay out the future frame before welding
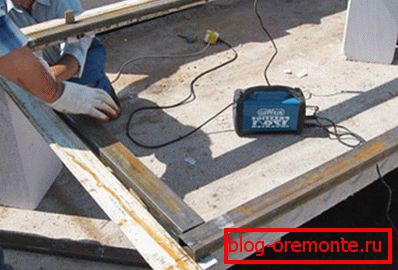
- Next, the design is welded with solid seams, it is important to connect the elements of high quality, ensuring maximum reliability of the finished box. Do not remove the finished structure anywhere, it will be needed for further work;
- Then the metal is cut for the frameworks of the valves, after which it is necessary to lay them out on the surface and them, and we will do it competently: we will lay out the structure inside the box, using the chips to make the same gaps between the elements, after which you can grab the elements by spot welding to get them;

The frame is best to try on inside the gate box
- After all the elements are securely welded (do not forget about the jumpers on the door leaves), you need to carefully clean all the seams with the help of the grinder;
Cleaning is performed using grinders and grinding wheels
- The finished elements are laid out neatly again, after which it is necessary to set the loops, it is important to arrange them as evenly as possible. After that, the elements are tacked, the structure can be disassembled for convenience and the hinges can be welded reliably, they must be held very securely, because they will bear the main load;
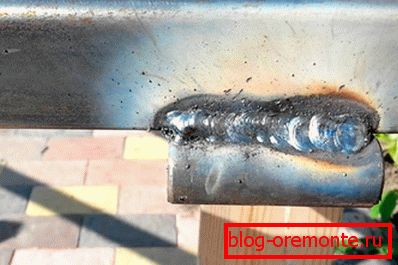
Welding hinges need as reliable as possible.
- Separate parts of the structure are painted to protect them from corrosion; this must be done before sheeting with profiling and installation so that you can process the elements from all sides. For work, paint with a primer is suitable, which perfectly protects the metal from rust and does not require special surface preparation;
Do not forget to paint the welded products.
- Sheathing of the sills with a professional sheet begins with cutting the material to the size you need, if you bought pieces of the required configuration, this greatly simplifies the process. Then you need to put the frame and set the sheet as it will be attached, after which you need to drill holes for the rivets, the diameter depends on what fasteners will be used. It is best to use a rivet with a diameter of 4 mm, and a 4.2 mm drill is used for it;
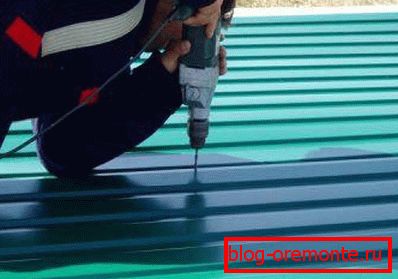
Holes are drilled after 15-20 cm, you will have to drill a lot
Tip! You can use the usual steel-colored rivets, and you can find color options, they are much more expensive than the standard ones, but they are almost not visible on the surface.
- Professional sheet rivet fastening is quick and easy, using a rivet gun for this. You can easily figure out the process by reading the instructions on the instrument packaging.
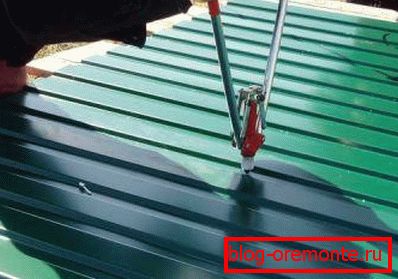
Rivets fix professional sheet very securely
As for the installation, I described it in detail in one of the reviews, here I will tell only the main steps:
- Hammering mortgages into the wall;
- Placing a frame using a level;
- Welding the box to the mortgage;
- Hanging the valves and checking the opening-closing of the valves.
If done correctly, the design will last for decades, and the only repair that may be required is painting of metal parts to protect against corrosion.
Another point that needs to be addressed is the installation of automation. If you subsequently or immediately put the actuators for opening outwards, then a stiffening rib must be added to the frame in the place where the brackets are installed. It is important to do this in advance, because it is very problematic to weld the profiled pipe to the finished product, and the profiled sheet will overheat and paint may leave it.
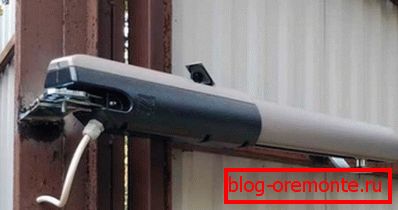
The drive must be attached to the stiffener, otherwise the gate leaf will simply become deformed over time.
In conclusion, I want to note that the price of the gate that you collect on your own will be at least twice, or even the second lower, since this kind of work costs more than the materials used.
Such gates will be suitable both for wooden buildings, and for structures made of foam concrete blocks, and for garages of sandwich panels, since their weight is small and the load on the supporting structures will be minimal.
Conclusion
I hope that this simple instruction will help you to understand the issue of building a gate from a profiled sheet and you can make a high-quality construction without the involvement of specialists. The video in this article will help to understand the process even better, and if you have any questions, then ask them in the comments under the review.