Garage lifting gate. kinds. preparation of drawings.
Options for designs of garage doors, there are quite a few, however, the most convenient are, perhaps, lifting the gate. But despite this, many homemade craftsmen prefer the swing construction, as it seems to be much simpler to manufacture. In fact, it is not much more difficult to make a lifting mechanism, and you can see this in this article, in which I will tell you in detail how to make a garage overhead gate with your own hands.
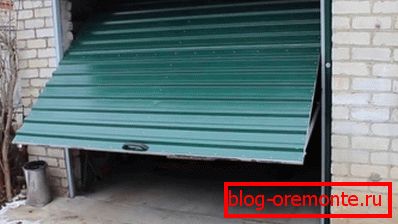
Lifting gates
Types of lift gates
Before proceeding to the manufacture of overhead gates, it is necessary to become familiar with the types of their structures. According to GOST 31174-2003, two types of structures are applicable to lifting:
| Type of construction | Special features |
| Lifting sectional | The canvas of such a gate consists of several sections (panels), which are connected by hinge type hinges. The height of each panel is about half a meter. When opened, such gates are tightened to the ceiling, as a result of which the panels are displaced relative to each other, forming an arc. Panels can be made of wood or steel. Among the advantages of this design are the following points:
As for the shortcomings, then they include instability to cracking. In addition, to make these gates on their own is very difficult. However, you can purchase a ready-made kit and install it yourself, rather than providing some savings. |
| Lifting and turning | This design includes a one-piece sash, which, when opened, rises and unfolds parallel to the floor, as a result of which it is located under the ceiling. The movement of the sash is carried out using a hinged lever mechanism. Among the advantages of this design are the following points:
|

Lifting sectional ворота
Thus, if you want to make the gate yourself, then the best option is a tilt-up construction.
Features lifting and turning design
The device of a swing-up gate is quite simple.
The mechanism consists of the following main elements:
- the boxes - consists of two guides along which the carriage of the hinged-lever mechanism moves. It should be noted that in addition to the vertical guides, horizontal guides are also installed, which are flush with the upper end of the gate. On them moves the upper part of the gate in the horizontal plane;
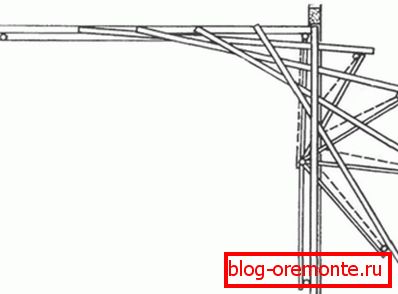
Tilting gate device design
- opening mechanism - is a carriage moving in a vertical plane to which the lever is attached. The latter is attached to the bottom of the gate by means of a bearing. It should be noted that you can make a simplified design without a lever, in this case, the lower part of the door will move strictly in the vertical plane.

Example of mounting the carriage to the gate without a lever
To make the design easy to open and close, it is necessary to make a counterweight on each side of the gate. It is a cable that is attached to the bottom of the gate and is passed through the block under the ceiling. The cargo is tied to the end of the cable;
- lifting sash - can be made of metal, sandwich panels or timber frame, sheathed with steel sheets.
As you can see, the design is simpler than it seems at first glance. The only thing I will note is that there are various variations of such gates. Often, a spring or a shock absorber is included in the lifting mechanism, however, in general, the principle of operation remains the same.
Of course, for the manufacture of such a design, you must have the skills to work with metal and be able to handle the welding machine.
Manufacturing
The process of manufacturing the gate consists of several main stages:

Work schemes
Next, consider in detail the nuances of work at each of these stages.
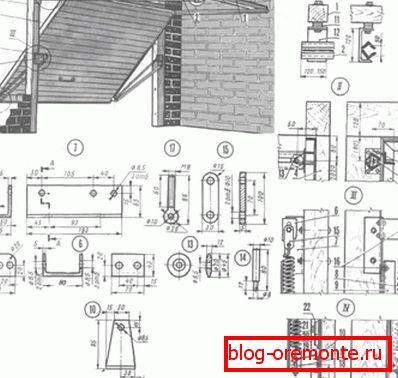
Diagram of a wooden lifting gate with drawings of important components
Preparation of drawings
At the stage of preparation of drawings, first of all, it is necessary to determine the size of the structure. Standard sizes of garage doors are 2500–2800 mm wide and 1960–2000 mm high. Of course, if necessary, you can adjust the size to fit your needs.
In accordance with the dimensions, the drawings of all the other parts should be indicated with dimensions. To make it easier to make a drawing, first draw the main components of the structure, then think over all the small details and how to fix them.
At this stage, you also need to decide on all the materials from which you will make the gate, since the construction depends on them to a great extent.
Mounting guides
It is best to begin work with the installation of guides, rather than fabrication of the web, since in this case you can adjust the size of the gate. Thanks to this, they will be maximally fitted under the box.
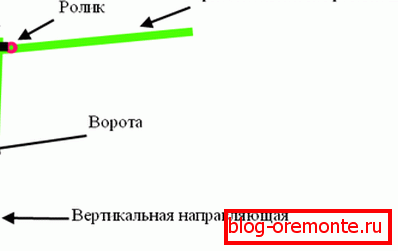
Layout of guides
The work is performed in the following sequence:
- as guides, both vertical and horizontal, it is best to use a channel. Therefore, first of all, cut them into parts of the desired length, from which the frame will be assembled;
- Next, you need to fix the vertical guides in the opening with anchors and brackets. At this stage it is extremely important to arrange the guides strictly vertically and in the same plane - this affects the performance and durability of the gate. To stiffen the box, connect the top of the rack with a beam;
- Now you need to install the vertical guides, which are welded on one side to the vertical posts, and on the other to the beam, which in turn is attached to the walls. On our portal you can find detailed information on how to fix the beam on the walls;
- Additionally, to give strength to the structure, the upper guides can be connected with struts.
The process of assembling the frame design is completed.
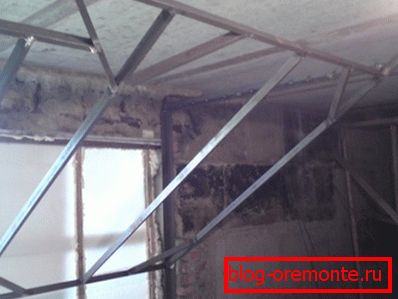
Lifting gate frame example
Fabrication
The process of making cloth does not contain any features. As mentioned above, it can be made from different materials. However, in any case, the frame is based.
It is best to make the gate metal - then they will be strong, reliable and durable. The frame for them can be made of a corner or profiled pipe.
The process of making metal doors with their own hands is as follows:
- cut the frame parts according to the dimensions shown on the drawing;
- then assemble a rectangle from the parts;
- the resulting structure should be strengthened with crossbars and braces;
- now you need to weld sheets of steel to the resulting frame.
The same pattern is going to canvas with a wooden frame of timber. The only thing to connect the timber, you should use metal corners and screws. It is possible to attach steel sheets to the timber using bolts.
Tip! You can improve the canvas with various locking systems, mechanisms that protect against hacking, security devices and other similar elements.
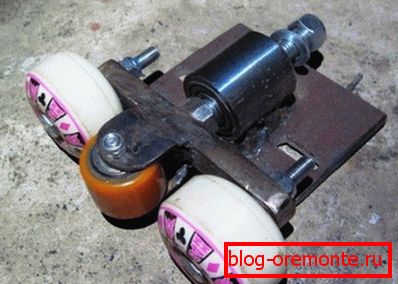
The carriage for the lower part of the gate
Manufacturing of moving mechanisms and installation of gates
Now you need to perform moving mechanisms.
Let's start with the lower carriages, which are made as follows:
- first of all, you need to make the base of the carriage. To do this, use a metal strip, at the edges of which you should drill holes;
- then install two rollers parallel to the bar, as in the photo above. Bolts can be used as axles for rollers. It should be noted that the diameter of the rollers must be such that they fit inside the channel bar;
- between the extreme wheels should be placed perpendicular to the third roller. For its installation, you must perform the u-shaped bracket, which is welded to the bar;
- on the other side of the strap opposite the middle roller, you need to weld a nut into which the bearing axis will be screwed;
- Now you need to make fasteners for the canvas. To do this, take the platform in the form of a steel rectangle and weld the bearing of a suitable size to it;
- just as you need to perform the second moving mechanism.

Bracket with upper roller
To make the upper moving mechanisms even easier, for this, weld the brackets with axes for the rollers to the canvas on the left and right sides. As the latter, you can use bearings. The only thing is that they should be of such a diameter that the axes are located above the sides of the guides.
In the process of making brackets make sure that they are the same size. The axles should be located at a distance of about 20 cm from the canvas, in which case the door can close freely. Before welding the brackets, it is advisable to install a gate in the opening and perform the marking.
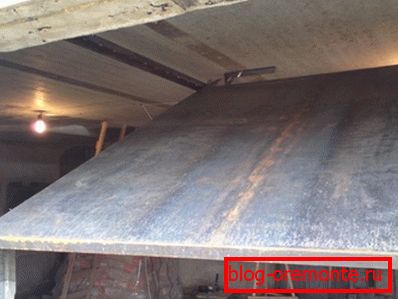
On the photo - installed gate
Now you can install the gate.
This is done as follows:
- First “hang” the gate on the upper rails. To do this, first put the bearings on the axle and fix them with nuts. At this stage, weld the stoppers to the upper guides so that the upper part of the gate cannot move further than necessary;
- Now you should install the lower carriages and attach them to the canvas. To do this, weld the platforms with the bearings at the same level, then position the carriages in the guides and connect them to the platforms with bolts that will serve as axles for the bearings. This bolts should be screwed into the nuts welded to the carriages.
Tip! In the closed state, the lower edge of the gate should be located in a special recess. Due to this, it will be harder to crack them, besides, they will fit snugly to the box.
At this homemade gate almost ready, it remains only to install counterweights.
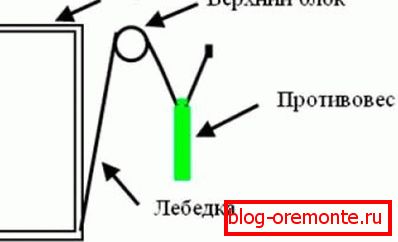
Counterweight design
Counterweight mounting
The process of mounting the counterweight mechanism is quite simple:
- installation of the mechanism start with the installation of blocks. For each block you need a pair of pulleys. They should be located above the gate on the left and right;
- weld loops to the gate, one on each side;
- Now hook the cables to the loops and run them through the blocks;
- then tie the cargo to the free ends of the cables. They should be positioned so that when the gate is closed, they are fun above the floor. I must say that the weight of the goods is chosen individually, so that the gates open easily and securely locked in the open position, but they did not open by themselves.
- at the end of the work you need to install a lock, which can be screw or any other.
Now your gate is fully prepared. It should be noted that the price of the purchase design will be an order of magnitude greater than the costs that required the independent production of the gate.
Conclusion
Above we have considered only the main points of the manufacture of the lifting gate. Of course, in the process of work, you will probably have to face the nuances that we have not touched. However, to cope with these difficulties certainly will not be difficult for every home craftsman who knows how to work with metal.
In the video in this article, you can see how the structure made according to the above scheme works. If some moments are not completely clear to you, ask questions in the comments, and I will be happy to answer them.