Fence of corrugated and brick diy - a detailed description
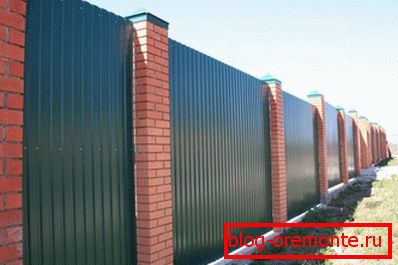
Fence of profiled sheets and brick posts with steel lids
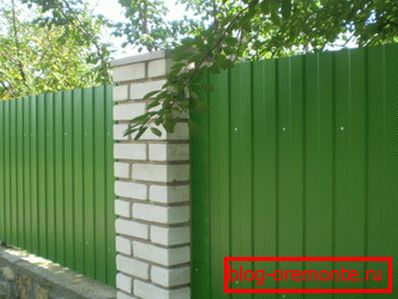
Looking for the best option for fencing a private house or garden plot? Pay attention to the combined fence of brick and corrugated. It will harmoniously fit into any landscape design of the site and the architectural style of the building, and at the same time will be a very economical, but durable solution.
Positive points
- Decking - These are steel profiled sheets coated with colored polymer or galvanized for corrosion protection. The fence of such material is excellent reliability: the sheets can be bent, but it is impossible to break their integrity with the naked hands. By the way, a spoiled sheet can always be replaced with a new one (even after the assembly of the entire structure).
- The durability of the fence of corrugated ranges from 25 to 50 years (it all depends on the operating conditions). It should be noted that this material is highly resistant to sunlight, temperature extremes, as well as to atmospheric, wind and mechanical stress.
- Extensive selection of colors and shades allows you to choose the best option that will be combined with the facade of the building and other elements of the backyard territory.
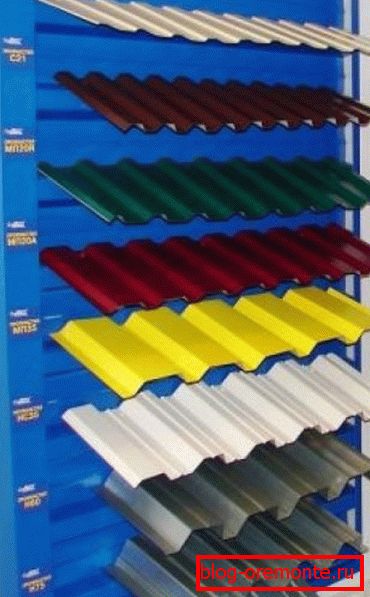
Several options for professional flooring colors
- Brick and corrugated fences mounted fairly quickly, as these are relatively lightweight materials. In addition, there is no need to attract special equipment.
- Brick pillars greatly enhance the construction of the fence of corrugated and add him more solidity and expressiveness.
- Climb over such a fence is very problematicbecause its sharp edge is a serious obstacle for intruders.
Assembly work
The brick fence with a professional flooring is built in stages:
- perimeter measurement;
- foundation preparation;
- making posts;
- fastening profiled sheets.
Note! Profiled sheeting is fixed in one of two ways: over the supports (i.e. as a result, it covers the remaining structural elements) or between the supports (in this case it is most often used with brick pillars). In the article we are talking just about the last method of installation.
Material selection
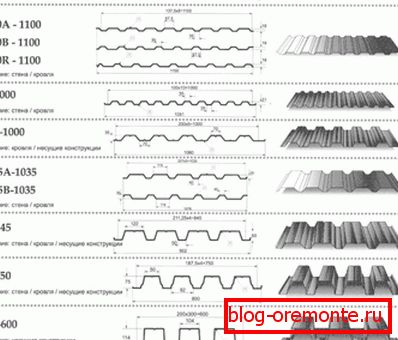
Types of profiled sheets
Below we give some tips on choosing corrugated flooring for building a fence with brick pillars. We hope they will be useful for you.
- As a rule, manufacturers use polyvinyl chloride as a coating for profiled sheets. It creates a rather thick and durable outer layer that prevents mechanical damage, wear and corrosion of sheets. The texture can be both smooth and textured. However, after a couple of years, the material will fade and noticeably fade.
- In addition to polyvinyl chloride, sheet coloring is also used. Fortunately, modern paints meet the highest requirements for protection against damage and corrosion. Not to mention the aesthetic properties: the saturation of the color of the painted sheeting is maintained for a very long time. Plus, manufacturers offer, in addition to the usual, luminous, electrical insulation, thermal indicator paint coatings.
- The presence of a protective layer is mandatory on both sides.
- The color of the material is better to choose under the color of the facade of the building.
- Experts recommend the following parameters of sheets of each section: thickness - 0.5 mm or more; profile height - C10 - C8.
Perimeter measurement
An example of a sketch of the future fence
So, go to the main question - how to make a fence of brick and corrugated? First of all, it is necessary to designate the exact location of the structure, select the appropriate level of the foundation and determine the thickness of the fence itself.
It is possible to isolate the construction area in the simplest way - pegs are installed at the site of future corners of the fence, and a nylon thread is pulled over them. After that, with the help of a tape measure, it is necessary to make all measurements and draw up a draft of the future fence.
Fenced off area with an already dug trench
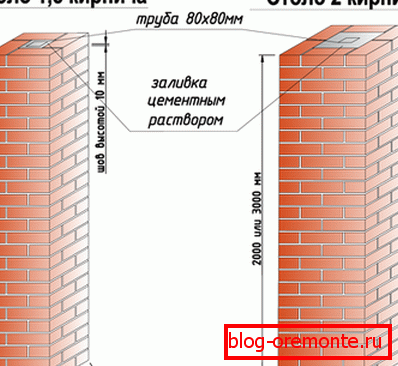
В нашей статье в качестве примера взят монтаж максимально узкого забора из профнастила и кирпича. У кирпичных столбиков будет боковая сторона толщиной в один кирпич, а лицевая – в полтора. С целью усилить столбы используются профильные трубы 40х40х2 мм и армирование каждого второго ряда кирпичной кладки оцинкованной стальной штукатурной сеткой 25х25х1 mm. Помимо этого, для крепления ворот используются столбы с закладными элементами, усиленные стальной трубой 80х2,8 мм. Кирпич – «Fagot».
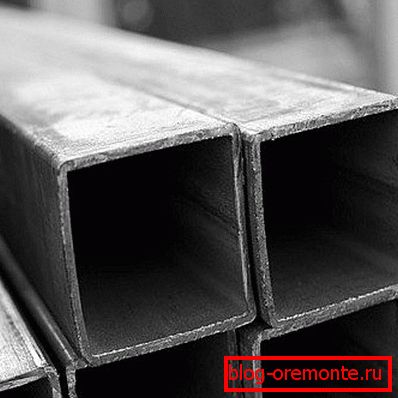
Profile pipes 40x40x2 mm
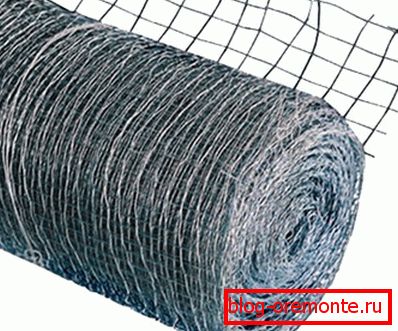
Masonry net
Land works
Before you build a fence made of bricks and corrugated flooring with your own hands, you need to decide where to put the soil dug out while digging the trench.
Please note! 1 cube of soil when digging loosens and increases in volume somewhere 1.5 times.
If the option to scatter excess ground around the future fence does not suit you, then you will need to take it out. For this purpose, perfect polypropylene bags (40-50 kg). At 1 m? It takes about 30 of these bags. Very comfortably. The upper fertile layer (black soil) can be poured separately from clay and earth. Excellent fertilizer for farming and plus savings on export.
Often, the excavator is resorted to with the help of an excavator, but during the construction of the fence, the volume of soil needed by the trench is not that big, only 3 cubes. So, digging a trench with an excavator is simply unprofitable and inconvenient.
For manual earthworks, the following tool will be needed:
- shovel;
- штыковая shovel;
- lm.
For trench preparation 4 m? soil without stones two workers need about 5 hours of time, taking into account the breaks.
Formwork
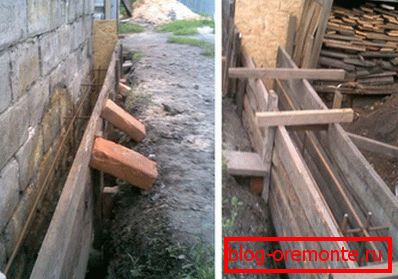
Formwork Example
Formwork can be made immediately after the trench has been dug. As a rule, for the foundation of the enclosure, formwork is assembled only for the basement part 10-20 cm below the ground level. It will be rational to use a half-edged construction board as a material - it is quite strong and inexpensive.
Armed with an electric drill and wood screws, we begin assembling the formwork. It should be noted that the pressure that concrete has on the formwork is rather high, and therefore the boards are additionally fastened with wooden lintels and brick supports. This is done all before pouring the foundation, because it will be very difficult to right back the already curved boards. Shields are assembled directly in the trench. We start with the top board, located along the nylon thread, which is stretched at the level of the future foundation.
It is also necessary to take care of the reinforcement of the foundation. For this, 10 mm reinforcement rods will be useful. Every 1.5 m in the trench put vertical rods. For horizontal reinforcement, we take all the same rods: horizontally on both sides at a distance of 10 cm up the trench, and also on both sides at a distance of 5 cm from the surface of the concrete.
The framework of reinforcing rods is easier to assemble on the surface, and then lowered into the formwork in its finished form. Rods are fastened with annealed wire diameter 1 mm.
A corner or pipe for reinforcement of brick columns is mounted in the formwork only when the formwork itself and the framework of reinforcing rods are fully prepared. They are aligned with the construction level and fixed to the boards.

Quality formwork and pipe installation
Foundation preparation
Ready multi-level foundation
Under the brick pillars the best option would be a tape reinforced concrete foundation. Continuous monolithic tape looks very solid, and besides, does not allow rain water to enter the fenced-off area from the street. The width of the base is better to do the same as the brick pillars.
However, here we need to mention one problem. Often, professional builders and home masters are faced with decent level differences. In our case, as an example, the level difference exceeds 0.5 m with a length of 10 m. In such cases, the construction of a single-level foundation leads to excessive consumption of concrete. In addition, such a foundation may interfere with the fastener gate. The most rational way out of this situation is to break the tape of the base into several separate sections with different levels of at least 10 cm.
It should be noted that the thickness of the foundation may also vary. For example, under the pillars, the base may be full width, and under profiled sheeting, narrower. The positive side of this option is the reduction of land works and the saving of concrete. Minus - formwork assembly is much more complicated. We take as an example a foundation of uniform thickness.
As for the depth of the base under the fence posts. The most optimal would be the distance that is equal to the depth of soil freezing in the construction region. In our example, this figure is 1 meter.
Remember that the foundation must, above all, ensure the reliable functioning of the gate, which will be fixed to the profile pipes in the brick pillars by means of welding. In those places where there will be less load on the fence, that is, under sheets of corrugated flooring, the depth of the foundation can be reduced to 50 cm.
Attention! The shape of the foundation should expand to the bottom of the pit. This is done to counteract the tangential forces of soil heaving, which can reduce the lifetime of the fence and disrupt the normal operation of the gate.

Concrete mixer - a very useful thing when building
Now let's talk about the concrete work that must be performed during the construction of the fence. To save time and effort, pouring the foundation for the fence should be carried out using a concrete mixer. It is better to put it next to the formwork, in order to less drag heavy concrete by hand.
So, the procedure for the mixing of concrete in a concrete mixer:
- Position the mixer at an angle of 35-45? and fall asleep rubble. Why do you need rubble? It is the largest aggregate and does not allow cement and wet sand to adhere to the walls.
- Then you need to pour in concrete mixer additive to the concrete and half the required amount of water.
- 0.5 required sand we fall asleep after mixing rubble with water.
- After 30 seconds of mixing, the concrete mixer should be placed at an angle of 60-70 ° so that dry sand and cement are not stuck to the wet walls. Next, we fall asleep cement and the remaining sand.
- The remaining water is poured after the mixer is again at 35-40 °.
- This whole mixture mixes well for about 2 minutes and, if not mixed lumps are not visible, the concrete mixer is discharged.
Good to know! The ideal load in the equipment - 0.5 maximum volume. The largest load of gradients increases the cooking time for truly high-quality concrete.
Next, we present the approximate composition of the concrete mix in terms of the volume required for the foundation of a brick and corrugated fence.
On 1 share of cement brand PC-400, as a rule, is taken:
- 6 rubble;
- 0.7 water;
- 3 sand;
- air entraining additive for 0.1% by weight of cement.
Tip! Regular liquid soap perfectly replaces the air-entraining and plasticizing additive. 10 ml of soap on 1 bucket of cement. In this case, it will be more convenient to lay the concrete, and it will become more frost-resistant.

Household liquid soap
How to make a fence of corrugated and brick, if at hand there is no concrete mixer? Concrete can be prepared manually. Here is a small instruction:
- We take a container with a volume of approximately 100 liters and fill it with 1 bucket of cement and 3 buckets of sand. Mix them dry. For a mixer, a garden rake can be useful.
- Pour 10 ml into an empty bucket and fill it with water to the top. On the surface there should be a lot of foam, and the concrete mixture is just as plasticized, the better, the more foam there will be. This means that the concrete will be easier to knead and lay.
- This soapy water is mixed with the dry mixture prepared in advance.
- When you have a homogeneous mass, pour 6 buckets of rubble into it and mix well.
The lack of mixing with their own hands is a lot of time (it takes about half an hour to prepare 100 liters of concrete). And besides, due to the increased volume of water, the concrete mix gets less durable. But, alas, with a smaller amount of water to knead the concrete by hand is very, very difficult.
After pouring the foundation, the concrete is immediately covered with plastic wrap in order to prevent the quick drying of its surface. In hot weather (25-30? C), the complete demolding is carried out in approximately one week.
Erection of brick pillars
As a rule, the posts for the fence of corrugated flooring laid out facing brick (for example, as in the photo below - brick "Fagot"). Of course, for this work, it is better to involve an experienced bricklayer and his maintenance worker.
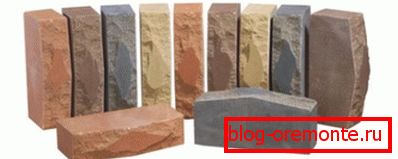
Brick "Fagot"
For laying brick used cement-sand mortar. He prepared the ratio of 1 to 3 (again, for plasticity with the addition of liquid soap). The laying is carried out gradually - 0.5 m of laying in height for 1 working day. Simultaneously with the laying, the gap between the steel column and the brick is filled with the same solution. Each row is reinforced with a special masonry mesh 50x50x4 mm for greater strength.
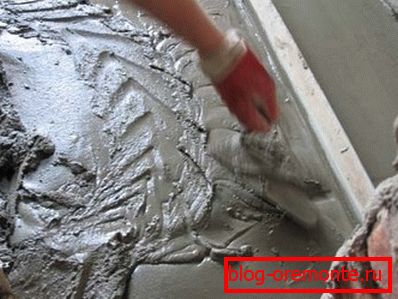
Cement-sand mortar
Masonry principle
The recommended distance between brick pillars when building a corrugated fence is no more than 3 m. The height depends on the following parameters:
- design of the site itself;
- aesthetics fencing;
- wind load;
- height of profiled sheets.
To fix the corrugated flooring in the brickwork, embedded plates and corners are provided (in the middle, below and above the columns). Three lag is enough for reliable fastening of three-meter sheets.
The final stage of the decorative design of the pillars is the installation of covers. They give the brick columns a finished look, and also protect them from moisture ingress. Such covers are made of concrete or galvanized and painted steel. The service life of high-quality products is equivalent to the service life of a corrugated sheet.

Decorative and protective cover for pillars
Tip! Preferring concrete caps, it is best to purchase those that are painted with mineral pigment. Under the influence of external conditions, paint will not wash off from them, and their color will not fade with time.
Concrete covers are placed on top of the columns on the cement-sand mortar. To install steel covers, you will need another mount - dowels, with which they will be attached to the bottom of the brick.

Covers give the fence a finished and original look.
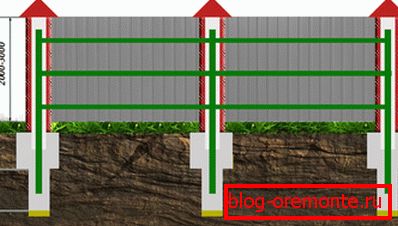
Steel frame assembly
This stage of the construction of the fence can be started after the concrete has settled in the formwork for at least a couple of days. The frame is assembled from a shaped pipe 20x40x2 mm using manual arc welding. Then the professional flooring itself will be attached to it.
Here is the scheme for assembling such a frame:
- We cut profile pipes into vertical segments of the required length;
- We put labels on the vertical sections at the places where the horizontal pipes will be welded (a margin of 30 cm from each edge of the fence);
- In marked places, we weld horizontal pipes on one side by welding;
- Check the building level of the correct position of the pipes;
- Weld horizontal pipes finally.
Assembling the frame is much more convenient to carry out two pairs of workers. For welding, a welding machine with a maximum power of 6.5 kW will suffice. After welding, the frame needs to be painted. Suitable alkyd enamel PF-115. But if rust is noticed on the pipes, then you will have to apply a rust converter in advance.
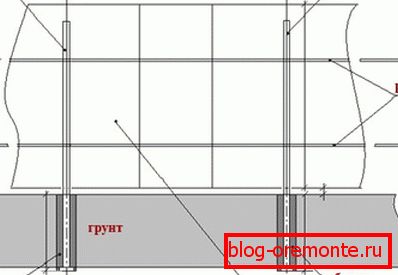
This diagram shows how vertical and horizontal steel pipes should be placed.
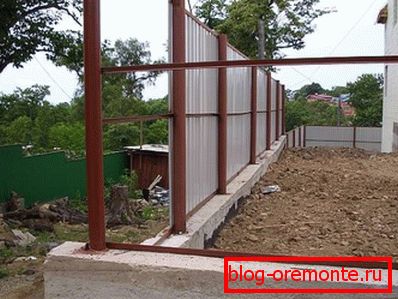
Installation of corrugated on the frame and mount to the pillars

General scheme of construction
The last stage of the fence is the installation of corrugated flooring. Before you get down to business, it is better to cover the foundation with cardboard, so as not to damage the bottom edge of the profiled sheets.
Then a marker can be used to mark the screws. The profile tube is fixed to the profile pipe 20x40x2 mm in size in the lower part of the corrugations through a single wave with the help of galvanized roof screws 4.8x30 mm with rubber gaskets. For 1 m of profiled sheets requires 6 screws. Overlapping profiled sheets. Screws better twist electric drill at low speeds. This is necessary so that the cutting edge of the screw does not overheat and does not grind.
Fencing cost

Pretty cute, economical and reliable
I must say, fences made of corrugated board and bricks are not such an expensive pleasure. Such a fence takes two weeks of construction work (not including downtime) and approximately 50 thousand rubles of the budget. This amount is calculated on 6 brick pillars and the fence itself is 9 m long.
If you know the perimeter of the fenced area, then you can easily calculate the required number of profiled sheets and brick pillars. To do this, divide the length of the fence by the length of the sheet of sheeting that you have chosen for yourself. Pillars are usually placed no more than 3 m apart.
Note! The height of the fence is almost unlimited. You can order sheets at the factory, the size you need. And in which case it is possible to build up a ready-made fence.
The total price of the fence includes the following components:
- cement;
- additive for concrete;
- profiled sheets;
- shaped tubes;
- reinforced rods;
- knitting wire;
- self-tapping screws.
It would seem that such a simple design, but it looks so impressive!
Necessary tools for construction:
- shovel;
- lom;
- bourgeois;
- screwdriver;
- screwdrivers;
- scissors for metal;
- welding machine;
- concrete mixer;
- electric drill.
Finally
In this article we tried to describe in detail the process of building a fence made of corrugated board and brick. You will find more information in a thematic video prepared especially for those who wish to build a reliable, durable, beautiful and, at the same time, inexpensive fence on their site!