Fence formwork - three stages of creation
If you intend to install a fence on your suburban area on your own, without the help of expensive specialists, then you should start with formwork. It depends on how well the construction will turn out, how long the fence will last, and the external components are also important.
Therefore, do not underestimate the importance of “old boards”.
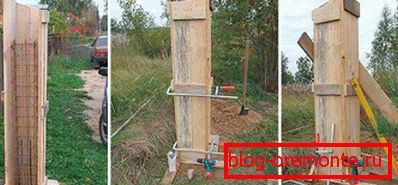
This is how a concrete column formwork looks like - the more reinforcing joints, the better.
The first stage is preparation
Before you make the formwork for the fence, you must decide on the dimensions of the fence.
- First, the height of the hedge is important, the depth of the pit will depend on it.. The minimum depth of 1 meter for enclosing structures, taking into account the solid foundation.
- Secondly, the length of the fence is important.. It is necessary to count building materials.
- Thirdly, it is required to determine in advance the materials to be used for the construction of the fence.. For example, high formwork is required for brick and stone fences, and the formwork is almost not needed for metal fence posts. Except when the foundation is planned above ground level.
Preparing the base
- The first step in the construction of formwork - you need to dig a hole in the ground. This can be done either independently with a shovel, or you can order a mini-excavator and it will cope with any work in a couple of hours.
- The pit can be of two types: either only in those places where there will be pillars, or around the perimeter of the plot. This is necessary for those cases when the fence is made of brick or stone.
Note! It is not necessary to dig a recess over the entire length of the same size. In those places where there are no pillars, the trench depth is permissible up to 50 cm.
- After the pits are prepared, it is necessary to fill them with sand to get a pillow of about 10-15 cm.
- The next step is tamping. To do this, you can use either a special tool or do it yourself. To do this, take a flat and smooth piece of wood, nail it to a wooden bar. The handle can be the same bar nailed perpendicularly to the base.
Important! Ram until the sand stops settling and turns into a solid foundation.
The second stage - the construction of formwork
- The first step is to prepare all the materials. For walls, it is better to use solid plywood panels or chipboard, wooden blocks are suitable as props.
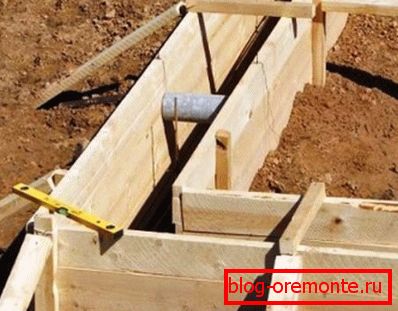
- Stretch the string from the corner to the corner along the edge of the trench so that a smooth formwork can be built along it.
- Retreat 50-60 cm from the edge of the trench and hammer into the ground bars along the entire length, every half meter. Bars should be driven into the ground so that even if they wish, they will not give in to buildup.
- Lower the trench on one side of the plywood shields so that they are pressed tightly against the sand pillow.
- Now do the same on the other side, having prepared the sliced bars in advance. They will be used as horizontal screeds.
- Install the screed just above ground level, nailing it to the sheets of plywood.
Note! If necessary, use metal joints, so the formwork will be much stronger and more reliable.
- The next step is to fasten the wooden bars as shown in the photo: from the bars driven into the ground to the upper edge of the plywood.

Bars installed at an angle will not allow the cement poured to break the flat formwork line.
Check the quality of the formwork, it should not stagger, eliminate the open space where the solution can leak, check the level of the structure. If there are not enough bars installed between the sheets, secure the upper edge with boards.
Many people are worried about the appearance of the formwork, but it is in vain, the main thing is its strength.
The third stage - the foundation
If you did everything as described above, then you should get a reliable quality formwork for the fence. Now you can proceed to the last stage - pouring cement.
However, the following processes are required:
- Buy reinforcing bars. Thickness is not so important, especially the price for them is not very different, so buy what suits you.
- Drive 2-3 pieces into the trench every 80-100 cm.
- Using a welding machine, connect the vertical rods with the horizontal ones so that you get a uniform design.
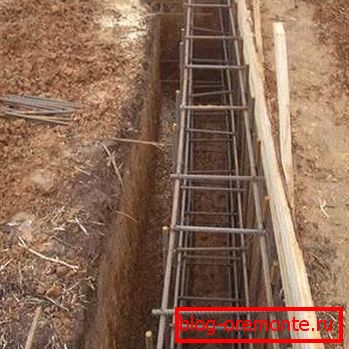
When building a foundation for a house, it is desirable to reduce the distance between the vertical bars to 30-40 cm
Tip! Doubt your abilities? Refer to the experts, 2-3 workers will cope with the fixation of the valve in one day.
Preparation of the solution
- For the cement slurry, prepare a large metal container. Of course, it is best to use a concrete mixer, but an electrical device requires a lot of money, if the budget is limited, you can knead the cement on the ground. Pre-bed plastic wrap.
- For the solution you will need: sand, gravel, water, cement and plasticizer.
- First of all, pour cement into the container and fill it with water. The ratio should be the following, for one whole water you need 0.7 cement.
- Add sand a little more than 3 to 1.
- Crushed stone is filled in the same proportions.
- The plasticizer is added last, its amount is not more than 1% of the total mass of the solution.
- Knead is necessary until a homogeneous mass.
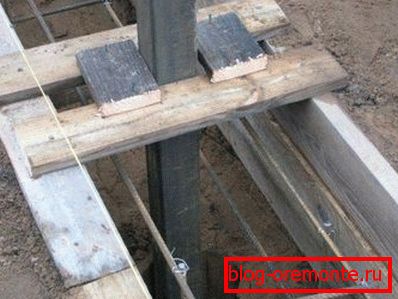
Metal pillars should be installed in advance so that during concreting they are already fixed in level
In the end, you get a sand-cement mortar, which should be poured into the trench. We advise the process of concreting not to stretch for a month, the foundation for the fence is usually poured in 2-3 days. It dries no more than 20 days, if the temperature outside is below 10 degrees.
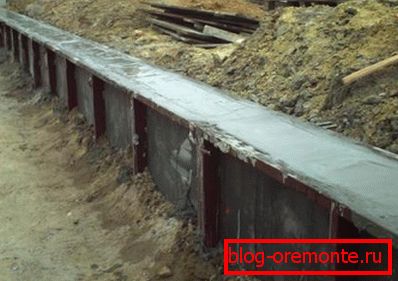
In the end, you should have something like this.
Conclusion
Now you know not only how to make a formwork for the fence, but also how to prepare the solution for the foundation. Just remember one important rule - it is the foundation that is responsible for the operational life of the fence. If something goes wrong, the aesthetic side of the issue will suffer, first of all.
If something is not clear to you, then the article has a video with visual hints and tips on how formwork is constructed.