Concrete fences: independent production and installation
How are built-in or monolithic concrete fences? What equipment and tools will you need? Is it possible to make a concrete typesetting fence with your own hands? Let's try to answer these questions.
Usually, the imagination draws a rather dull sight. However, much more beautiful structures can be made from concrete.
Installation of a typesetting fence
There is nothing mystical or complicated about this operation. The most advantageous combination - concrete fences from the manufacturer and their self-installation; in this case, the savings against the turnkey solution will be at least twice (see also the article Fences from concrete panels - a reliable fence).
All that is required of you is a fair amount of physical strength (yet concrete is not the easiest material) and the simplest set of materials and tools:
- Spade for digging holes for poles;
- Scrap - in order to break met large stones.
In addition: scrap is convenient for tamping bursting pillars in the pit of stones.
- Plumb, long cord and level. To put the fence, focusing on a visual assessment of straight lines and verticals, really, you should not.
- Stones or broken bricks, which the pillars will be uncovered in the pits.
- Sand and cement for concreting the bases of the pillars.
Preparation area
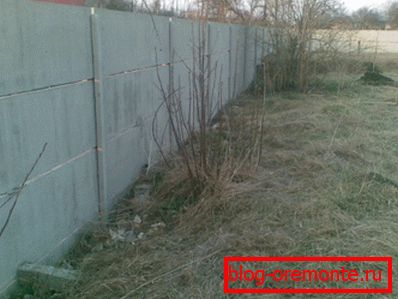
It boils down to clearing bushes and tall grass that can interfere with the installation of a fence. If you have an old fence, it is better to dismantle it when the posts and spans are already stored in your yard. This sequence will allow you not to be left without a fence for any force majeure.

Elements of the future fence are stored in the yard.
A separate case is the installation of a fence along the slope. In this case, you will have to perform an improvised terracing: on the slope horizontal platforms of two meters in length are formed (this is the length of the span of the standard fence). At the same time, the height difference between them should not exceed 10% of the height of the future fencing.
Pits
Standardly concrete typesetting fences require a depth of 0.7 meters in dense soils and a meter in weak and loose. The width of the pit may not exceed 30 centimeters: for installation, the spacer and the concreting of the post will be enough with a margin. The bottom is covered with sand and (or) rubble.
However: in practice, when digging with a shovel, you will probably have to make the mouth of the pit much wider.
Installation
Stacked concrete fence can be installed in two ways.
In the first variant, you place each pillar exactly in the level with exact observance of the distance between the pillars; the base is covered with a thick solution with a mandatory splicing (scrap, reinforcement or a shovel). The ratio of cement and sand is not more than 1: 4.
So that the pillar does not deviate from the vertical, until the solution seizes, it is pushed apart with a stone or broken brick at the mouth of the pit. Spans are installed only after the solution has completely frozen (preferably not earlier than in 3-4 days).

The scheme makes clear the device fence.
The method, however, has a number of serious drawbacks:
- Poles will have to expose very accurately. The slightest error means that the concrete section simply does not fit into the slot intended for it.
- The work will have to be divided into two stages, which is not always convenient.
- If the plates do not go well in the grooves, you will have to adjust the surface.
That is why concrete fences are often placed a little differently:
- ALL pillars are set on the level and rigidly burst in the pits with stone or broken bricks.
- Then the sections are started. If necessary, the position of the pillars is easy to adjust by removing some of the struts in the pit.
- Vertical and horizontal lines are checked once again by plumb and level. If necessary, the position of the pillars and spans is corrected.
- Then the pits, along with the arching stones, are poured with a liquid solution with a ratio of cement and sand of 1: 3 to 1: 4. Do not be afraid that it will harden excessively for a long time: excess water will go to the ground.
Span fitting
As a rule, at least one span is shorter than two meters. To shorten concrete products for the fence, use an ordinary grinder with a cutting wheel on concrete. For cutting reinforcement, of course, it is better to replace the circle on the cutting for steel.

The diamond wheel cuts the concrete faster, but it is better not to touch the reinforcement.
Independent production
If double-sided concrete fences (having a relief or textured surface on both sides) require the mandatory use of expensive prefabricated forms and a vibrating table, then it is quite possible to make simple, one-sided sections, like pillars under them, yourself.
Pillars
The post form can be assembled from OSB, QSB, plywood or boards. The protrusions under the grooves in the pillars are easy to form, fixing on the side walls two bars of the appropriate size.
Of course, there are a number of nuances:
- In this case, the solution is used with a cement: sand ratio of 1: 3 or even 1: 2.
- Careful baling is required.
- The form is not assembled on nails, but on screws. To remove the pole, it is necessary to detach the side walls with the protrusions.
- Plywood, boards and, to a lesser extent, OSB, are hygroscopic; the cement mortar will cling to them. To solve this problem is simple: do not be lazy to cover the surface of the form with plastic wrap. The beam forming the protrusions is completely wrapped; the walls and the bottom are covered so that the edges of the polyethylene stick to the outside after the mold is assembled
- Reinforcement pillars required. Corrugated fittings are used; 4 rods are located no closer than 15 mm from the surface of the product.
Please note: for binding reinforcement used knitting wire. Welding is undesirable: a rigid structure inside the concrete will accelerate its cracking due to the difference in expansion coefficients when heated.
The solution should be firmly seized for one or two days. After that, the pole can be removed and put in a moderately warm room to gain strength within two to four weeks. In dry weather, the surface is periodically moistened or, better, is covered with wet sawdust.
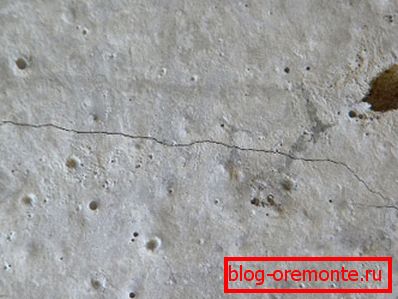
In the heat of the concrete without moisture can crack.
Spans
The instructions for making spans are no more difficult; but to create a beautiful shape for them will be quite difficult. The simplest solution is to order a ready-made form for the fence section. The price of products made of ABS and PVC plastics starts from about 1000 rubles.
Further manufacturing is quite traditional for reinforced products:
- The frame is laid out in the form of a wire with a thickness of 4-6 millimeters; thick reinforcing mesh can be used. In the latter case it would be a good idea to lay arched forms with voids decorating the fence from above.
- The form is filled with a solution of 1: 3 and accurately, in order not to damage the form, is bayoneted. In this case, the presence of at least the simplest improvised vibrating table is very desirable: the decorative surface will be smoother.
- After a day or two, the form turns over, and the finished section is laid out to gain strength. Of course, with the same periodic moisture in hot, dry weather.

Flexible polyurethane forms are especially convenient.
Concrete foundation for fencing
A very popular construction is a stone, slatted or brick fence on a concrete base (see also the article Building a Brick Fence: tips and tricks).
How to perform this foundation?
- The strip under the fence is cleared from the bushes and grass.
- Along the future line of the fence tensioned cord.
- A trench of 30–50 centimeters wide (depending on the expected thickness of the fence) and half a meter deep is digging. The foundation must protrude in each direction beyond the masonry at least 5 centimeters. On the slope of the trench digging terraces, with the same differences in height at regular intervals.
- At the points where the pillars are located, pipes are vertically driven into the ground - round or shaped. They will increase the stability of the fence and its ability to withstand side wind. The part of the pipe leaving in soil is protected from corrosion by bitumen mastic.
It is useful: if the fence is made of a profiled sheet, it makes sense to immediately install the columns of the required height and mount the horizontal parts of the frame directly on them.
- The bottom of the trench is poured with five to ten centimeters of sand and is poured abundantly with water for its shrinkage.
- A formwork for the above-ground part of the foundation is constructed above the edges of the trench. Its height rarely exceeds 20 centimeters above the ground.
- Rebar is laid in the ground and formwork - four to eight parallel rods with a cross section of at least 8 millimeters. Between themselves and the crossbars they are knitted with wire; so that the reinforcement does not lie on the sand, bricks or stones are placed under it.
- Then the trench and formwork are filled with mortar and carefully bolted with reinforcement. Work continues after the concrete gains strength for at least two weeks.

The ready basis with a framework for a professional leaf.
Monolithic concrete fence
Concrete monolithic fences are not very popular, primarily because of the rather dull appearance. However, a painted concrete fence can look quite decent; for painting are used facade water-based paints with a mandatory pre-primer.
How to put a concrete fence?
Here is one of the relatively simple scenarios:
- Under the columns with a pitch of no more than 4 meters, wells are drilled with a depth of 1 meter and a diameter of 20 centimeters.
- They are placed strictly according to a plumb line of pipe with a diameter of 50 - 65 mm. The underground part is protected by bitumen mastic. The well is concreted.
- A straight line between the pillars is filled with gravel or sand. Digging a deep trench is not necessary: it is enough to simply mark a small indentation.
- The pipes are welded to pipes with a section of 6-8 millimeters with a pitch of 20-25 centimeters. It will give strength to future spans.
- The timbering from moisture resistant or protected by polyethylene plywood gathers. It is pulled by long studs at a distance of about 10 centimeters.
- The formwork is poured with concrete and carefully bolted.
- After the concrete has set, the formwork is removed; the holes from the studs are filled with mortar.
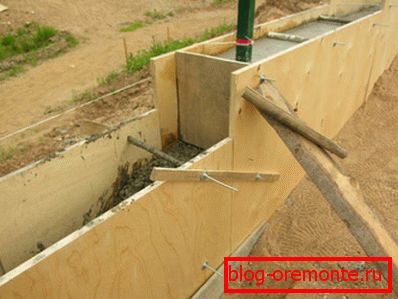
So going plywood formwork.
Conclusion
Concrete fences are not always the best choice in terms of aesthetics; however, their strength and durability are difficult to challenge (Find out also what a precast concrete fence is). We hope you enjoy the result of your work. Successes in construction!