Automatic garage doors: do not “open sesame!”, but also
Probably, it would not be an exaggeration to say that installing an automatic gate on the garage would not be against any owner of the car. And indeed, it is much more convenient to open the entrance for a car without leaving it - by pressing one button on the control panel.
And if a few years ago the appearance of such gates was exotic, not everyone can afford it, today, any car owner can choose, purchase and install a set of garage automation.

Previously, such a picture could be seen except in James Bond films
However, this system is still quite complicated, because before buying and installing it is worth sorting out the details. Below I will talk about my experience in installing garage doors, and give a number of recommendations for those who plan to solve this problem with their own hands.
Varieties of portal structures
When deciding which gate to install in your garage is better, you should first familiarize yourself with the varieties on the market. There are not so many of them, but at the same time they are fundamentally different from each other, so it will not be difficult to make a choice, starting from the actual situation.
Swing construction
It is most convenient to compare automatic gates of various designs according to the table:
| Type of mechanism | Features of construction and operation |
| Swing | Automatic swing gates to the garage are distinguished by the simplest design. In fact, these are ordinary doors with hinged doors, but they do not open manually by means of an engine installed in a garage. The movement of the valves is provided by the displacement of the rods, which are fixed on the supports of the gate or on the walls inside the room itself. |
| Retractable | Sliding type gates are usually installed not at the garage itself, but at the entrance to it. It's all about the design features: the sash, which overlaps the entrance, moves along the guides left or right, but it does not provide a tight fit to the garage itself. And if the safety issue can be solved by installing additional limiters, then there will be guaranteed problems with heat insulation and moisture protection. |
| Sectional | Ideal for installation in the garage. The door covering the door is a sectional construction, which in the folded position retracts under the ceiling, and when unfolded it completely blocks the passage. The advantages of such gates are high tightness and work efficiency, the downside is the relatively high price. In addition, sectional doors require careful handling and regular maintenance, as a worn lifting mechanism is almost guaranteed to get stuck. |
From my point of view, the choice of mechanism should be based on an analysis of the current situation:
- if you need to improve the existing design, you can simply add hinged sash opening drive;
- if the task is to fully automate the process of opening the gate, then the best choice would be to install a sliding or sectional mechanism.
Fabrication and installation
Swing option
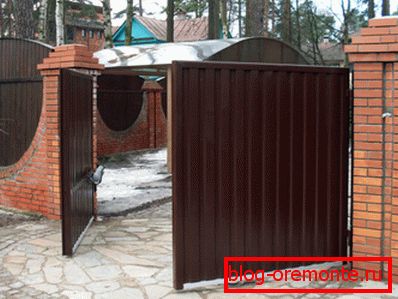
So, let's say we decided to install an automatic gate: a swing-type garage door in this case will be the simplest and most accessible for sale.
It is with them that I will begin a review of methods for installing structures.
- The first and most important conditions for the installation of the swing mechanism is the availability of free space on the site before entering the garage. At the same time, the open area must have dimensions sufficient not only for the free opening of the flaps (or the flaps, if we make the single-section version), but also for placing the car there.

Sash drawing
- If there is enough spacious area in front of the garage, proceed to the manufacture of the structure itself.. The skeleton of the gate is made of a profile pipe with a section of at least 40x40 mm with a sufficiently thick wall. Wooden planks, metal panels, forged bars, etc. are used as fillings.
- The pillars on the sides of the gate are also made of a profile pipe., which is sunk into the ground at least 70 cm and concreted. For additional strengthening around the metal axis, it is possible to build a brick bollard with the removal of steel mortgages for the installation of loops.
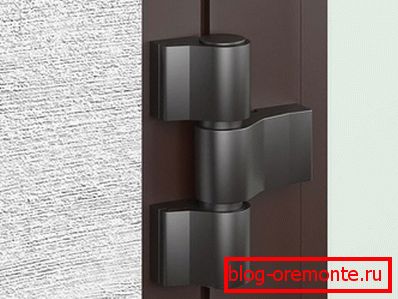
Loop for swing gates
- Attach hinges either to support posts or to mortgages embedded in masonry. For each leaf you need to use two or three loops (the amount depends on the weight of the leaf, its dimensions and the type of loops).
- To control the opening of the gate, install side stops. They are metal rods protruding from the ground and limiting the movement of the sash - for example, to protect flower beds located at the gate from damage.
Important! I prefer to make the stops removable: in the soil I concrete the base with a screw stud that protrudes a few centimeters, and on the stud I screw on a piece of rubberized pipe. If necessary, such an emphasis can be quickly removed, opening the doors fully and ensuring the freedom of maneuver.
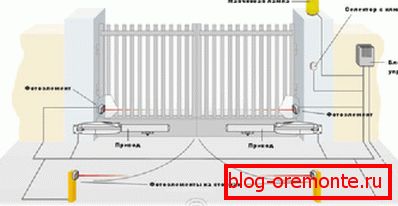
Automation scheme with photocells
- In the next stage, mounted automation, the main element of which is the control unit gate. The drives responsible for the movement of the valves (left-side and right-side) are attached to it. The power of the drives depends on the weight of the sash and on its area, so a special calculator program should be used to select the appropriate model (such software can be found on the websites of most automation manufacturers).
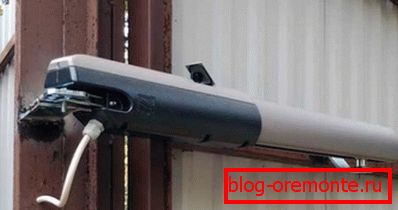
Photos of the installed linear (worm) drive
- The choice of drives also determines the functioning of the system.. So, linear (worm) devices make it possible to open the sash in both directions, and lever-type designs can be installed not only on special supports, but also on stone columns, and on other elements of the gate framework.
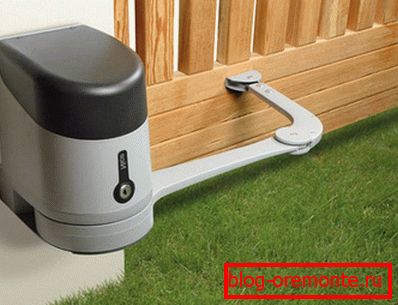
Lever actuator with arc rod
Sliding gates
Gates with a sliding door today are very popular, but here I would like to warn you against an ill-considered purchase. Before you choose a sliding model, carefully examine the configuration of the driveway: it is important that there is enough free space either to the left or to the right of the opening, enough to completely move the sash.
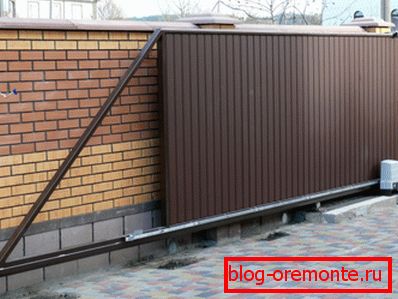
General view of sliding gates
The gates of this type are made quite simply, but for them it is worth buying high-quality automation - and it is expensive.
In any case, the installation algorithm will be as follows:
- We prepare the supporting part of the structure: we make the side pillars and we concrete them, digging them into the soil by about 80-100 cm.
- From the side where we will have the shutter in the open position, we dig a trench, which we concrete, making a massive base. From above we install on this foundation a piece of steel channel - the so-called “bench”. On this channel will move the rollers of our gate.

Scheme of betting banquet
- On the supporting pole, located on the opposite side, we install an end beam: there will be a locking mechanism, as well as a platform for end rollers / catchers.
- Then we make the sliding door itself. Its standard dimensions are 175 - 250 cm in height and 250 - 400 cm in width (excluding the cantilever part). We make a frame from a profile pipe, which we clean of rust, degrease, weld and paint with a composition that protects against corrosion.
- We fasten the sash filling to the ribs of the frame: polycarbonate, boards, welded lattice, etc.
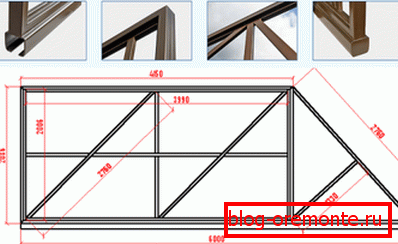
Sash with cantilever part: profile and dimensions
Now we have the most difficult part of the work: the installation of the sliding part. To do this, you need to purchase an automatic machine that controls the gate drive and the locking part.
Understanding the technology of assembly of this system will help the manual, so here I will give the basic algorithm, common to most models:
- On the inside of one of the support pillars, I install a drive with an automatic block.
- I fasten an electromagnetic or electromechanical lock on the sash, and fix its counterpart on the end rail — where the sash will rest in the closed position.
- At the bottom of the gate, I fix the rollers, and if necessary, metal guides and gear racks, which provide lateral movement.
- I install the console part of the sash in the trough of the stool and attach the whole structure to the drive mechanism.

Drive mechanism for movement of the toothed rack
- Adjusting the position of the rollers, I put the sash in a horizontal position. I check its movement first in the manual mode, and then with the help of automation.
By and large, we have a hybrid: a frame part of our own production, connected with factory automation. It seems to me that this combination is optimal from the point of view of economy of means and forces.

The main elements of the system
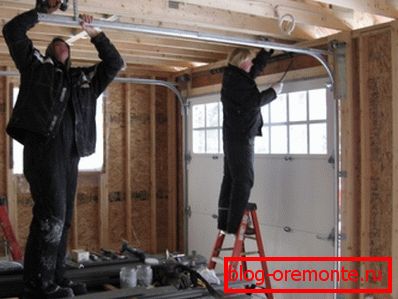
Assembly and installation of the sectional mechanism
Unlike swing and sliding mechanisms, sectional doors are best bought off the shelf. The thing is that we can hardly make all the parts with the required precision in a handicraft way, so it’s better not to risk it.
Installation of automatic gates begins with the preparation of the opening:
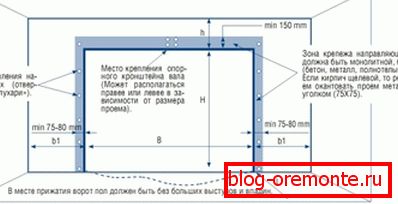
Marking the opening for the installation of sectional doors
- We dismantle the old gate, removing the sash from its hinges.
- Cut the loop and eliminate all irregularities from the walls of the opening.
- If necessary, expand the opening, strengthening its edges.
Important! Most often there is a need to remove part of the upper wall, because there we will need free space to accommodate the drive.
- We control the level of the floor at the entrance to the garage. The maximum permissible drop in height is no more than 1 mm per 1 m, so if necessary, either knock down the protrusions with a perforator, or fill in a concrete strip reinforced with a steel bar.
- Next, referring to the instructions, put on the walls and ceiling markings for the installation of guides.
Mounting guide elements
- Install tires, which will move the section of the door leaf. When installing, we do not use wooden linings or foaming, because sooner or later this will cause the frame to loosen. If a gap is formed between the guide and the wall, then an insert made of metal, dense plastic or other incompressible material should be laid into it.
- Then the assembly of the door leaf itself is performed - a kind of curtain of several sections. We connect the details, starting with the lowest one, while ensuring that they are located strictly parallel, without distortions.
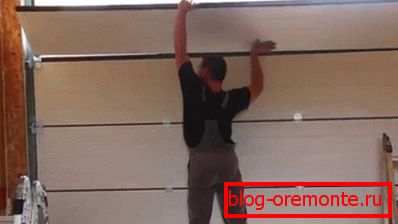
Section assembly is tight
- We attach the canvas to the guides with the help of special rollers. Then we connect the rollers with the drives of the lifting mechanism - it is most often installed either on the ceiling or in the upper part of the wall.
- We check how the sections move, manually - so they can be opened in the absence of electricity. After that, turn on the system and set up its work from the remote control: automatic opening should be even smoother than manual.
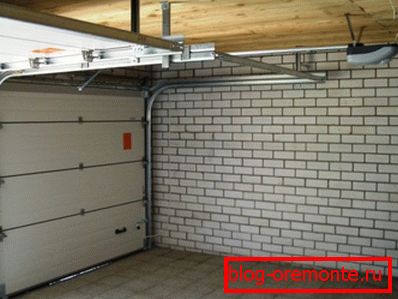
Ready design with drive
Prices for garage doors and mechanisms
Most models of automatic garage doors have one major drawback - the high cost of components.
For budget planning, I recommend that you use a table containing the actual prices of some parts and sets of equipment for the gate:
| Name | Approximate cost, rubles |
| 360 ° swing gate opening mechanism | 6200 |
| Nice A02 control unit for one electric drive | 3500 |
| Nice A60 / A control unit for two electric drives | 6700 |
| Electric drive for swing gates Nice WALKY 2024KCE / O (up to 180 kg) | 32000 |
| Electric drive for swing gates Nice HYKE KCE (up to 330 kg) | 64000 |
| Sliding gates консольного типа 3000 х 2000 (каркас под обшивку) | 19500 |
| Automatic set for sliding gates CAME BX 64 | 16000 |
| Electric drive for sliding gates Came BX-64 | 15600 |
| Chain drive for drives | 8600 |
| Control unit for sliding gates Nice A500 | 15200 |
| Sectional garage doors ALUTECH TREND 1750 x 1750 | 25000 |
| Section garage gate ALUTECH CLASSIC 1875х1960 | 29500 |
| Section garage doors HORMANN LPU 40 3250 x 2125 | 53300 |

Automatic set for sliding gates CAME
As you can see, both the gates and the components for them are quite expensive, because information about the self-assembly of such structures will clearly be useful to you: by saving on the labor of craftsmen, you can significantly reduce costs.
Conclusion
Automation for garage doors is a rather complicated mechanism that requires careful study and thoughtful installation. But at the same time, it is not necessary to think that the installation of this automation is only for professionals.
If you take a responsible approach to solving the problem, study the advice of manufacturers and view the video in this article, then the chances of success will increase many times. In the end, you can ask for advice in the comments to the material: I, of course, do not pretend to have a thorough knowledge of all models of automatic garage doors, but I will help with practical advice!