A willow fence with your own hands: exquisitely does not
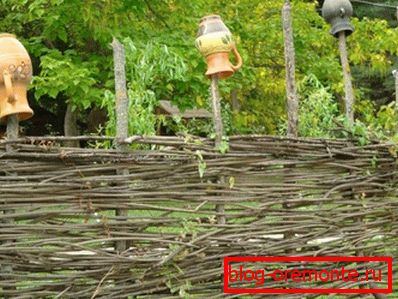
Wicker elements on the plot create an atmosphere of comfort
In order to turn a garden into a true work of art, it is not at all necessary to spend impressive sums. There are many ways to create great design with almost no material costs, for example, using weaving a fence from a vine. And this article will discuss how to make a willow fence with your own hands.
Oddly enough, but the main scope of work will be directed to the preparation of rods. This is a fairly time-consuming process that will require perseverance and endurance from you. However, the final result will certainly please you, and you will forget about tiredness and wasted time.
Overview of the main types of wood
So, the first step is to find the rods themselves, from which the wicker fence will be made of willow. For weaving mainly used 1-2 summer shoots of willow. It is best to harvest them in early spring or late autumn (at this time there is no growth).
Our country is rich in this breed of trees, so there should be no problems with the search. Its main varieties should be introduced.
Belolaz or Almond Willow
It is one of the best varieties for weaving. Grows mainly as a shrub or small trees. It has a brown bark with a yellow or green tint.
You can find it on wet soils, less often on peatlands (but in this case, the quality of the original product will be slightly lower). Perhaps the main advantage of this variety is the simplicity of splitting and removing the bark. In the process of cooking, she gets a great bronze tint.

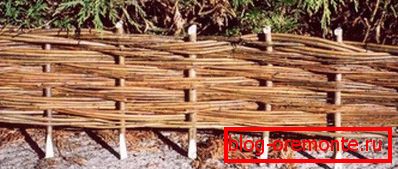
A living willow fence fits perfectly into any facade.
Talik or red willow
It has a shiny bark of a reddish (less often brown) shade. It is used mainly for weaving haberdashery products, since it has a small core. A living fence from a willow of this variety will not be durable, so it is better not to use it.
Connoisseurs
It grows in the form of massive shrubs up to eight meters in height near water. To create a fence is better to use 2-3 summer plants (they will have a green-brown shade of bark). The main advantage of this variety - increased flexibility, which greatly facilitates the work.
Lauroliestnaya
It is an impressive tree up to 14 meters high. Therefore, if you decide to make a collection with your own hands, then be prepared to remember childhood and the skill of climbing trees. It can be found on peatlands or wet meadows.
It is perfect for creating wicker fences, as it has a thick and durable core. The bark has a dark green tint.
Козья ива
It is a large shrub with smooth bark. It grows on a variety of soils (but most often on wet). According to people who know firsthand how to weave a fence out of willow, it is this variety that is best suited for this purpose.
Training

The smoother the starting rods, the easier it will be to work with them.
Having picked up the kind of wood you like, and choosing the right time, you can proceed to further operations.
Collection
Before weaving a fence from willow, you need to collect a sufficient number of rods. This should be done as follows:
- Choose a bush (or tree) with young shoots of the required length.
- Cut off his branch and carefully consider it. If the wood on it has a red-brown shade, and the core is loose, then this bush should not be used, since its rods will be brittle.
- It is best to use rods, in which the core has a thickness of from 15 to 40 mm.
- The ideal option is straight and flexible sticks with a thin core and without any damage (knots, growths, etc.).
- Cut branches should be using a garden pruner (in extreme cases, a well-sharpened knife).
- After cutting, they must be cleaned of leaves and branches.
Storage
The next aspect that will affect our instructions is storage. If you collected during the sap flow (late spring or midsummer), they should be immediately removed from the bark. If the collection was chosen autumn or winter, then you will need to perform several additional manipulations.
In particular, the branches should be subjected to boiling: immerse in boiling water for 4-5 minutes. Such rods can be stored for a very long time if the bark is not removed from them. As a storage you need to choose a closed and not too wet room (otherwise they will begin to rot).
Tip: in order for the bars to retain their flexibility as long as possible, they should be stored at a temperature of 0 to +40 degrees. A cellar or an attic is perfect for this purpose if it is warmed. However, after cooking, they should be thoroughly washed to prevent the formation of fungus or mold.
You can buy ready-made bars, but in this case, the price of the fence will be much higher.
Preparatory manipulations
Rods collected in the warm season and peeled immediately required to be dried in the sun. To do this, they need to spread out on the floor of poles or boards. It is very important to remember that you can not put them in groups, because in this case they will be covered with spots and lose their natural gloss.
As a rule, willow fences are built in the summer, so the question of storage should not arise. To dry in sunny weather will be quite enough for two days. If the rainy period has fallen, then you can dry under a canopy, then it will take 5-6 days.
If the bark was removed in winter, then the drying should be done in a heated room. After that, the workpiece can be stored in any ventilated area, stacked on the floor.
Before you begin work, you need to carry out the last procedure - soak the bars. To do this, they must be placed in a trough or tank and kept until they acquire an adequate level of flexibility. It is very simple to check this - it is enough to take one sample and slightly bend it.
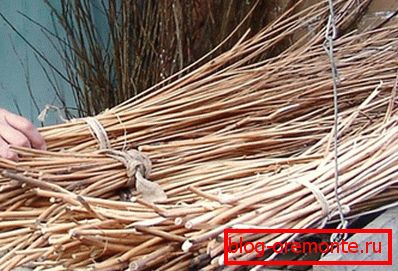
The photo shows properly prepared rods ready for “work”
Construction of the fence
When the rods are fully ready for use, you can begin to create a fence. Begin, as a rule, with the construction of the frame, which will be responsible for the strength of the structure as a whole.
Do this as follows:
- Dry spruce stakes are harvested in advance and trimmed in the form of a pencil (the diameter of one such “pencil” should be no more than 5 cm).
- Stakes are driven into the ground in 30 cm increments to a depth of at least 35 cm, since they must be held securely, otherwise the strength of the structure will be in question.
- In order for the future wall of willow does not give curvature, it is recommended to nail the rail from above.
- Next, you need to install the first rod - in the example we are analyzing it should be perpendicular to the stakes.
Tip: you can paint willow sticks before work. Such a measure bears in itself not only an aesthetic, but also a practical benefit - coating with lacquer materials increases the durability of the material.
- One end must be fixed on the front of the first stake, then use the other hand to start the second stake. By this method it is necessary to push it along its entire length.
- The second rod should be fixed in the same way, but starting from the last stake, to which the first rod reached. In this simple way it is required to install all the rods to the required height.
- At the end, the beaten rail is removed as accurately as possible so as not to disturb the structure. However, if you live in a region with a frequent gusting wind, you will have to leave it.
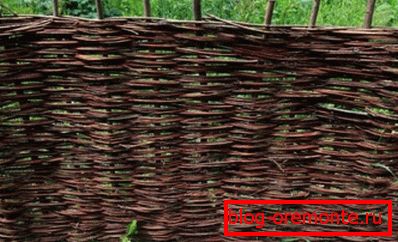
If you did everything right, then you should get something like this.
Conclusion
In this article, the creation of a willow fence was thoroughly discussed: from collection to finishing. If any points you do not quite understand, watch the training videos, which are presented here. Only a vivid example is able to convey to a person all the subtleties of a particular operation (read also the article “Which fence is better and cheaper — a choice for every taste and budget”).