Thermal insulation of the facade foam
Thermal insulation of living space reduces heating costs. Of all the options, you can select the insulation of the facade with foam. In the article we will describe the technology of thermal insulation of the facade with foam plastic with our own hands, as well as demonstrate the video instruction.
Ideally, insulation is best done in a house under construction. If the house has been built for a long time, it is necessary to carry out preparatory activities.
Preparatory work

Before insulating the facade with foam plastic, it is necessary to remove from the surface:
- hinged and decorative elements,
- gutter
- ventilation pins,
- Outdoor Lighting,
- decorative carving,
- lepnina.
Note! After preparation, the wall should be smooth, without protrusions, everything else will interfere with work.
If you need to warm the plastered wall, then you should first carefully examine it, looking for weak spots and flaking plaster. Such pieces should be removed.
In addition, the degree of inclination of the walls and the presence of irregularities are checked with the help of plumbs and other similar devices. The protrusions and defects are best noted in advance, so that with further work you will not forget to process all the projections, otherwise you can lose sight of something.
Note! If there are roughnesses of more than 1.5 cm in size on the heat-insulated surface, it is necessary to coat them with a primer and plaster, specially designed for this purpose.
Fix the initial profile
 After carrying out the preparatory work strengthen the starting bar and basement profiles. First you need to install the bottom edge, which will be going to warm. To do this, determine the starting point, and only then, using a hydraulic level, mark the entire wall along this point.
You can use coated cord. It is stretched between two points, slightly delayed and released - the starting line is obtained. It installs a base profile, designed to support the bottom sheets of insulation, which can be displaced until the glue has dried.
The initial level should be the same width as the insulation. Attach it to the dowel number 6, making the distance between them no more than 350 mm. Nails are best used with washers. When connecting the starting bar in the corners, special elements are used, or they simply cut at an angle of 45 degrees and adjust them to each other. In addition, when installing profiles between them, you need to insert special fittings that reduce the load with temperature changes.
How to make glue

All adhesives are prepared directly at the place of work, because they are not recommended to be stored in finished form for more than 2 hours. The volume of the prepared adhesive should be exactly what is needed during this period of time, otherwise the residue will no longer be used later.
Dilute the adhesive mass as follows:
- To do this, pour the water in the required proportions in a large bucket.
- Pour glue powder and stir it with a drill at low speed, using a special nozzle. Ideally, the resulting glue should not be clots.
- After that, the composition is left for 5–7 minutes to “ripen”.
- Then it is thoroughly mixed again for 1-2 minutes, after which the glue can be used.
Note! Sometimes the adhesive will thicken to the end of the work. Do not dilute it with water. It is necessary to stir it again thoroughly so that it acquires the desired consistency.
Applying adhesive composition
 There are several ways to apply glue to the insulation. It all depends on the size of the roughness that is on the heat-insulated surface.
If they are less than 10 mm, then the adhesive composition is applied in strips along the edges, closer to the center of the sheet they also make several strips of solution. The strips must be at least 30 mm wide and should be distributed so that at least half of the slab is covered with glue upon contact with the wall. This should take into account the fact that when the insulation is attached to the wall, the glue disperses over a larger area.
If the recesses on the heat-insulated surface have dimensions from 10 to 15 mm, use another method of applying glue. The solution is distributed around the perimeter of the insulation strip of a width of about 20 mm. Then make a few strokes of glue up to 100 mm in diameter in the middle of the sheet, on an area not exceeding half a square meter.
Note! In both cases, it should be remembered that the strips should be made intermittent, otherwise air pockets may appear between the wall and the insulation.
Installation of sheets of insulation на стену

After the glue has been distributed to the insulation, it must be immediately applied to the wall. There is no more than a third of an hour to fix the insulation on the wall. Insulation is attached to the wall with a small offset, which should not exceed 30 mm. The sheet is fitted to the other sheets and pressed tightly. In this case, it is necessary to control the plane of the location of each piece of insulation with a level or other device. The glue on the wall or on the insulation should be removed immediately.
Note! The joints between the plates of the foam should not be more than 2-3 mm. Ideally, they should not be at all. If they still happen, they are filled with building foam.

After the foam sheet is attached to the wall and pressed, it can no longer be moved, otherwise the quality of adhesion to the wall will be seriously impaired. If you need to move the sheet for some distance, you should detach it completely from the wall, remove the old glue, apply a new one and then glue it again.
How to glue a sheet

Starting to glue sheets of insulation should be below the basement level, which is designed specifically for this purpose and must be fitted very accurately. It is best to start a row, attach the initial and final plates of insulation. For them it will be easier to navigate the correct fit sheets on the plane. The next row is preferable to start with the offset of the vertical joints by half the width of the sheet - this is the best mounting option.
Building corners

Special attention during the work on the insulation require the corners of the building, both internal and external. The most important thing here is to prevent the formation of a large vertical seam, which can contribute to the loss of the quality of insulation. To avoid the appearance of such a seam, you need to connect sheets of insulation in the manner of teeth - when the sheet falls into the plane of the adjacent wall. After the glue hardens, you can remove the excess from the corners, carefully cutting and trimming the foam with a knife.
We fix the result

After the final drying of the adhesive solution, which lasts for three or more days, you can begin to strengthen the sheets with dowels. It is best to use dowels made of plastic with a large umbrella-shaped cap, as the metal conveys well the cold, which impairs the insulating qualities of insulation. The size of the fixing part is selected in such a way that it passes through the layer of insulation and recessed into the wall for some distance. It depends on the material from which the wall is made.
Fixing rules with dowels:
- The largest penetration is required for the walls of the cellular structure, it is 120 mm, the smallest - for concrete walls, here it is only 50 mm.
- In the brick wall dowels are buried at a distance of 90 mm.
- The distribution of dowels on the sheet of insulation goes like this: 1 square. m consumes up to 8 pieces, they are mounted on the edges and in the middle of the insulation.
- Next to more complex areas, such as base, windows, doors use a greater number of them.
- In addition, the number of additional fasteners depends on the operating conditions of the building, weather conditions, materials from which the dowels themselves are made.
When installing dowels, first, using a perforator, create a hole a little deeper than it is planned to hammer in fasteners. Then the dowel is inserted there and the nail is hammered, or the pin is screwed. After installation, the umbrella-shaped cover of the dowel should not protrude above the surface by more than 1 mm. Install dowels only at right angles to the wall. It is necessary to constantly check the quality of their mounting.
Installation of the reinforcing layer

Weak points, such as corners near windows and doors, must be reinforced with a special grid. It helps prevent premature destruction. To do this, use strips of mesh not less than 20? 30 cm.
Perforator installation
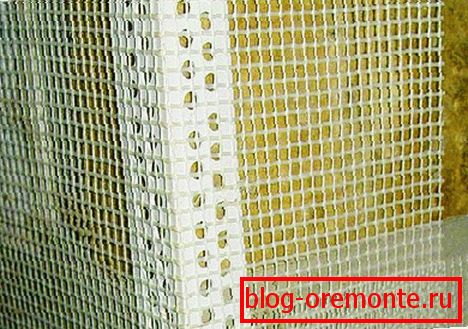
On the heat-insulated surface you need to glue all the projections and corners with special perforated corners. They can be both from aluminum and plastic and are already sold with fragments of the grid. The angle of the reinforced wall is pre-plastered with glue, then a corner is attached to it in such a way that the mesh is glued, then the structure is leveled and pressed tightly. The excess glue, released by pressing out of the holes, is rolled out. When mounting the corners it is not recommended to overly tension the grid.

After three days after complete drying of the base, it must be primed with a special mixture containing sand. This will facilitate further work with the wall.
See also some expert tips:
- Insulate walls with foam should be at positive temperatures and in more dry weather. When carrying out repairs it is necessary that, if possible, precipitations, the sun, do not affect the materials and the substrate. Otherwise, the quality may deteriorate.
- Scaffolding for repair must be reliable, convenient for movement and not interfere with the work. To do this, they are placed at some distance from the wall - up to 30 cm.
- Sometimes foam insulation is not immediately removed under the other layers. As a result, it may acquire a yellowish tint under the influence of sunlight and atmosphere. This does not spoil its quality, just when resuming work, it is necessary to scrape the yellowed layer with sandpaper.
Video
We recommend to watch the video about the installation of foam plastic on the facade of the house.