Sock docke (deke)
Vinyl siding "Docke" is known in Russia and around the world. This is German siding, which has been produced by Deke Extrusion for more than 10 years and during this time has won the trust of many consumers, because it has established itself from the best side. Production is carried out in the city of Dmitrov, Moscow Region, using German technology and foreign equipment. Certified European raw materials are used. Quality control is carried out at each stage. All this makes Docke siding an aesthetic, reliable and modern solution for facade finishing from the leading manufacturer of vinyl siding, facade panels and gutters.
Distinctive features of siding: structure, texture, advantages
According to its structure, Deca siding is very durable. It is not solid cast, but produced by coextrusion of polyvinyl chloride. Thanks to this most advanced technology, the plate is made as if glued together from two layers: the first layer gives color to the siding and affects its resistance to sunlight. The bottom layer is reinforcing, it is responsible for strength. In addition, in the manufacturing process, chemical components are added to the mass, which give additional elasticity to the panels. The texture of the panels repeats wood pattern.

A distinctive feature of siding, its "trick" - anti-uregano lock. This gives additional resistance to strong winds.
Advantages of siding:
- strength;
- durability - the manufacturer gives a guarantee of deformation for 50 years;
- small cost in comparison with other types of finishing front materials;
- огнеустойчивость;
- low weight, so there will not be significant pressure on the foundation;
- easy installation;
- ease of care;
- guarantee for absence of manufacturing defects and color fastness.
The lineup
The model range is presented in 5 varieties.
 | The most popular siding. It comes in 11 color variations. Panel length is 3660 mm, thickness - 1.1 mm, width - 232 mm. |
 | It looks like a traditional clapboard. Its dignity is a small price. Available in four pastel shades: green, gray, white, blue. Panel length is 3050 mm, thickness - 1.1 mm, width 255.75 mm. |
 | Simulates a log house. Available in 6 colors. Panel length is 3660 mm, thickness - 1.1 mm, width 240 mm. |
 | Panel length is 3050 mm, thickness - 1.1 mm, width 180 mm. Available in 4 colors. |
 | Кроме того, Docke предлагает покупателям новую модель Simple. Внешний вид соответствует модели «Ship beam», но отличается от него размерными параметрами. Длина панели составляет 3050 мм, толщина – 1 мм, ширина 203 мм. Выпускается в 5 цветах. |
Almost all colors are pastel. This is to reduce the percentage of fading. Docke provides color stability for about 8 years.
The company provides a choice of ready-made design solutions, and also provides an opportunity to use the services of a virtual designer.
Installation siding: instruction
Panels should be transported in a car with a flat body, the length of which is not less than the length of the panels. Material in transit should not be on the weight. Siding must be laid on a flat surface in a dry room equipped with a roof. It must be protected from direct sunlight. Place it in such a way that the light from the windows does not fall on it, keep a distance of more than 1 m from the heaters. Storage temperature range from -35 to +50 degrees.
Instruments:
- healing,
- water level - check the evenness on large areas
- the building level serves for local inspection,
- coated cord is designed for visual marking,
- a tape measure will be needed to measure the distance between adjacent elements of the batten, etc.,
- punch is used to make hooks,
- dismantling hook,
- screwdriver for screwdriving,
- perforator - they are drilled holes in the facade when installing the batten and panels,
- hammer,
- Bulgarian.
Subsequent to the installation technology depends on the subsequent service life of the finish.
Additional elements
For installation используются доборные элементы, которые необходимы для качественной облицовки всех элементов фасада: окон, углов, карнизных свесов и т.д.
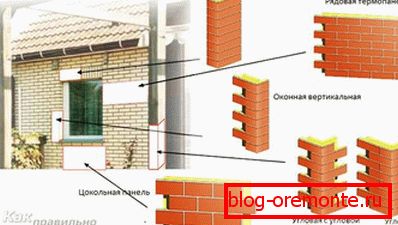
Periocular profile It is nothing but a joint casing and a slope. It is installed in a pre-fixed finishing profile. The bar itself is cut with a margin, since they must overlap each other, forming an angle. In addition, for fixing in the finishing bar necessary serifs. Elements are set from bottom to top.
Finish bar used when fixing the last in a row of panel siding and additional elements, such as j-chamfer and trim.
J-chamfer eaves and frontal overhangs are veneered for decorative purposes. The upper part is fixed in the finishing bar, and for this you must first punch the hooks, and the lower bar is attached to the crate.
j profile installed along the contour of siding panels or spotlights.
H profile It is necessary to connect the panels vertically, when finishing walls more than the width of the panels. Can be used as a decorative element.
Molding used when installing spotlights. This is a kind of plinth. The bottom of the molding closes the last wall panel siding.
For installation spotlights on the one hand set the j-chamfer, on the other hand - molding.
Features of mounting the remaining additional elements, we consider in the instructions.
Step-by-step installation instructions for Docke siding
 | Inspect the facade of the house and determine if it needs repair. Sometimes it is necessary to repair it, for example, to fix the boards, to paint, to replace rotten elements. Finally, if the facade is wooden, it should be impregnated with antiseptic solutions. Then remove the elements that interfere with the installation - these are lights, benches, standing close to the facade, waving plants, etc. |
 | First you need to fix the crate. It can be made of wooden or metal elements. In the process of installation using the construction level, level the irregularities of the facade. |
 | Crate for vertical siding set horizontally for horizontal siding - vertically. The recommended pitch of the batten is not more than 40 cm. Then additional elements are mounted. |
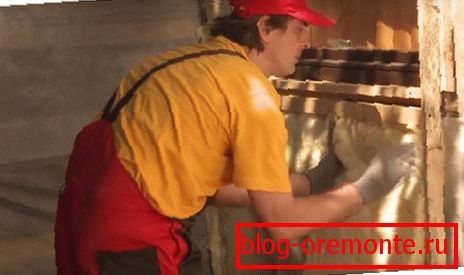 | Often under the siding pre-install insulation. It is cut according to the size between the sheathing profiles plus 3-5 cm for a tight fit. |
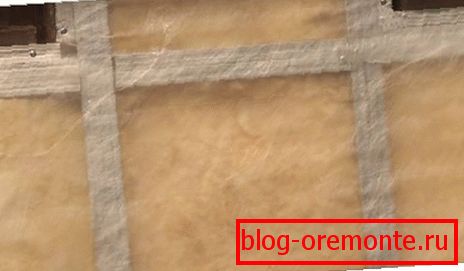 | After installing the insulation, wind and vapor insulation must be installed, since mineral wool, for example, loses its insulation properties when moisture enters. |
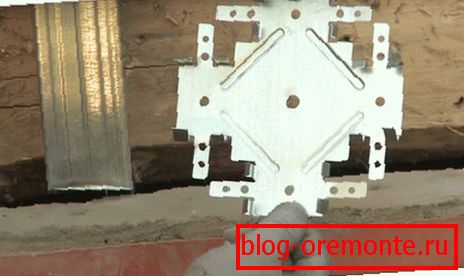 | If a metal crate is used, it is mounted on straight hangers, which are perforated strip of flexible metal and “crabs” - they are shown in the photo. |
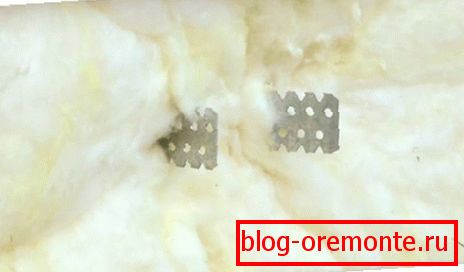 | If necessary, lay two layers of insulation, which is worn on direct suspensions, between them withstand a distance of 40 cm during installation. The joints of the layers of insulation should not coincide. Then, wind and vapor insulation is installed. |
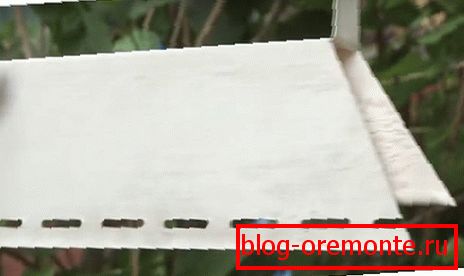
 | The first step is not set the starting profile, and the ebb. It provides water drainage from the facade. |
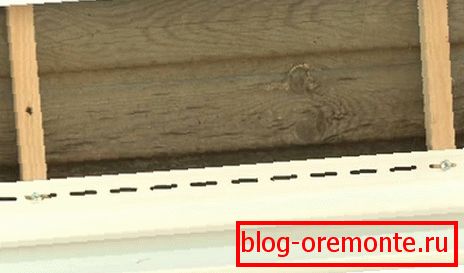 | The ebb, like any other siding element, is set strictly to the level, fixed with screws by the center of the holes with a pitch of no more than 40 cm. The panels must move along the fasteners, which is ensured by the gap between the mount and the panel of 1 mm. This is a necessary thermal gap that will prevent siding deformation. If the panels are pressed too tightly, the fasteners are loosened. If necessary, you can drill a hole in the panel, if the existing one does not coincide with the location of the batten. Choose to fix the screws more than 35 cm long and with a cap diameter of more than 8 mm. Mount adjacent panels in an overlap of - 25 mm. |
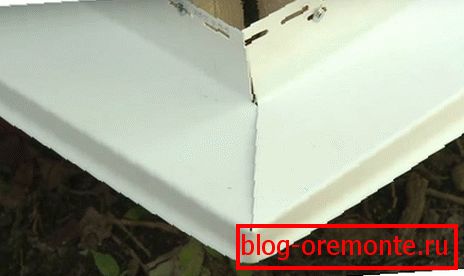
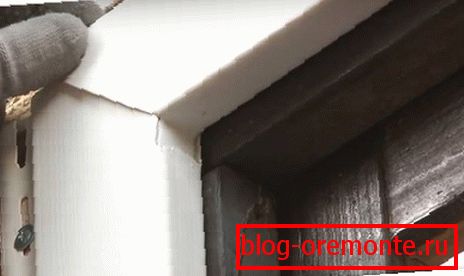
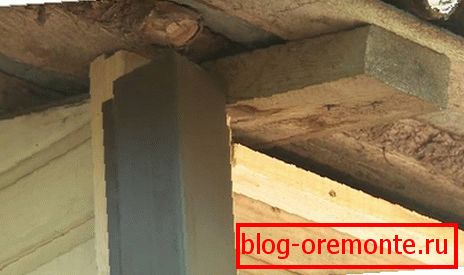 | Then proceed to the installation of internal and external corner elements. The corner panel is cut to the desired length and secured with a top screw. Check the level of the evenness of the installation. Then finally fix. Mounting pitch - 20 cm. Do not forget about the thermal gap. Its presence is checked by moving the panel up and down. |
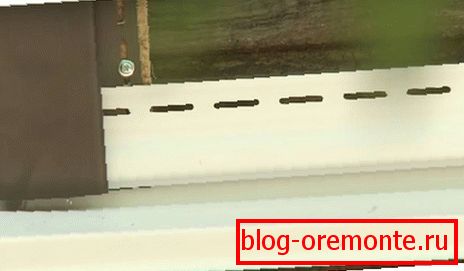 | First set the starting profile on top of low tide. The edge of the panel is inserted into the groove of the corner profile. Fasteners are placed in increments of 40 cm. Check for thermal clearance. |
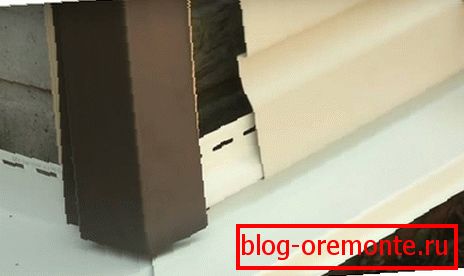 | The first siding panel snaps into the starting profile. Is fixed. The next panel is inserted into the lock of the previous panel, etc. |
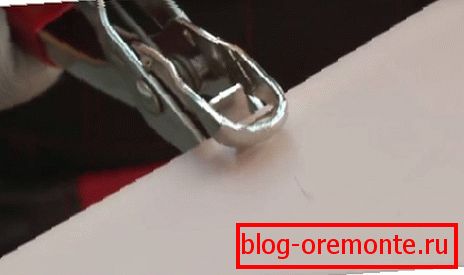 | In the last panel, the punch makes hooks. |
 | And it snaps into the pre-set finish profile. |
When installing vertical siding in the corner from which installation begins, the starting level is set. If necessary trim the siding is shortened at the top.

The rest of the installation is carried out similarly to horizontal siding. At the end of the installation in the extreme corner a finishing strip is installed, and it is fixed with one screw together with the corner panel.
Separately, it should be said about the framing of windows on the example of the installation of a casing 75 mm.
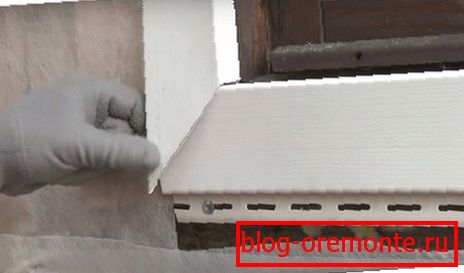 | Mandatory allowance for angles of 45 degrees. The edges of the side elements are cut diagonally. The edges of the bottom bar leave rectangular. |
 | In the upper element do bends with a length of 20 mm. This will protect the internal parts of the crates from precipitation. |
 | First, install the bottom element, then the side and last of all the upper platband, which bends inwards into the side panels. Elements fix screws. |
In addition to the casing 75 mm, casing can be mounted together with the starting profile and with a slope.