How to fasten the window siding bar
When installing metal or vinyl siding provides special additional elements. Without them, perform high-quality installation will not work. Special attention is paid to the finishing of windows and doors. To make the window opening look neat, a window strip was designed. In this article, we will look at how to fasten the window siding siding.
Fasteners and security elements
At installation of a siding a number of elements which are used for finishing slopes of windows and doors is provided.
- Window strip - used exclusively for decorating slopes.
- J profile When finishing doors and windows is used to hide the edges of the siding.
- Finishing plate. It is used to fasten the window trims around the perimeter of the opening.
- Chamfer. Its use is possible only with the finishing bar. It is sometimes used instead of a near window trim.
- Slat-casing. If the window opening is located flush with the wall, then this type of slat is used.
Without the use of these elements can not make the facade beautiful.
Features of the construction of the window bar
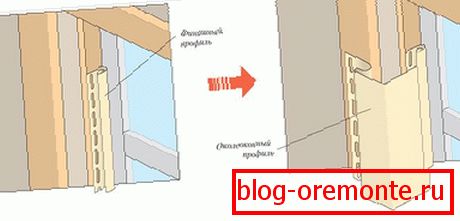
According to the standard, the window bar is manufactured in a length of 143.4 cm. This size fully complies with the European standard. At installation the level is inserted into a finishing level. This bar is convenient to use on those facades where window slopes have certain dimensions.
How to calculate the amount of material
Calculate the required amount of material is simple. For this, the entire length of the side and upper slopes of the windows is summed up. If you do not plan to put a low tide on the lower slope, then the length of the lower slope is also summarized in the total length. To avoid shortages, it is recommended to add 6 cm from each side.
Note! On each slope a solid plank should be used. Docking can be done, but the appearance of this will suffer.
Installation of window bar on different slope width
In this article, we will consider three options for fastening the near-window bar.
The location of the window is flush with the wall
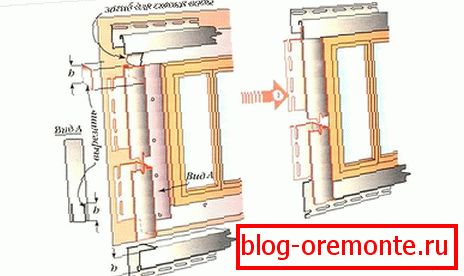
In this scenario, the siding near the window should be fixed with a j-profile. Here it is important to correctly connect the profile at each corner of the window. Therefore, for starters, rake is mounted on the sides of the window. Then the j-bar over the window is fixed. It is installed with the removal of the frame on 6 cm on both sides. At the bottom of the rail above the window should cut the strip that you need to bend down. On the vertical slats installed on the sides, a 2 cm cut-out is also made on the sides. On one side of the top slats, a side cut is made at a 45 ° angle. So, the protrusion will not be evident. Further to connect side and top laths among themselves does not make any problems. To give the finish a finished look, a j-strip is also installed under the window.
The width of the slopes on the window opening to 20 cm
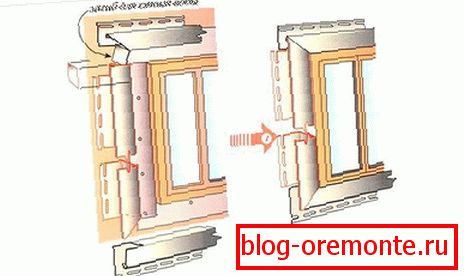
The work on the installation of the window bar is carried out in several stages. To begin with, a finishing plate is mounted around the entire perimeter of the window. The window hardware will be inserted into it. After this, the installation of the window bar is carried out.
Note! If you have plastic windows, the installation of this bar is not performed. This is due to the fact that the windows on the outside are installed with a slight immersion in the wall. This is done to reduce condensation. As a result, the slopes will always be wider than the width of the window bar.
So, the first thing is mounted lower and upper profile. After that, the side are mounted. If an ebb is to be installed, then the profile should not be installed at the bottom. Connect the j-profile is necessary at an oblique or right angle. The method of connection will depend entirely on the design of the finish. The top plate should be shorter by 4 mm from the total length of the top slope for thermal expansion. When heated, the panel will rest against the slopes on the sides.

Note! If the installation is carried out in the cold season, it is necessary to provide a slightly larger clearance for thermal expansion.
If the installation of the near-window strip is performed on the slopes of the facade of the old building, then irregularities can be observed, which subsequently will cause the appearance of cracks. They can be filled with silicone sealant. Due to the elasticity of the sealant, the bar will expand and contract as needed.
Note! If you decide to install a near-curtain strip on the lower slope, then you do not need to equip it additionally with a shimmer. The design of a level provides removal of moisture and condensate.
The width of the slopes on the window opening of more than 20 cm
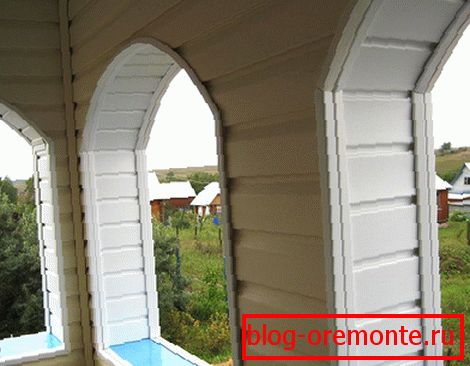
In this case, the window is finished with siding panels. They are inserted into a profile that is mounted around the entire perimeter of the window. External corners are set to external corners, and along the perimeter there is a j-profile. In this scenario, near-window bar is not installed.
Installation Tips and Tips
When working with siding, it is important to follow a number of rules and requirements for successful completion of work:
- Maintain clearance for thermal expansion.
- For mounting use self-tapping screws and galvanized dowels. This will prevent rust.
- Twist the screw in the center of the mounting hole. This will prevent deformation.
So, we have reviewed with you several options for how to fix the window siding siding. As you can see, this element is not installed in every case. If necessary, you can use the j-profile. If the parameters of the slopes of the window allow you to apply near-window bar, then this is certainly the best option for finishing the facades.
Video
If you are new to this issue, the video will help you understand the peculiarities of the work: