Installation of heating gutters
When you create a project of the roof usually try to take into account the likelihood of loads from precipitation. If such calculations are performed incorrectly, the entire structure may collapse. In some winters snow falls more than usual. In order not to suffer from this, you need to install heating gutters.
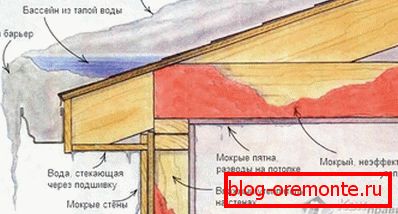
Why ice accumulates
Causes of ice are related to external and internal factors:
- Frequent temperature changes. This leads to the fact that the layer of snow that was already lying could have melted, after the temperature dropped, it froze and the next one covered it.
- Failure to angle the slope of the roof. It must be calculated in accordance with the climatic features of a particular territory.
- Uncleaned drain channels. In the autumn period, the gutter could fall asleep foliage. It clogs the holes, which prevents the outflow of water.
- Insufficient warming of the attic space.
- The presence of an attic room. When using the attic as a living room, steam is released, in addition, this leads to an increase in the temperature of the flooring. From this snow melts, and the water freezes in the cold.
- Irregular roof cleaning.
The heating system for gutters is usually mounted together with the heating of some sections of the roof. The device of this type has the following tasks:
- Removal of icicles and frozen nodules on the roof.
- Prevent rotting of roofing decks due to accumulation of moisture.
- Freeing congestion holes for fluid passage.
- Prevent sudden changes in temperature, which may cause damage to some materials.
- Reduce the weight of the falling sediment layer to reduce the load.
- Extending the life of the flooring and the entire roof system.
- Automate roof cleaning.
The principle of operation of the heating system
The heating system operates in automatic mode. No user intervention is required. This is ensured by the fact that the design provides for the presence of a special sensor that continuously receives data on the ambient temperature. It transmits a signal to the regulator, which closes the supply circuit of the electric current and the heating elements already in place, warming up a layer of snow or ice.
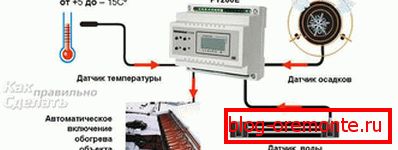
If necessary, the activation can be done manually, usually for this is an additional switch.
Choose the type of heating cable
The basis of the whole mechanism is the heating cable. For some, this concept is something new, but in fact such solutions have been used for more than one year.
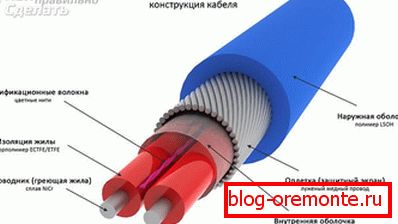
Resistive. In appearance, it resembles an ordinary single-core or stranded aluminum braided cable. Heating is due to the internal resistance of the conductor. The temperature is easily maintained at the same level, which guarantees the reliability of the system. Usually it is in an affordable price range.
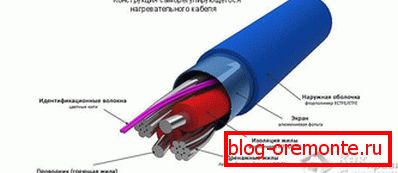
Self-regulating. The structure of this conductor is more complicated and its cost is higher. As the name suggests, this cable can function autonomously, without user intervention. This means that there may be different temperatures in different areas. This is explained by the following mechanism: between the two conductors there is an insulator, which, to a certain extent, transmits electrical energy. The lower the temperature, the lower the resistance, the more current passes, and the more heating occurs. After warming up, the resistance increases and the permeability decreases.
Each of these options has its strengths and weaknesses. Resistive:
- quick warm-up;
- simplicity of installation of a two-core cable;
- ease of calculation of power per meter;
- There are no special nuances with the connection.
The disadvantages include:
- the need for laying a specific declared length;
- overuse of electricity in uneven areas;
- As a check before installation, only the resistance measurement is available.
The advantages of self-regulating include:
- possibility of use without thermostat;
- installation of a piece of arbitrary length;
- resistance to physical stress;
- more economical consumption compared to resistive;
- resistance to voltage drops;
Some cons:
- relatively high price;
- slow warming up;
- high starting power.
In some situations, for the sake of cost savings, these two types combine. For example, along the slope of the roof, where the cover of snow or ice is about the same, a resistive is allowed, and a self-regulating cable is laid in the gutters, drains and funnels.
Design
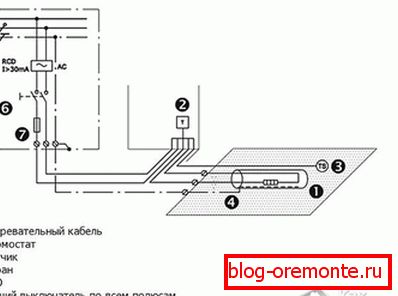
In addition to the heating base itself, some components will still be needed:
- Temperature sensor. The best option would be a small meteorological station. She will be able to monitor not only temperature, but also humidity, as well as precipitation.
- Thermostat For such purposes, preference is given to an electronic product. It more accurately tracks fluctuations and withstands sufficient loads.
- Cold cable. Usually taken in double sheath. It will serve as power to connect the load. The section is selected depending on the total consumption of the system.
- Signal cables. Used for temperature and humidity sensors.
- Circuit breaker. The number of poles will depend on the incoming network.
- Assembly boxes. One will be needed for the thermostat, one for the automaton, if it is not installed in the general shield and another for the weather station.
- RCD. Required item. This device will allow you to track the slightest leakage and immediately stop the flow of electric current to protect all residents of the house.
- Couplings for tight cable connections. Fixing material in the form of screws, dowels, brackets for wires.
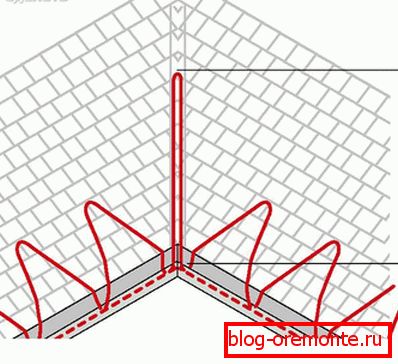
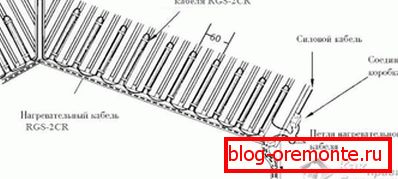
Now it is necessary to calculate the length of the heating cable required. To do this, measure the length of all horizontal and vertical sections. Usually two lines fit into the gutter, so the result must be multiplied by two. For a vertical drainpipe, there are also two, but it is important to warm the bottom part further, since it is closer to the ground and can freeze more strongly. About 10% of the stock should be added to the result. He will go on to make additional turns in the funnels. The length of the segment, which will be on the roof, depends on what method of installation will be selected. It can be carried out in several threads or a snake. The height of the snake loop is selected according to the pattern of the laid flooring, but it should not be less than the width to which frost usually forms (on average this value reaches 35? 40 cm). If there is an internal corner (endova) on the roof, then the heating cable must also be placed in it. Minimum need it on? its length in two lines.
The cable power for each case is calculated individually, but there are several average values:
- Under normal conditions, the starting point is taken to be 22 W for a resistive cable and 30 W for a self-regulating cable per meter.
- For soft roofs and plastic drains, the power per linear meter should not exceed 17 watts.
- With the possibility of strong icing for the metal gutter is allowed to use two threads with a power of 50 watts per linear meter.
- With a large width, the grooves can fit not two, but three or more lines.
- If the attic is cold, then 70 W / m will suffice2. In the case when the attic is used under the attic, then the number of turns and lines is calculated so as to get from 200 W / m2.
Now, knowing the total length of the whole line and the power of each conductor, we can calculate the total consumption. In accordance with this value, a circuit breaker, a cold cable section and a thermostat are selected.
Installation
- Installation is best done from the top down. But you need to start not with the heating cable.
- Inside the room we choose the location of the electrical panel. If necessary, using a perforator, we make a recess for it. We drill holes and fix the box with screws and dowels.
- We carry out the installation of machines for each individual circuit. Here we also install the thermostat.
- We make a network cable output. Pull it to the level where it will connect with the heating.
- A sealed junction box is installed under the roof. It starts up the power wire.
- Next, you need to thoroughly clean all the gutters and the place on the roof where installation is planned.
- The resistance of the heating cable is measured and the value is checked for compliance with the declared. Indications are entered in the passport.
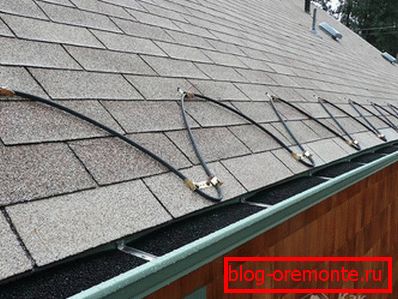
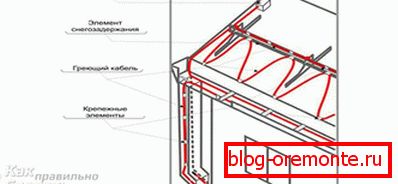
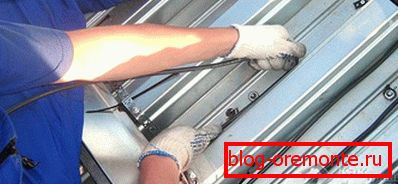 Stretching of the heating cable begins. The first step is laying on the roof. In order to secure it, use special plates with brackets or lattices. They allow you to realize the necessary pitch and wave of a snake or the distance between parallel threads.
- Laying in horizontal gutters. In order to provide the necessary gap between the cables (it must be at least 3 cm), special plastic stretch marks or metal braces are used. Some of their types are hung on the edge of the groove, others need to be fixed with rivets.
- Around the funnel is necessary to make several additional turns. In no case should there be congestion, this is done for the rapid outflow of water.
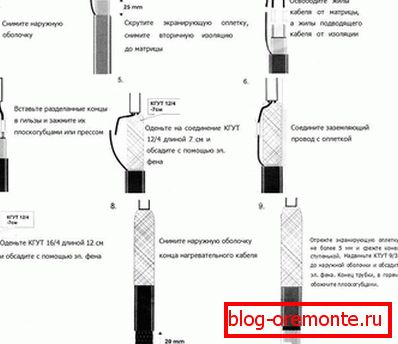
 To lower the wire in the vertical pipe, apply a cable with plastic braided. Cables must not cross each other. To do this, they must be separated in advance using special spacers. At the bottom of the loop is fixed with a small protrusion. You can do this by drilling four holes and fixing the conductor using screeds.
- The ends of the conductor are brought to the installed box. Inside the connection is made with a cold wire.
- The temperature sensor can be mounted either directly near the drains or on the north side of the house so that it can pick up the lowest possible temperature.
- When the entire system is mounted before start-up, it is necessary to check the RCD. Then voltage is applied and the state of the laid highways is monitored.
In the case when the water flow occurs in the storm system, then the cable must be laid in it to the depth of freezing. For flat roofs, it will be necessary to additionally use special funnels with heating, as well as lay the cable around the drain holes in the same way as in the case of conventional funnels. Throughout the installation process, take care that the insulation sheath is not damaged. If this happens, in the case of a resistive cable, you will have to replace the entire line.
Before purchasing a cable, be sure to familiarize yourself with all of its characteristics, as well as the permissible temperatures of its use. At the design stage, it is better to consult with professionals who have been engaged in similar work for some time. In fact, during the installation process there is nothing that you cannot do with your own hands.
Video
A variant of mounting the heating cable for heating gutters is presented in the following video: