How to make a wind generator with your own hands
The ability to use alternative energy sources often attracts people. Therefore, attempts to get energy from the power of nature were made before the Common Era. In this article we will explain how to make a wind generator with your own hands at home (from scrap materials).
The wind generator can be used for the following purposes:
- room lighting
- connecting television or audio equipment
- connect household appliances or office equipment.
Most often, a wind generator in a country plot cannot be the only source of energy, unless it is installed in a site not in one instance.
Sometimes you can see a whole network of wind turbines that convert wind energy into electrical energy and accumulate it into prepared batteries. Such sources of electricity can be used purposefully, to operate only one household appliance, or to save them as a backup in case of the main source of electricity disconnection.
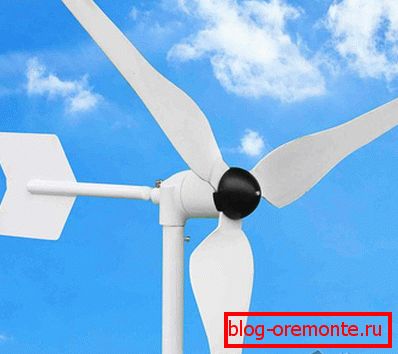
The main difference that makes it possible to distinguish two types of wind turbines is in the form of a propeller: propeller or sailing.

Before you make a windmill, you need to decide for what purpose it is needed. The more difficult tasks are set for such an energy source, the more difficult its design will be.
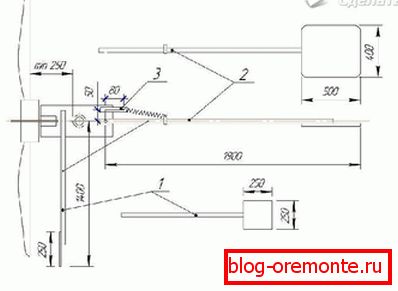
The structure of the wind generator includes:
- wind wheel with blades;
- gearbox (mechanism that transforms and transmits torque);
- the mast on which it will be installed;
- battery;
- an inverter (a mechanism for converting DC power from AC power to AC).
The work of the wind generator is as follows: the wind rotates the wind wheel with blades with its energy, and the torque is transmitted through the gearbox to the generator shaft.

When self-fabricating an alternative energy source, you should pay attention to the rotary or vertical type of such a device - it allows you to get more energy due to the effective impact of wind energy on it.
You must first prepare:
- The generator is 12 V, the battery is 12 V. The most commonly used batteries are acid, gel or armored - they can withstand the maximum number of discharges - from 250 to 1200 cycles. It is not recommended to use a car battery due to the fact that it does not withstand even the full 100 discharges of the battery, which means that it will fail faster and require replacement.
- Rotor size from 1.5 to 2 m.
- Metal barrel or volume bucket for the manufacture of blades.
- Two relays - to charge the battery and to charge the lamp (an ordinary incandescent lamp, power from 25 to 150 watts - it will show that the wind generator is working properly).
- Switch.
- Voltmeter.
- Junction box.
- Mast up to 10 m (for example, a metal pipe or PVC pipe, with a diameter of not less than 160 mm, designed for sewage, or pressure pipe. Pipes for simple sewage will not work because they are too thin and fragile).
- Stranded wires (2–3 cores) with a cross section of at least 4 mm ?.
- M6 bolts, corresponding nuts and washers in the amount of 4 pcs.
- Stainless wire with a diameter of 0.5 to 1 cm.
The tools will require different wrenches, drill, screwdriver and pliers.
Creating and installing a wind generator

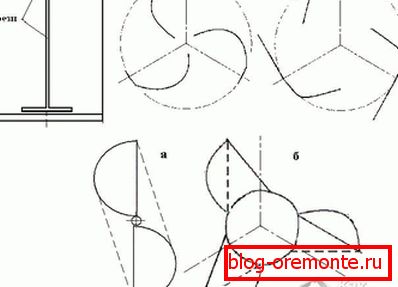
- Originally required to make a rotary type wind generator. The diameter of the rotor is directly dependent on the average wind speed during the year. The rotor is a cylinder-shaped structure, the blades of which look like arcs in section. For the manufacture of used sheet metal, curved in the form of an arc. Blades are attached to the upper and lower discs with rivets and corners. To the lower disk is required to attach the flange. It is designed to attach the blades to the rotor.
- It is necessary to take a bucket, mark it with a pencil into 4 parts, carefully cut it to the end. In the bottom, prepare the holes for the bolts so that the generator axis is clearly in the center of the bottom of the bucket. Made from the walls of the bucket blades need to bend at the desired angle - depending on the direction and intensity of the wind. The greater the bend of the blades, the greater the speed of rotation of the device, however, the device can fail faster.
- After that, the modified bucket, namely its bottom, must be attached to the pulley with bolts. The connection points must be chosen very carefully - improper mounting will result in the need to constantly adjust the position of the blades and adjust the rotation, which is difficult to do on the wind generator already installed on the mast.
- Wires are required to be connected to the generator. If the wire is not multi-colored, then it is desirable to indicate the location of the wires and their marking with multi-colored tags.
- After connecting the wires to the generator, you must assemble the circuit in the junction box. The generator prepared in this way should be attached to the mast, after which the wires should be attached both to the generator and to the mast. The generator must be connected to the circuit, and after it the battery. The load must be connected using wires with a cross section of at least 4 mm ?.
Mast installation
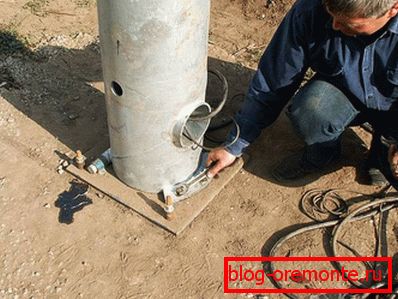
Wind turbine mast must be carefully secured. To do this, prepare a hole in the ground slightly larger than the diameter of the mast. The depth of the hole should be at least 50 cm. Laying a gravel-sand pillow on the bottom with a layer of 10 cm, it must be tamped down and shed with water. After that, the cement mortar must be poured into the hole by 10 cm. You need to install a mast into it and, having fixed it, fill the hole with concrete with the mortar until the end.
In the case when it is necessary to increase the efficiency of the wind generator, the mast length should be increased by 30%. The high mast allows not only to increase the amount of wind energy, but also to eliminate wind interference in the form of buildings or trees.
Video: пропеллерный ветрогенератор
And this is an example of a propeller windmill to give: