How to connect a washing machine with your own hands
Without the use of modern electrical appliances is extremely difficult to ensure a comfortable and cozy living. For this reason, air conditioners, dishwashers, convectors and other appliances that facilitate life, confidently entered our lives. But perhaps the most sought-after appliances is a washing machine. This is due to the fact that the washing machine reduces manual labor. After buying such a desirable technology is to figure out how to connect the washing machine with their own hands. In this article we will offer you instructions for self-installation of this unit. All work is divided into several successive stages.
Preparation is the way to success
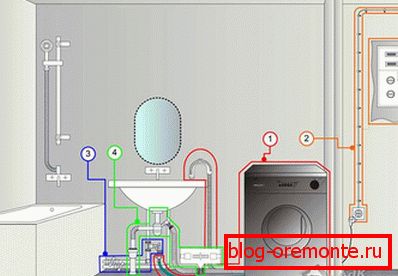
Before you connect a typewriter machine, it is necessary to carry out several important preparatory work. First you need to find the perfect location of this equipment. In principle, its installation can be carried out in any room, but mainly it finds its place in the bathroom or in the kitchen. When choosing a place for it, there are several important factors to consider:
- What is the distance from the nearest engineering communications. We pay attention to the electrical wiring, sewer and water supply. It is to these communications that the washing machine will be connected.
- Will it spoil or decorate the appearance of the room.
- Is there a flat surface in the chosen place?
- Is it convenient to use it?
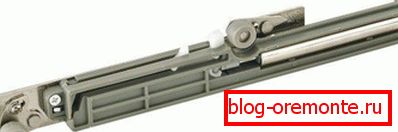
Having considered all the nuances, we proceed to the next stage of preparation - the dismantling of shipping parts. This is an extremely important step, because if you ignore it, then when you start important units of the machine will fail, and you will not have time to do even one wash. As a rule, it is necessary to remove the shipping bolts, wooden beams and brackets. The dismantling process should be carried out carefully so as not to harm the appearance of the unit. To avoid mistakes, it is worth once more to get acquainted with the attached instructions from the manufacturer.
![]()
Well, the last point of preparation is the choice of a flat place with good coverage. The floor surface must be:
- durable;
- flat horizontal;
- resistant to aggressive operating conditions.
If the selected surface does not meet these parameters, it is important to carry out the preparatory work. For example, you can make a new cement-sand screed, put tiles and the like. Most importantly, the surface was perfectly smooth, check the horizontal level.
Detailed description of the installation process
After all the preparatory work, you can begin the direct installation of the machine. To do this, you must have a building level. On the upper cover of the machine checks the evenness of the installation. The maximum permissible deflection angle is 2 °. The horizontal is very easy to adjust: for this you need to adjust the legs of the unit.
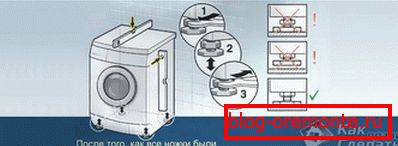
Leveling the machine by placing objects under the legs is prohibited! The only thing that is allowed is a rubber mat. It can serve as a protective element on a sliding surface.
When the machine is set to the level, the legs must be firmly fixed. To do this, tighten the locknut counter-clockwise with a key. If you want the installation procedure of the washing machine to be carried out technologically correctly, you must follow the following recommendations:
- The unit will be installed securely, the legs tightly fixed, and the floor is flat.
- For mounting support structures, you must use fixing elements.
- To check the correctness of installation, you need to shake the machine diagonally. If there is no fluctuation, then the work is done on “5+”. Otherwise adjustment is required.
Water connection
You should know how to properly connect the washing machine to the water supply. Watering is a responsible event. For this, the manufacturer has provided a special flexible hose, as well as special fittings. In some cases, the length of the hose may simply not be enough. What to do in this situation? There are two possible solutions:
- Purchase a rubber hose of greater length.
- Perform a fixed installation.
In the first case, the task is quite simple. You just need to connect the product through a hose from the point of the fence to the nozzle on the washing machine. Ensure that there is a rubber seal on both sides of the hose. Otherwise, water will leak.
When connecting the hose, it is necessary to fulfill three important requirements: firstly, it is unacceptable to lay the hose in a place where there is a risk of mechanical damage. The hose can be brought, for example, under a bath; secondly, the hose is not allowed to stretch. During the operation of the unit, deformation may occur due to the vibration of the machine; thirdly, the pipeline must provide a tight and reliable connection.
If you follow these simple rules, further operation will not cause any problems.
As for the second option for connecting a machine - stationary, then there will have to work harder. To implement this plan will require the use of metal or polypropylene pipes. But immediately it is worth noting that as a result of using steel pipes for this purpose, important nodes may be blocked due to rust particles. It is better to opt for plastic pipes.
Stationary connection method is used in rare cases. The best option was and remains a flexible hose.

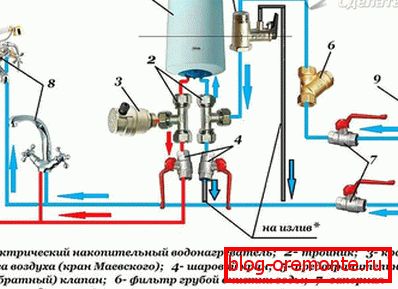
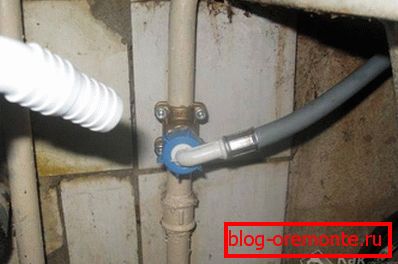
So, no matter what type of connection you have chosen to the water supply, you must fulfill a number of conditions:
- The connection must be made using a ball valve. This is necessary so that the water supply can be suspended.
- Before entering the washing machine it is worthwhile to install a small coarse filter. This will protect against problems with clogging of internal nodes.
- Water connection is carried out using ready-made taps or using a tee from the main pipeline.

Sewerage connection
Connecting the washing machine to the sewer at first glance is a simple and simple operation. However, this is not always the case. Everything will depend on the features of the connection scheme. The procedure for connecting the discharge of water occurs in two ways:
- Temporary connection.
- Stationary connection.
In the first case, the drain hose goes to the sink, toilet or bathtub. As for the second option, there may be some difficulties.

Connection of the washing machine to the sewage should be carried out:
- taking into account the length of the drain hose. It should not be too big. If you independently increase the length of the hose, the load on the pump automatically increases, as a result it will lead to its premature wear;
- through siphon. As a result, the machine will be protected from getting into it unpleasant odors from the sewer system. You can also position the hose obviously in such a position that a water seal is formed. From the level of the floor to the place of the bend of the hose must be at least 500 mm
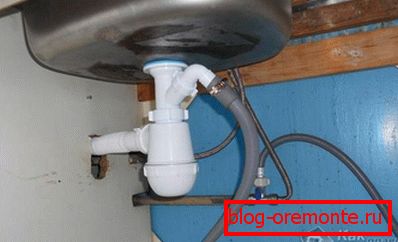
To connect the hose to the sewer will require a special rubber transition from the smaller to the larger diameter. As a result, the connection will be tight.
Electrical network
Connecting the washing machine independently to the electrical network should be carried out in compliance with the requirements of electrical safety. In most cases, a washing machine has a high power consumption of 1.5-2.5 kW. Moreover, the machine is constantly in contact with water.

To complete the connection correctly, you must follow these guidelines:
- Take care of a separate power line. To implement this condition, it is necessary to lay a separate line from the switchboard to the unit. If this procedure is performed after the completion of repair, use a special plastic box. They will not spoil the look.
- Use special means of protection against electricity. Like any other household appliance, the washer should be connected through a safety device. For this you can use a circuit breaker. In the switchboard, you can install a residual current device (RCD), it will protect against possible surges of electricity, as well as protect against leakage of electricity.
- Use electrical circuits that will be suitable for operational and technical characteristics. In particular, it is recommended to use wires with three conductors, and a cross-sectional area of 1.5 mm2.

Connecting sockets is carried out according to the scheme. There must be a protective grounding. The ground wire must be connected directly to the ground bus, which is located in the shield.
Do not connect the ground wire to a water or heat meter. In the event of an emergency, these devices can fail.
With regard to the choice of sockets, from the point of view of security, the ideal option is a socket with spring-loaded contacts. Observing all these recommendations, you will relieve yourself of the need to use extension cords, because in this case the contacts may become hot, which will cause the unit to break. It is also not recommended to mount the outlet in a damp room. Therefore, it may be better if the installation of the outlet for the washing machine will be carried out in an adjacent room.
Check and start
When all installation procedures are completed, you can perform the first test run. To do this, open the valves for water supply, connect the machine to the mains and check for drainage to the sewer. In the process of powering and draining make sure that there is no leakage and other errors.
As recommended by the manufacturer, the first wash should be carried out without laundry. The water heating level is set to the maximum position - this will remove technical grease from the drum surface.
If the wash cycle is completed successfully, then the washing machine is ready for its subsequent operation.
Video
We recommend watching the video to finally understand all the nuances of installing a washing machine: