How to connect a loop switch
Everyone was faced with a situation where it was necessary to cross a dark room to turn on the lights. This gives a lot of inconvenience, in such a situation it will be possible to install a switch that allows to control the lighting from different places. In this article, we will tell you how to connect a loop-through switch, demonstrate the wiring diagram, and also show photo and video instructions.
Purpose of the switch

Walk-through switches are used to turn on and off lights from different parts of the room, the corridor or on the flight of stairs. The scheme of their work allows you not to return to the first device and turn off the light from a convenient place.
According to their performance they are:
- single key;
- two-key;
- three-key.
The design of the device determines the number of lighting devices connected to it and disconnect points. In addition to key management, there is a sensory model.

Any switch is used to break the phase conductor and de-energize electrical appliances, but the specificity of the continuous switch is that by opening one circuit, it closes the contacts of the pair switch.
Unlike a conventional device connected by two wires, a pass-through switch requires three-core switching. At its core, it is a switch that guides the voltage from one contact to another. The light turns on when the keys on both devices are in the same position and turns off when the position changes. Management can be carried out not only from two, but also from three or more places; for this, a cross switch is connected to the circuit, and if necessary, several. The one-button switch is equipped with three terminals. The two-button device has 5 terminals: two for connecting with switches and one common. The three-key switch has a more complicated device, but, having a circuit, it will not be difficult to understand this.
Installation of the switch through passage

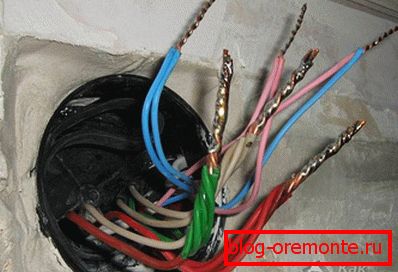
The wiring diagram is slightly different from the installation of conventional switches, but the presence of three wires instead of two makes you wonder. Consider the purpose of each of them. Two wires are used as jumpers between switches placed in the room, and the third is used to feed the phase. Before you begin to connect a loop switch, buy a switch box in which the wires will be connected.
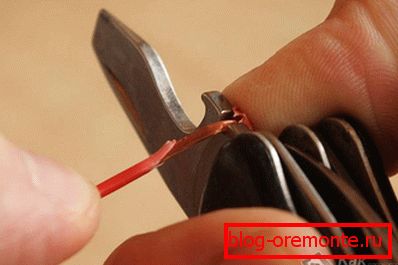
The ends of the wires are freed from insulation by 2–3 cm - this is necessary for twisting. If the wires are connected by interconnecting pads, the wire is stripped by no more than 1 cm. In the switch box, the wire that supplies power from the switchboard is twisted to the input contact of the first switch. The two remaining output pins are connected to the same wires from the second device. The input contact of the second switch is twisted with a wire from the lamp. The zero wire from the lighting device is connected to the zero coming from the shield. All places twists are closed with electrical tape. The cross-section of wires for marching switches is selected by the power of controlled lighting.
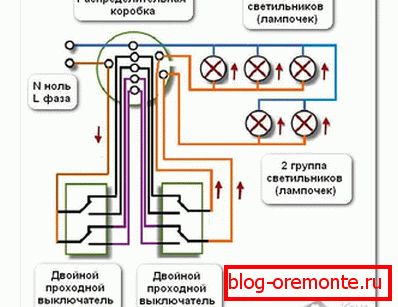
A device that controls two groups of fixtures
It is advisable to install a two-button walk-through switch in a large room where it is necessary to control several lighting fixtures. Its design consists of two single switches in a common housing. Installing one device to control two groups allows you to save on laying the cable to each of the single-key switches.
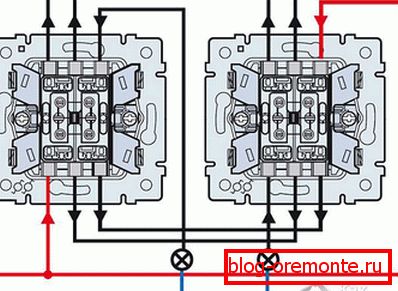
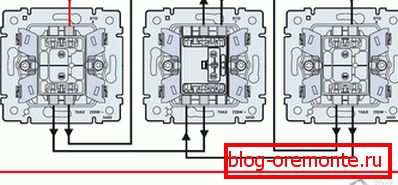
This device is used to turn on the light in the bathroom and toilet or in the corridor and on the landing, it is able to turn on the lights in the chandelier in several groups. For installation of the switch through passage calculated on two bulbs, the greater quantity of wires is required. Each of them has six cores, since, unlike a simple two-button switch, the gateway does not have a common terminal. In essence, these are two independent switches in one housing. Switching circuit breaker with two keys is performed in the following sequence:
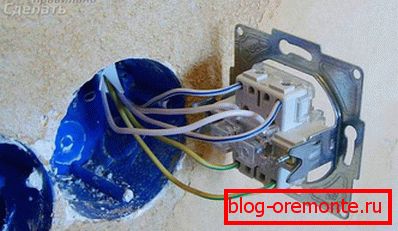
- In the wall are installed podrozetniki for devices. The hole for them is cut by a perforator with a crown. Two wires with three conductors (or one six-core from the junction box) are fed to them on the wall in the wall.
- A three-core cable is supplied to each light fixture: neutral wire, grounding and phase.
- In the switch box, the phase conductor is connected to the two contacts of the first switch. Two devices are interconnected by four jumpers. The contacts from the luminaires are connected to the second switch. The second wire of the lighting devices is switched from zero, coming from the switchboard. When switching contacts common circuit breakers in pairs are closed and open, providing on and off of the corresponding lamp.
Two-button switches also use, if necessary, to control the lighting of three or four places. A double cross-type switch is installed between them. Its connection is provided by 8 wires, 4 for each limit switch. It is recommended to use junction boxes and label all cables for mounting complex connections with multiple wires. A standard O 60 mm box will not accommodate a large number of wires, you will need to increase the size of the product or put a few paired ones or purchase an O 100 mm junction box.
It is important to remember that all work with wiring and installation of devices is carried out with the power off.
We also recommend reading the article "How to fix a light switch."
Video
This video describes the device, the principle of connecting and installing loop-through switches:
This video shows an experiment in which various ways of connecting wires were tested:
Scheme