What can decorate the arch - decorate with your own hands
Carrying out repairs in the apartment, one way or another, the question may arise: what can be done on the arch? The issue is relevant, as the arch, as an element of interior design, have a steady popularity.
The process of making the arch is quite a simple procedure, if you follow the recommendations, have patience and some skills. So let's start the work.
Arch making
In this article we will talk about the technology by which the arch is made and how to decorate the arch. As the material for the arch, you can use a variety of materials, but drywall is the most practical and convenient in work (see Making an arch out of drywall).
For the work we need:
- drywall sheets (12 mm.) in duplicate;
- arched drywall (6.5 mm.) - one sheet;
- guides - 4 pieces and rack profile - 1 piece;
- reinforced arched corner - 2 pieces.

The arch will be made by us according to this scheme:
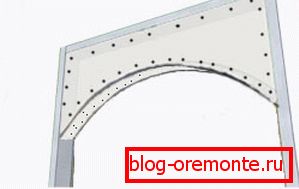
- It is necessary to cut a couple of sheets of drywall, which in width will exactly repeat the doorway.
- Draw a semicircle on each sheet. The semicircle forms the contour line of the future arch. Cut the contour of the arch with a knife or jigsaw.
- Fasten the metal guides in the place of the opening, with a distance of 15 millimeters from the edges. We use for mounting screws that are hammered into pre-drilled holes.
- With metal screws 3,2? 25 mm we fasten the sheets with the prepared contours of the arch to the guides. At the same time, the screws are twisted with a pitch of 100–150 mm, their caps are recessed in the drywall.
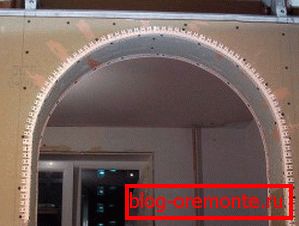
- We measure the arch of the arch along the length. According to the obtained result, we cut the guide profile, and then, using cuts, bend it along the contour of the arc. We fix the profile in drywall.
- To strengthen the design from the inside of the arc, you need to add jumpers from the parts of the rack profile. We fasten it with screws to curved guides.
- We measure the length of the arc arch. According to the result we cut the drywall strip. The width of the strip is equal to the depth of the door opening.
- Bending the drywall along the desired radius, we fix the strip to the frame with self-tapping screws.

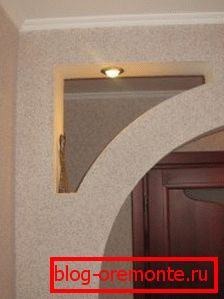
The arch is ready for finishing! There are many options for finishing (see. Arch design). Let us dwell on the most common - wallpaper or plaster.
Wallpaper finish
This is the easiest way - pasting the arch with wallpaper, which will also be covered with walls in the room.
Arch finishing will require such materials and tools:
- wallpaper;
- wallpaper glue;
- pencil and ruler;
- scissors;
- brush.
First prepare the glue. For pasting the arch with a wall, we make thick glue; it should be thicker than for pasting the wallpaper, so that it is very slow and does not harden into pieces. Glue a thicker consistency allows you to move the strips of wallpaper, getting a full match of the pattern.

Begin to stick wallpaper:
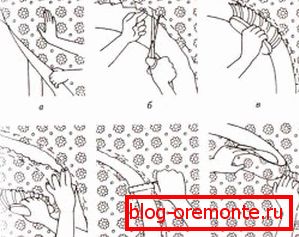
- First, glue the strip to the wall near the arch. The next strip is glued so that it covers part of the arch opening. Following how this strip is glued, you need to cut the bulging part, leaving an allowance of 25 millimeters.
- Next you need to cut the allowance at intervals of twenty to twenty-five millimeters, we bend the allowance to the slope, and, using a brush, glue it to the plane.
- The arch cavity on the side of another room is glued in the same way.
- It remains pasting wallpaper arch of the arch. To do this, we cut a strip out of the wallpaper, which is equal in width to the depth of the arch opening. The strip should be slightly longer than the required size so that it can be moved, ensuring that the pattern coincides.
- Glue the strip to the arched vault and the side walls of the opening. In the case when the arch is high, the strip is divided into two (in this case, the joint will be located at the top of the arch) or three (in this case, joining will be in the place where the arcs and vertical planes join) parts. Arch lining is over.
Glued wallpaper should be carefully ironed, then, to avoid the formation of air bubbles beneath them. So, we told how to make an arch wallpaper.
Decorative stucco finish
Another way to finish the arches is facing with decorative plaster.

Framing arches is carried out according to the following scheme:
- The first step is to plaster the drywall, from which the arch is made. This should be done so that the seams between the massive part of the opening and the sheets of plasterboard do not protrude from under the plaster layer, as well as with the aim of obtaining the most even surface for plastering.
Please note that the decorative plaster is not painted, so do not hold to the alignment fillings. It is only necessary to block the largest irregularities.
- When the surface treatment of putty is fully completed, you need to apply a primer. Priming of zashpatlevanny surfaces will provide the correct adhesion of decorative plaster and a surface.
- After polymerization of the primer, which takes from four hours to days, it is time to apply the plaster. It is necessary to form a relief on the newly applied plaster, using a grater, sponge or spatula.
- We paint finally dried surface specially intended for coloring of decorative plaster paints. If we used tinted plaster mixture in the mass, instead of painting it is allowed to confine ourselves to simply applying a finishing protective layer or decorative metallic. The lining of the arch with plaster is complete.