We make the doors of linden for the bath
Doors for a bath of linden can be found quite often. True, the price of the finished product is small. Therefore, in this article we will describe how to make a door for a bath of linden, and do it completely with your own hands, and thus reduce the cost of the whole structure. The price of the material is not low.
Instructions will be given to do this work. First you should see photos and videos on this topic. Decide on the configuration and design. After that, you can and start to work.
Why linden
Linden sauna doors are the most acceptable and optimal option. Just before purchasing the material, let's weigh and decide whether this material is suitable for you.
So:
- The first thing we will think about is that this material belongs to hardwood. And this is extremely important. After all, this material is not so hot and you about the contact will not burn the skin, and this is important. So the door can be used for finishing the steam room;
- The second is that there are no resins in the texture.that can be released when heated;
- This wood is well processed. and therefore does not require a special tool;
- When heated, the material produces and essential essential oilsthat is extremely beneficial to health;
- Such wood contributes to the creation of positive energy in the bath.
But there are drawbacks that will have to be considered:
- This material is extremely prone to decay, it is poorly resistant to high humidity. Therefore, this design may not be durable. This can be eliminated. The truth is, it is worth doing the treatment with antiseptics, which, when heated, can release harmful substances. Nowadays there are special preparations for finishing wood in the bath. Therefore, you can carefully study the instructions and apply. Give preference to materials made from natural ingredients;
Attention: If you apply linden in the finish, then after taking bath procedures you should thoroughly dry the room. Then you will significantly increase the life of the finish. When constructing a bath, pay special attention to ventilation, which is extremely important in such a structure.
Choose the size of the door and buy the material
Doors of linden bath do, as a rule, a smaller size from interior doors. This is due to the fact that you want to save heat, so their size is chosen smaller.
So:
- The most preferred is the height of the door from 150 to 180 mm from the floor.. In this case, a width of up to 70 tysm is applied. If this door is an entrance door, then it is better to make it of a more massive look, this will allow keeping the heat in the room more qualitatively.
- To begin, correctly calculate the volume of material. Should be considered and waste that will be exactly;
- When choosing a board, give preference to a material with a moisture content of less than 12 percent;
- Pay attention to the bitches. They are best avoided. The fact is that when the humidity changes and the temperature drops, they crack and fall out. But if the choice is not large, then take not falling out.
Door manufacturing
The linden door for the bath can be made in several versions, they all differ in the complexity of the work. We offer the best option that can meet all needs. And it does not depend at all, this is a Caucasian linden for bath doors or any other material.
This applies to any wood. Let's take a closer look at the production version.
Making a canvas
For the manufacture of wooden doors should purchase all the material in advance. Take note and tips that were given earlier.
So:
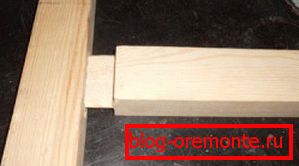
- First we take the board, it is best to apply the tongue and groove version. Here the connection will be performed with the highest quality. We cut off the right size, do it with a simple hacksaw;
Attention: When trimming to the desired size, be sure to take into account the frame trim. It is also made of wood. Therefore, consider the size in the complete assembly. To have less work in the aftermath.

- Now we take the first board and cut off the spike from it. After that, the surface of all boards is worth being scared. You will make a flat plane, then it will be much easier to work. Ultimately, the finish you should get a door thickness of about 26 mm. It is quite satisfied;
- Now we start the assembly of the canvas. We connect parts that are mounted in the grooves. Make sure that the material is snug enough tightly and there are no cracks left. Make it fit. For this we use a chisel and a jointer. Remember that the connection must be tight;
- After the assembly of the canvas, it is likely it will be wider than the desired size. Then it is necessary to cut the two extreme slats in length and fit to the desired size;
Attention: When cutting, it is not necessary to cut off the groove on one side and the thorn on the other. These parts are required to assemble the entire structure.
- After trimming, it is necessary to make their display on a flat surface and assemble. For joining, we use PVA glue, which we coat the groove of the element. The connection must be strong. No backlash allowed;

- Now we need to fix the canvas and let it dry. To do this, we beat on a flat surface two slats. The width between them should be slightly larger than the width of the canvas. After that, put the canvas in the middle and insert wedges along the edges. They should press and fix the slats. So leave for three days. Everything has to dry well enough;
- After the canvas is completely dry, we check the surface. We process all the cracks with glue and remove irregularities with the aid of a jointer.
Door trim and hardware fastening
During the drying of the fabric should be made accessories and strapping. Factory locks in the steam room will not work, just there is a high temperature. So you have to make wood. And it is quite possible.
So:
- Bars, which are purchased for strapping, cut to the desired size. Vertical timber cut already in the finishing size. From the horizontal size, one should subtract the width of the vertical joints and then cut them;
- In the made blanks we make a groove, which is performed with the help of an end mill. We make a depth of 26 mm and a width of 25 mm. This size corresponds to the crest of the wall paneling. After this, we make a groove around it with a width of 50 mm and apply a depth of 10 mm. such step will be required for clapboard paneling.

- Now we take horizontal slats for strapping and make a spike using a milling cutter. It must fully comply with the groove made. After completion of the preparatory work we collect the strapping. When assembling, use the square and check the angle of attachment;
Attention: In the manufacture of the door is extremely important to withstand the diagonal design. Therefore, when assembling the strapping, use the fishing line to check the diagonal. This will be the main check of the geometric shape of the product.

- Bolts and handles are made of waste timber. It all depends on your imagination and skill. Some make carving decoration (see. Doors carved into the bath: the right choice).
Door assembly
At the final stage, we need to assemble the entire structure. Assemble the box and make the necessary fixtures.
We do this as follows:
- First, we carry out surface treatment of products using a special composition that will protect the surface from rotting and mold. Do this necessarily;
- Now with the help of a pencil we outline the correct contour on the canvas. It corresponds to the size of the blade clean and plus another 15-mm for the fastening. Take the details of the wall paneling and do the final trimming for the desired length. After this we do the fastening to the door. We carry out the connection with the help of small nails, hiding the caps in the groove of the part;
- Now we make the installation of the canvas place. First, all the bars should be treated with antifungal composition. We make the attachment of the vertical beam. With the help of the mallet we customize and fasten tightly;
- We add PVA glue to all the mounting grooves, and make the connection reliable. After that, perform the installation of the lower beam. To glue it, we no longer use it. If it is necessary to repair the blade, it will just have to be removed and a replacement made;
- And the final stage of the installation will be to strengthen the connection with screws. We twist them into the details of the strapping, and with this we make the connection rigid; after that you have to hit the lock.
After making the door leaf make the box.
This work will be much easier:
- For this work, we use a bar, which must have a cross section of at least 50 mm. Make the trimming to the required length and select a quarter at the ends. This is done with a milling cutter.
Note: Quarter choose only five mm more from the spike. Here it is impossible to do butt, consider this tolerance. This will save the product during heating in the bath and then the panel will not warp.
- We make poses on the edges of the beam to make the connection.
Making the complete assembly of the box we check its corners with the help of a square.
Do the installation of the door in place
Doors for the bath, linden or other wood, the work is done a little differently, in contrast to the interior.
So:
- To begin with we do the preparation of the grooves in the opening. It is with walls of wood. The groove should be made one cm more from the width of the box. This is done so that after installation you can align the door horizontally. This is done using ordinary wedges. After this we do the installation of the box. Only the most important thing in this matter is to set in the right direction. For a bath the door should open only outside;
- After that, we start a horizontal bar and make a support with the help of vertical posts. In the lower part we have a threshold and make adjustment using a level. Now align the structure with wedges;
- We fix the box to the wall with dowels, but for this you must first prepare the holes.
- After installing the box, we do a sidebar hinge and hang the door in place.
Doors linden for a bath is not as difficult to wish as it may seem at first glance. The most important thing is not to hurry and do everything right.