Retractable interior doors do it yourself
Today we will talk about sliding doors and how to install them. Sliding, or as they are also called sliding doors, look spectacular in any interior, more economically using the capabilities of the room. Space saving is achieved due to sashes that are of two subspecies: parallel-sliding and sliding-folding.
Материалом, из которого изготавливаются interior sliding doors, чаще всего выступает древесный массив или клееная комбинация дерева, ДСП и шпона. Створки дверей иногда выполняются из закаленного стекла, но наиболее часто встречается комбинация стекла и дерева.
Материалом, из которого изготавливаются interior sliding doors, чаще всего выступает древесный массив или клееная комбинация дерева, ДСП и шпона (см. Двери шпонированные: что это и как делается). Створки дверей иногда выполняются из закаленного стекла, но наиболее часто встречается комбинация стекла и дерева.
Technical properties of sliding doors
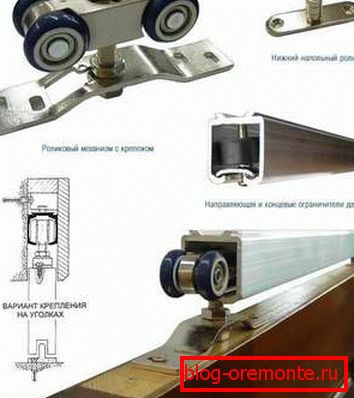
The fittings used by the sliding room door include:
- carriage guide rails;
- mount kit;
- door leaf limiters;
- videos;
- door leaves;
- a bar;
- platbands;
- shutter position locks;
- door handles (see. Handles for interior doors - how to choose the best);
- locks
In order to reduce noise during the movement of the valves, rollers are used, which are coated with silicone, and inside which are silent bearings. The doors of the sliding door are equipped with two rollers each - at least. If the weight of the valves is more than 75 kilograms, you will need at least four rollers for each valve.
Advantages and disadvantages
Sliding interior doors have both positive and some negative features:
- save space;
- the flaps open very easily;
- indifferent to gusts of air;
- interroom sliding door can be automated.
Negative characteristics:
- such doors should not be placed in an apartment or bathroom - poor sound and heat insulation;
- locks on such doors are more expensive than on hinged doors (see Installing hinged interior doors. How to combine beauty and functionality).
- The walls along which sliding doors are installed must be free from electrical accessories and interior items.
Installation of a sliding door

Note! The guide rail must be straight, regardless of the beam. After completing the measurements, we fix the rail.
So:
- We put the canvas door to the wall. We mark the upper door level on the wall.
- Retractable interior door is installed in the opening, we note the upper level of the leaf again.
- Make sure in the horizontal position of the door leaf. Mark seventy mm up from it, denote it by a horizontal line. There will be a rail guide.
- Fastened to the wall with screws wooden beam (fifty to fifty mm). Its length is twice the width of the door opening. We press the bar tightly to the wall, we use screws. The bar should be strictly horizontal.
- Fasten the rail guide to the end of the wooden beam. We determine the position of the hole for fasteners, first along one side of the guide (divide the thickness of the door leaf by two, add the required distance from the wall to the received number). Slightly fasten with a screw, then repeat the measurements and fasten to the screw on the other side of the beam.
- Screw the bolts into the carriage so that the ends protrude slightly from the hole. We get the assembled carriages in the rail, we look at their free movement.
- We install travel stops for the rail, on which sliding interior doors will walk.
- We retreat fifteen mm from the edge of the flap and drill a hole along each side of its middle part. Cut the groove for the bottom rail, strictly in the middle of the sash. For cutting the groove using a router, electric drill or parquet saw.
- Install the mounting carriage on the door leaf. Strictly in the middle with a 2 mm indent from the ends of the leaf. Fasteners are installed with the expectation that the notches on the brackets look at the wall.
- Hang the canvas. Substitute the door leaf to the rail, combine the cutout on the right bracket with the bolt of the right carriage. The nut with the washer should be outside the bracket, and the bolt is wound into the hole for fasteners in it. We fasten the brackets on the bolts, but do not tighten the nuts to the end.
- Shift the lower part of the door from the wall, install the guide from the bottom into the cutout in the lower end of the canvas. We return the lower part of the door to the horizontal position and the guide knife blade inserted into it. Move it to the open position of the door. Adjust the gap between the blade and the wall (up to 5 mm): reject the lower part of the sash until it reaches it, then mark the position of the knife. We unscrew the nuts of the carriages, remove the canvas and fasten the guide on the bottom of the two screws.
- Repeat hanging the sash: plant bolts carriages in the holes of the brackets, while not unscrewing the nuts to the end. We regulate a gap between a shutter and a floor. Having achieved a gap in the region of 5-7 mm, fasten the nuts.
- We install a decorative platband on top of the guide above. The distance from its bottom edge to the end of the leaf is 5-10 mm. What if you need to get to the sash, make the casing fold,
- Everything, a door interroom retractable is established.
Now you will not be difficult to install interior sliding doors with his own hand!