Polycarbonate porch with your own hands: doing it right
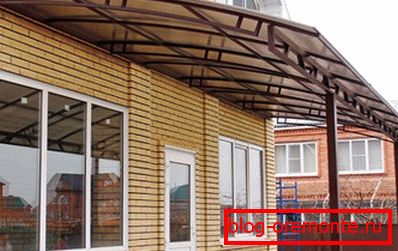
The porch made of polycarbonate is increasingly seen in the design of buildings. This is a beautiful and light material. Its longevity is enough for years of life. It has high plasticity, so it is possible to give any shape to an invented porch.
The product will be not expensive and very practical. Easy to install. There is an opportunity to make it to every person who wants to realize his fantasy.
Tool
For manufacturing it is enough to have a standard tool, which is available in almost any household:
- Bulgarian;
- Drill;
- Screwdriver and nozzle for screws;
- Welding machine for 220V.
We buy material
So:
- We buy metal profile: square or rectangle, depending on personal preferences. Roughly calculate how much snow can be on the porch and how much weight the profile will support.
Attention: It is necessary to take a profile with a margin so that when making an arc the size smaller than conceived will not turn out.
- For polycarbonate fasteners, take self-tapping screws and do not forget to take thermo washers to them (so that the water does not show up at the attachment point).
- You need a tape for polycarbonate and a profile for the end (to protect the internal cavity of the sheet from the ingress of insects and dust).
- Metal requires a degreaser, primer and paint.
- Polycarbonate, thickness not less than 6–8 mm.
Manufacturing steps
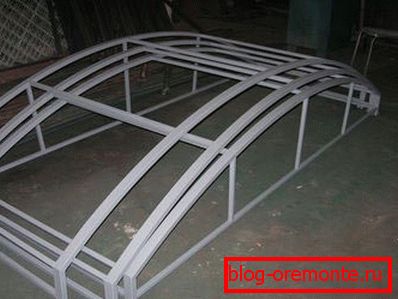
Make an arc of the profile
- Fix the profile on a flat surface. Cut out small sharp corners. Masters are advised to first make the corners small and bend the pipe. If you see that the radius is small, increase the angle of the notch (do not make a large one at once so that you do not have to weld the overlays later).
- We make cuts every 4–5 cm.. (define yourself depends on the radius of the arc).
- Leisurely bending the profile, bending will show if you need to increase the angle of the notch.

Attention: To keep the arc smooth, holding the yoke by the two edges of the pipe. Do not bend on individual sections, a uniform radius will not be maintained.
- The number of arches do depending on the length of the porch. So that the distance between them was about 70 cm. We bend the workpiece slowly, apply it to the first product and verify the identity.
- We weld and cut the incisions and grinders.
- The edges of the finished arc connect the same pipe and weld.
Attention: The pipe with which you attach the edges of the arch, first rihtite. When buying a rental has a bend. After attaching the structure, this is difficult to do without damaging the radius of the structure.
- Cut and weld the jumpers between the connecting pipe and the radius of the arc.
- First, we put two extreme arches and weld them with a profile on the length of the porch (bottom corners, not radius). Fixed. We expose perpendicular of arches by a plumb. Exposed. Fix the transverse profiles of the arc.
- Degrease rust converter (this will create a protective layer of metal), after drying, wipe the deposit with a dry cloth.
- The frame is ready. Ground, beautiful.
- Fastened to the porch posts and to the wall of the house (see How to attach a porch to the house correctly).
- If the conceived design will be large, welding should be carried out at the assembly site.
Attention: Decide in advance how and by what, the porch will be fastened to the wall of the house and posts.
Correctly fasten the polycarbonate
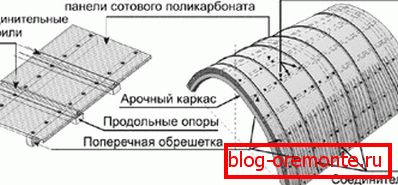
Stiffeners are arranged in polycarbonate in length. Installation is carried out so that the collected condensate has a free exit along the internal channels.
When placing the material vertically, the stiffeners must be vertical to the ground. In an arc laid, with the arch design. Be sure to consider bending, this requires an additional amount of material.
When buying a polycarbonate, note that it protects from UV rays. On the one hand there is a special protective film. To avoid mistakes, install the sheets with a protective coating (location should be on top), removal is carried out after installation.
With an arched installation, the radius should not be made greater than that specified by the manufacturer.
We mount polycarbonate correctly

Attention: Do not attach the polycarbonate panels to a very tight grip. Do not use nails in the fasteners, washers that do not fit, rivets. Do not pinch the screws.
So:
- Polycarbonate should be secured with a side that protects against UV radiation. As a rule, this side is covered with film.
- Sheets should be attached vertically to the edges of the arc.
- If the length of the sheet is not enough to cover the arch completely, put two sheets. But first, they are tightly joined at the top of the arch and fastened, starting from the top to the bottom. We cut off the excess.
- The open edge is closed with a special profile or sticky aluminum tape.
- For fasteners use screws, studs, complete with which are laying and a wide washer.
Caution: When heated, polycarbonate expands. When installing, consider the thermal play in the hardware. Make holes on the floor of the diameter of the pin or screw.

- When attaching, use gaskets 4 mm thick. Avoid contact of polycarbonate with metal.
- In order to prevent overheating from the sun's rays, the supporting structures should be painted white.
- The slope of the slabs should be at least 15 *, but it is preferable to do more.
- The minimum radius for support floors must be at least Rmin = 150, d slab thickness.
- It is better to use boards for laying plates 40 cm wide for safe movement on polycarbonate plates.
- Remove the film from the plates immediately after installation, since it will be extremely difficult to remove it later.
- Do not wash polycarbonate with alkaline solutions. As a result, cracks may form.
- Use only neutral silicone to seal the plates so that it does not contain substances harmful to polycarbonate.

The end of the panel must be properly closed. When mounted vertically and inclined, the upper end is carefully sealed with aluminum self-adhesive tape. Below, the tape is perforated, this will prevent dust from entering and ensure unobstructed passage of condensate.
When the construction of the arch, perforated tape handle both ends, they are tightly fixed to the ends of the polycarbonate. Drill several small holes in the profile to ensure free drainage of condensate.
Caution: Do not leave the ends of the polycarbonate open. Do not glue the ends with tape. Do not close the bottom end tightly.