Noise isolation of the front door with your own hands: make
Below we will tell how to soundproof an inexpensive entrance door. Noise isolation with your own hands - quite a doable task for every person, you just need to follow certain rules in the work.
What do we do:- Improve sound insulation due to sound-absorbing materials.
- Increase the weight of the door with panels and bitumen sheets. This will be beneficial as the thicker and more massive the door, the more difficult the sound to penetrate through it.
- We warm the door with heat-insulating materials (see Warming of doors with dermantine: the rules for performing work).
- We will get rid of clapping and drafts due to sealing and gaskets.
- Improve the look.
Soundproofing Stages
- Upholstery removal.
- Choosing materials
- Sticking up
- Thermal insulation
- Wiring
- Appearance
- Finishing touches

Upholstery removal
Insulation of the front door begins with the removal of upholstery. Most often inexpensive doors are covered with a decorative coating made of leatherette, which is connected to the door with furniture nails. We pull the nails with pliers for the caps, then the door covering is removed along the entire perimeter.
- Remove the sheet of hardboard or hardboard for a decorative coating.
- We prepare the released coating for sound insulation (see. Sound insulation of the entrance doors with their own hands in the house).
Exposing the inside of the door you can marvel at the uneven stiffening ribs and often the poor quality of the welding of an inexpensive door. Although such properties have no particular effect on consumer properties. The main thing is that the geometry of the frame was smooth.
So, we take a rag and acetone, and carefully wipe all the internal surfaces of the door with a cloth moistened with a solvent. It is advisable to use gloves, as there can be burrs on the surface of the metal.
Choosing materials
Soundproofed entrance doors do not need to use foam. It is a thermally insulating material for sealing gaps, but its sound-absorbing qualities leave much to be desired, in particular because of the very low foam weight.
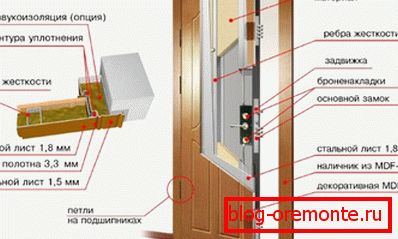
How to soundproof the front door, what materials will be needed? Creating a noise barrier, we can use self-adhesive bitumen vibration insulators (vizomat, bimast) and self-adhesive sound insulators (splen, vibroplast, etc.). For a standard door, we need three to four sheets of both types of materials.
Sticking up
Noise isolation: entrance doors must be covered with special materials. After drying the surface, you can proceed to sticking. Directly to the metal you need to stick the bitumen sound vibration isolation (heavy thick sheets with adhesive sealant). On top of it, overlapping the layers, glue the noise insulation (foam-sheet-like lightweight sheets).
To glue gently, first cut a tenth of the paper and glue this strip, then carefully pulling out the paper, smooth and glue the remaining material. This process is similar to wallpapering. Overlapping layers means that if you have glued some material from the bottom, then another one will start to glue on top. The remaining excess material must be removed with a regular knife.
Helpful advice! In order for the gluing of vibration-proof self-adhesive materials to be of high quality, the temperature of the surface and air must be above +20 degrees. It is desirable that the temperature was even higher than +25 degrees. Therefore, if the insulation of the entrance door is carried out in cold time, it is necessary to heat the door with a fan heater.
So, most of the door sound insulation is complete. Now you can try to turn the key in the lock. Entrance doors with good sound insulation hide the metal bounce and clank from key rotation in the well.
Thermal insulation
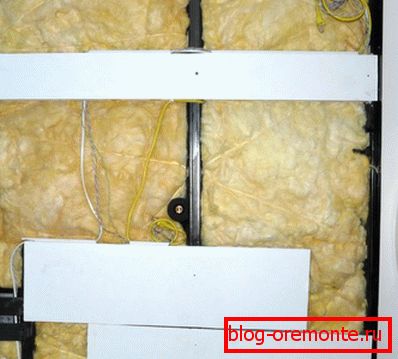
Noise insulation of entrance doors does not necessarily imply thermal insulation. But it is desirable to do. It is necessary to lay mineral wool or foam rubber in the free space. To keep the material, we create a reinforcement from the fishing net, which will be held on the nails that previously held leatherette.
Wiring

Noise insulation of input doors may include laying of several power and signal wires from the top hinge to the locks and the eye (see. Door bells: how to choose and install). If in the future you need to install any device that requires power supply, for example, a radio-controlled lock, an electronic peephole, you will not need to re-disassemble the door for wiring.
Appearance
Entrance noise insulation doors can be made more pleasant to the eye. For finishing we use MDF panels or usual lining. It is better not to use PVC panels, as they are easily deformed and lose their appearance. We fix the crate under the wooden car.

Install the panels from the hinge side. We cut the wall paneling in size, put a thin bar between the panel and the nut, glue the panel on the liquid nails. Then glue the remaining panels, not forgetting to make a hole under the peephole.
The last panel is glued from the side of the lock.
Finishing touches
On the perimeter of the panels we glue decorative strips in order to close the uneven cuts of the panels. Seal the silicone sealant gap between the metal frame of the door and the panel. After the sealant dries, we carry out the final stage - we glue the seal with a foam rubber profile (self-adhesive) (see Sealant for metal doors - draft protection).
In order for the seal to be properly glued, the surface must be well degreased. However, if the seal keeps bad, it can be glued with super glue. MDF and clapboard can be varnished, this will create an imitation of the coating of expensive wood.
We have transformed the entrance doors: sound insulation and heat insulation are ready. The work is over.