Manufacturing of wooden doors: technological process
Wooden doors can be made independently. However, making them is a laborious process that requires a certain skill. This article will briefly describe the manufacturing technology, their types and installation rules.
Door installation rules
So:
- Measurements. Before purchasing the door, take measurements of the opening (see. Size of entrance doors). If there is no floor covering, add to the calculations its planned height.
- Build the box. Check all parts, repeat measurements. Glue the details in the corners. Secure them with screws.
- Zapenivanie. Install the box in the opening. Fix the frame in the corners and in the center with wedges. Install the spacers opposite the wedges. Fill the voids between the box and the wall with foam.
- Installation. Wait for the foam to dry, after 12 hours, remove the dried pieces, remove the wedges and struts. Drill holes for nails, gash the desired length at a 45 degree angle. Fix the platband with finishing nails. Install the door to the hinges.
- Pens. Screw the handle. It is advisable to insert the lock in advance.
Manufacturing is usually done in standard sizes:
- Height 2-2.3 meters.
- Width 0.6-0.9 meters.
- 75 mm pitch.
- Thickness - 35-44 mm.
Openings in the houses of the old layout may differ from the standard.
Door Types
Panel doors
The manufacture of wooden doors, or, more precisely, the trimming or core of the doors, is made from both soft and hard rocks, connecting the door elements with dowels or into a spike. In low-cost models are used only butt connections.
In order to divide the panels, in the middle of obvyaz set intermediaries. Depending on the design, one or several pivots are put.
In the transverse and longitudinal links choose grooves or quarters for the installation of the panels. They can be made of plywood, hard wood or glass. Door hinges, handles and locks are fastened to the side bars of the obvyez.
Panels for frame bindings are made either with shaped notches or flat (see. Production of paneled doors: how it happens). Details are mounted in the slots of the frame, or strengthen the patch plinths.
Flush doors
Frameworks for such doors are made of soft wood, then they are lined with plywood sheets, filling the internal cavities with materials for sound insulation. A placeholder is placed between the cladding panels. The framework consists of a thick timber, and the central part is reinforced with overlays.
Carpentry panel doors
The manufacture of this type is made of planks connected by slats. The doors are assembled into oblique grooves on the keys, mounted across the canvas, fastened into a simple or full tip. The tips are glued.
Tip! If the door is jammed in the wet season, doors may start closing problems. In such a situation, it is possible to plan with a plane the parts of the box and frame that are touching each other. It is not necessary to immediately restore the damaged coating. It is better to do in the warm season.
Device doors and process
В этом разделе мы опишем устройство дверей и расскажем, how do wooden doors.
So, door manufacturing: technology:
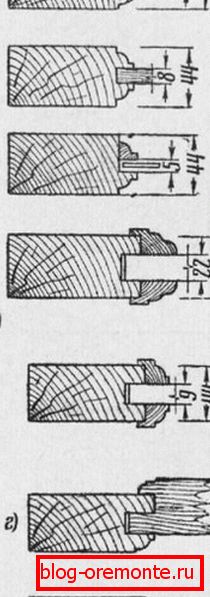
- Blocks: Двери состоят из рамки и полотна. Frame наружных дверей сделана из бруса толщиной до 150 мм. На внутренние двери применяется брус до 50 мм толщиной.
- Frame: Дверь может иметь нижний брусок для улучшения свойств тело- и звукоизоляции. Frame двери выбивается в четверть. Щель под дверью нужна не только для проветривания, но и с целью компенсации будущих провисаний и для застилки полов материалами.
- Block Mounts: In some houses that are not subject to sediment (frame-shield) frame is attached with screws and nails to the racks of the walls. They are in quarters. So they are less visible because they are covered with a door. The recesses are leveled with a putty or plugs.
They are set by level, with the help of wedges. On the vertical bars is at least three nails. In stone buildings, the frame is attached to the mortgage bars. The gap between the wall and the frame close up the cement mortar or tow.
- The casings (see How to install the door trim): Manufacturing technology with an adequate level of security includes trim. They are internal and external trim. The manufacturing process requires that the internal trim should not be less than 200 mm wider than the box bars. The outer side can be relief, or simple. Corners angles create an angle of 45 degrees. First mounted vertical trim. Then a horizontal platband is placed under their upper part, the angle is marked with a pencil on one side, sawn off. Then the operation is repeated with a different angle.
- Pins: These elements protect the doors from spilling during warping.
- Loops: The most frequently encountered are removable hemispherical of two cards (with or without a rod). Also divided into right and left, universal.
Making wood doors: video
Installing the chain, peephole and lock
Peephole installation
How to make we figured out above. Now let's talk about the sidebar lock and fitting installation.
So:
- We drill a hole at eye level under the peephole. Insert the tip into the hole and twist, getting a tight connection.
- Installing the chain and staples is simple. The main thing: the proper attachment to the box and the door.

- We apply to the place where the template lock will be laid, transfer it to the positions of the holes for the screws and the contours of the larva.
- Holes drilled under the larva feather drill. In order not to have wood chips, cut the contours of the holes with a sharp knife.

- After installing the larva we connect it with the outer lining. From the inside, we press the lock to the door. Fix it with screws.
- We put on the frame of the door on the level of the lock mate gate valve. Drill holes for screws.

Lock installation
The technology may or may not include the installation of a lock (see How to insert a lock into a wooden door) at the production stage.
Installation Instructions:
- We impose a lock with an end plate and trace its contours.
- We fasten a wooden block to the canvas (flush). On the router puts grooving cutter. Its diameter is equal to the width of the contour. Adjust the side stop, select the chute under the locking plate.

- Putting the lock to the center of the gutter, we get the size of the nest. Nest make a drill.
- Using a router with a finger mill, align the socket for the box.

- We put the lock on the canvas, mark the position of the shaft of the handle and the larva. Cut through tightly along the contours so that the wood does not have chips. We drill holes and adjust them with files. We put the lock, fasten it with screws. Fix the handle.
- We put forward the lock bolt, mark its tongue latch position. According to the sizes we apply a strebnya, we outline contours. Chisel make a sample for her, drill and process with a chisel holes for the tongue and the bolt. Fasten shrebnya screws.
Hopefully this article has given you answers to questions about how to make.