Installing sliding interior doors - a new approach to
The article presents the classification of sliding doors, their pros and cons. Describes how to install sliding doors.
When there is a question about installing new doors in the house, the majority of people do not hesitate to install their choice on the usual hinged doors. However, there is a good alternative - the installation of sliding interior doors. This will be quite an interesting and original solution in the design of any room.
Sliding door installation
There are two ways to install sliding doors:
- Door leaf when opening hides in the wall.
- The doors move outside the wall.
The first option is preferable, because it allows the most efficient use of space in the room. However, it is quite difficult and expensive to perform.
After all, you need to additionally build a wall that will hide a special pencil case where the doors will be hidden. So you have to do a major overhaul.
Tip: the installation of sliding doors that hide when opening must be done at the stage of construction of a switch.
The second option is much easier to perform and cheaper. And most importantly - the installation of doors can be done without a major overhaul. Simply remove the old door and provide the space needed for the door leaf, where it will move when opened.
To install these doors, you just need to install the top guide along which the door leaf will ride on the roller mechanism. If the canvas is heavy (large or made of solid wood), then additionally install the lower guide.
Required materials and tools
In order to make the installation of sliding interior doors with your own hands you need to prepare all the necessary materials and tools.
The following materials and tools are required for installation work:
- door leaf;
- door frame;
- guides;
- roller mechanism;
- special door handles;
- wooden block 50? 50, which should beat the door twice in length;
- cashiers;
- anchors, screws, screws;
- electric drill;
- screwdrivers;
- carob keys;
- roulette;
- building level.
Preparatory work
Web preparation
Before installation, you need to install handles and a lock on the door leaf (see Installing a lock in an interior door. Then, when the sash hangs in its place, they will be very inconvenient to fix.
Important: for sliding doors, only recessed handles and locks are used, which do not protrude and thus will not interfere with the closing and opening of sliding doors.
When using a heavy door leaf, it must be made 70? 20 mm, which is needed to install the bottom rail.

Preparing the doorway
At this stage, the installation of interior sliding doors, you must carefully measure all dimensions of the doorway:
- In three places we measure the height and in several places the width of the opening. It is also necessary to measure the actual thickness of the walls in several places.
- Next you need to align the walls well. Opening must have clear dimensions, without the peaks and valleys. The protruding parts of the foam concrete, brick, drywall clean up, all cracks and gaps to repair. The smoother will be the wall, the better will be snugly sliding doors
- A box is installed inside the doorway. If the door is hidden inside the wall, then it will be a double box, where a guide will be placed between the two upper parts of the box, along which the leaves will move, and on both horizontal sides of the slot where to enter the canvas when opening.
- If the installation of a sliding interior door is of a type where the leaves do not hide, then a regular door frame is installed in the doorway. Vertical parts of the box are cut to the appropriate dimensions, taking into account the thickness of the horizontal part.
- Further, the horizontal and vertical parts of the box are connected with screws and inserted into the opening.
- With the help of wedges box box is aligned horizontally and vertically. These parameters are checked using the building level and plumb. With the help of screws box is attached to the wall.
- After installation of the box, spacers are placed and the mounting foam is blown into the gap between this box and the wall.
Mount
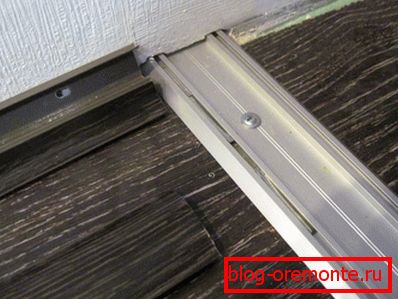
Mount верхней направляющей
After installing the door frame, the door leaf is attached to the opening and the upper position of the door leaf is marked with a pencil. Do the same procedure in the doorway, because sometimes the floor may have a slight slope.

With the help of the level we draw a horizontal line at the highest point. From this line we measure 70 mm upwards and again we draw a line along the level. Along this line we will pass the upper edge of the wooden block, to which the guide will then be attached.
Depending on the material of the wall (brick, foam concrete), self-tapping screws or dowels are used to fasten a wooden bar.
Attach a guide to the lower edge of the beam. We retreat 2 to 3 mm from the wall and with the help of screws fasten the upper guide. The guide must be set strictly on the level. The slightest bias will lead to the fact that the sash will not open.
Installation of the roller mechanism
- The next step is to attach the roller mechanism to the door leaf. We retreat from the edge of the door 2-5 cm and put a mark. On it we put the edge of the roller and with the help of screws fasten the mechanism to the canvas. Do the same procedure on the other end of the door.

Tip: if the door leaf weighs more than 75 kilograms, then you need to use not two, but three roller mechanisms.
- The next stage is height adjustment. To do this, we hang the doors and lower or raise the door leaf by changing the height of the roller relative to the doors. Expose the desired height - from the bottom edge of the door to the floor should be 5 - 10 mm
- Check the operation of the roller mechanism. To do this, you need to open and close the door several times. When properly executed, the door will move freely along the guide. Turn the corkscrew nuts.
Tip: No need to save on the roller mechanism. It is better to buy once a mechanism that is enough for many years than to change it once a year or two.
- Next, the brakes for the roller mechanism are inserted into the rail. They are designed to stop the rollers in the extreme position of opening or closing doors.
Install the bottom rail
When installing light door panels on the floor is set a simple guide. Immediately after this guide, the lower brake is installed, intended for braking the doors in its extreme position.
In some models, sliding doors interior installation provides for the use of a full bottom guide.
In this case, it is necessary to make a groove in the lower part of the web. The standard size of such a groove is 70? 20 mm. Next to the floor is attached a special decorative threshold, in which there is a lower guide. Inside the guide there is a small protrusion that fits into the groove made in the canvas and does not allow the door to open when it is closed and closed.
To install the lower rail, it is necessary to move the door away from the rear door, insert a decorative gate from the rail into the groove and carefully release the door leaf.
Next, you need to set the bottom guide if, a few times to ride on it with the door leaf. If it is necessary, it is necessary to adjust the height of the doors by adjusting the rollers fixed in the upper part of the canvas. When the doors move normally, it is necessary to attach a decorative flag to the floor using dowels.
Installation of decorative cash cops
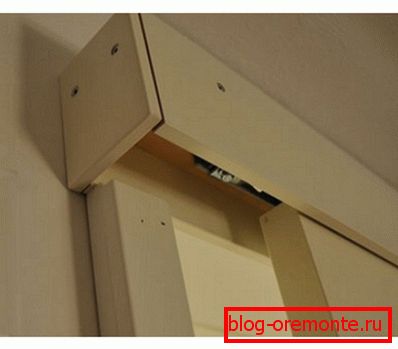
After the installation of the sliding interior door is completed, it is necessary to install a decorative caster in order to hide the upper guide (see Installing the trim).
You can also make a small box of drywall, on top of which then pokleit wallpaper. In order to more clearly see how the installation of interior sliding doors is done with your own hands - the video will give you an accurate idea of all the stages of this process.
Useful tips
- Simple sliding doors cannot be delivered to one person.. One assistant is a must.
- If you do not have the necessary experience - it is better to entrust the installation to professionals.which will make this work much faster, well, and, most importantly, qualitatively.