Installing a door closer do it yourself
Most recently, a door closer installed on the door could only be seen in administrative institutions and very respectable establishments. Today this will not surprise anyone, and such a mechanism is perceived by many as something everyday - something that you can install with your own hands, and therefore, be used in the house.
What is this device, what are the options for sale, and how to install a door closer? We will try to answer these questions in as much detail as possible, and as a visual aid we suggest watching the video in this article.
Varieties of closers
The principle of operation of the first closer, developed at the end of the 9th century by the American Blount, was based on a piston crank mechanism, and was mounted only in the upper part of the door arbor.
- This mechanism, although somewhat outdated, is still produced by most manufacturers. The reason for this is its simplicity, reliability in operation, and, of course, reasonable price. Naturally, for more than a century of history of door closers, there were engineers who created devices with completely different principles of operation.
- For example, these are mechanisms with a camshaft and a sliding rod; with gear drive; with electromagnetic and hydraulic elements. Thanks to new ideas, the installation of the door closer can now be made not only along the upper contour of the canvas.
Modern devices for closing doors, can be built into the floor or frame, and in general, be mounted in any possible position. Accordingly, the installation options for door closers depend on their design features, which we will dwell on in more detail.
Models for top mounting
In order for a swing or pendulum door to open, a certain effort must be transferred to its canvas — a person pushes it forward, or pulls it towards itself. When the door closer is installed on the door, it takes up the effort. Impact force is accumulated by a compressing spring, which is located in the internal cavity of the device.
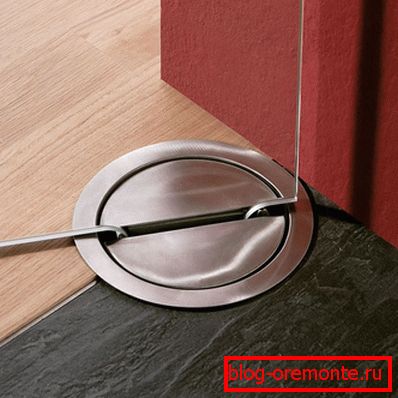
- Unclenched, it returns the canvas to its original position - that is, it regulates the closing of the door. Despite the fact that there is a certain variety of options, the installation of door closers in the vast majority is carried out from above. The exception, perhaps, is made of glass pendulum doors, where closing mechanisms are usually built into the floor.
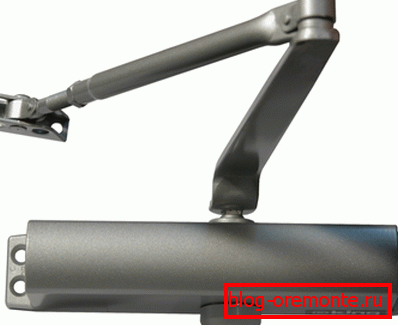
- The mechanism of the closer that you see in the photo is based on a drive consisting of a gear piston and a gear that moves it. Such models are quite simple and affordable. When the door is opened, the lever connecting the web with the door closer moves in an arc. He is not just screwed to the body - his shoulder is connected to the gear, the axis of which coincides with the axis of the device.
- Rotating gear gear teeth with a piston, which transmits the force through the spring to the lever connected to the door leaf. For a long time no one had any complaints about such devices. But over time, it turned out that this option is not the best for the force process.
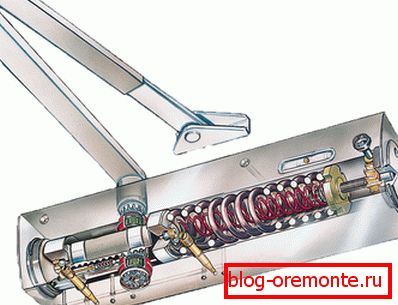
- It happened with the advent of mechanisms with a cam drive and a sliding rod. Today, such a technical solution can be considered the most optimal. Installation of the door closer of cam type, can be made both in floor option, and from above. The main structural difference of such devices is the cam, which is located between two pistons: opening and braking.
- Between themselves, they mate through the rollers. When the door is opened, the opening piston rotates and the cam squeezes the spring evenly. When it begins to straighten, the opening piston becomes its starting position, and the brake one holds the door, preventing it from slamming shut.
Compared with cam door closers, mechanisms with a hydraulic piston and a gear drive seem to be outdated, since they have no proper control over the door curtain or the ability to regulate it. Too much height can not be attributed to the number of their merits.
Other types of closers
It is clear that the installation technology of closers depends on their constructive variety. Only not every option can be so easily mounted by yourself, as is the case with devices of the upper installation.
So:
- When it comes to, for example, floor closers, the question of their choice is decided only at the design stage of the room - or its major overhaul, when the doors are also dismantled (see Removing interior doors: how to do it right) and floor covering. And in general: it’s not even a question of how to install a door closer to the floor on your own. Usually, this is done by specialists of the company that sold you the door.

- All floor closers work on this principle. The bottom support of a door is at the same time an axis of the closer. When opening the door leaf, it acts on the roller inside the device, setting it in motion. The roller is located between the strips connected to the hydraulic piston, on the rod of which the spring is mounted. The following scenario is known: the spring is unclenched - the door closes.
- The synchronism of such a device is ensured by means of a power closure roller. Since there is no lever in the floor closer, it has a much more powerful torque. On pendulum doors, such a device can be installed not necessarily near the wall, but also in the center of the opening. In this case, you can get through the door from two sides - but not all models of closers are suitable for this.
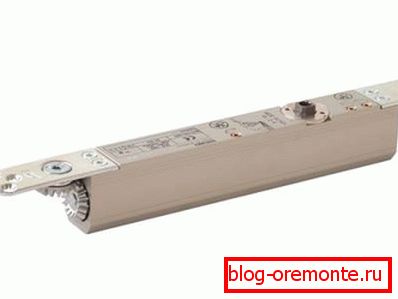
Devices designed for installation in the door frame, work on the same principle as the floor, but they still have a small structural difference. It is the same notorious lever, which is absent in the floor version of the closer.
How to choose and install a closer
The current standard states that the closers need to be selected according to the dimensions and weight of the door leaves (see the parameters of interior doors - what you need to know about them), since it is by these characteristics that they are classified. In total there are seven classes for doors with a width of 750 mm or less (class 1), to canvases with a width of 1600 mm (class 7).
- At the same time, the weight of the canvas should not exceed 160 kg - two closer can be installed on a heavier door, which will evenly distribute the load. In the case when the door height exceeds 2.5m, and it is installed in a place where there are drafts, manufacturers recommend selecting a closer one or two classes higher.
- To which class this or that model belongs, you can learn from the product passport. By the way, its presence is a mandatory requirement of GOST to the completeness of the device. Installation instructions must also be attached to the door closer. All documentation must be printed in the language of the country of the consumer - pay attention to this when purchasing.

When installing the device type overhead, you need to focus on the direction of opening the canvas. If the door is opened inside the room, then the door closer is placed at the top of the canvas, from the hinge side.
When opening in the direction of exit from the room (from oneself), the body of the device is attached to the box, and the lever is attached to the door leaf. The operating principle of the closer, the installation technology does not affect.
The nuances of editing
Let's take a closer look at the installation technology of the closer, and we will keep in mind the invoice option. The device, as a rule, is located in a cardboard box, disassembled: case, lever arm, all necessary fasteners and mounting template.
- To do the work you will need: a screwdriver, a screwdriver, a 3 mm drill bit, a cap wrench 10 mm, and a tape measure. If the closer is mounted on a street door, then in any case, it is better to place it indoors. If there are door hinges in the same place, the body of the closer is fastened to the sash, and the lever on the frame.
- The mounting scheme in the kit is performed by the manufacturer in real 1: 1 scale. It shows exactly how to position the device. The red line on the template represents the line of the porch: below it is a canvas, above it is a frame. If the installation will not be done from the side of the canvas where the hinges are located, the template just needs to be turned over so that the closer's body is on the canvas and the traction is on the frame.
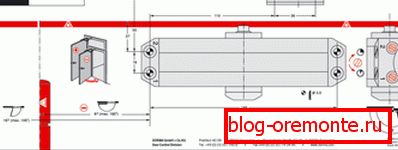
Note! Having attached the scheme to the door, at the installation site of the closer, you will have to mark it with an awl through the paper and then drill holes for the fastener. It should be borne in mind that for coders of class 2 and above, the marking is made by black marks. In total you need to outline six holes: 4 for the body and 2 for the lever.
- Most often, complete with the device are two sets of fasteners: one for metal, and the other for PVC and wooden doors. The correct mounting option is also reflected in the scheme. First, the supporting part of the lever is installed, then the body of the closer, and then the thrust is attached to it with a bolt. To tighten this bolt, you will need a spanner key.
Finally, you need to decide whether to adjust the final closing speed of the door. For this, there are special valves on the closer. Information about the functions of each of them, you can learn from the passport of the product. After adjustment, it remains to install the instrument cover and fix it with a cap.