Installation of sliding doors with their own hands
Not all modern housing is new, and there is not enough free space everywhere. Simple installation of sliding interior doors will help to get out of this situation.
Saving space - an important issue in the design of interiors in the repair or redevelopment of an apartment or house. At the same time there is no need to order the installation of structures in the repair company, you can perform all the necessary work yourself.
Choose one of two options: sliding-folding or parallel-sliding doors, and follow a specific technological plan, and you will succeed without the use of sophisticated tools and special skills.Necessary consumables, fasteners, tools
To perform the work quickly and from the first quality you need to prepare:
Hardware and materials
- Liquid nails or silicone glue with similar characteristics;
- Bars or wedges of wood for spacers;
- Screws for wood of different sizes (5? 25, 5? 45, 5? 80 and 5? 110 mm);
- Plastic dowels;
- 40 mm nails;
- Carnations for finishing attachment.
Please note that the number of consumables varies depending on the design.
Required tools:
- Electric drill with a shock function or a small hammer drill;
- Hacksaw for woodworking;
- Hacksaw for metal work;
- Construction level with the length of the working surface of 1.8 m;
- Screwdriver or screwdriver;
- Wrench for adjusting and tightening the bolts;
- Hex key, which is usually wrapped conformata;
- Hammer and mallet with rubber worker brisk.
System installation, door installation
What kind of sliding design you will choose for your apartment (see Which interior doors are best for you) depends on your preferences. They fit well into any room with any interior and can decorate and transform it.
In some ways, the installation of such systems is somewhat simpler than the installation of sliding doors in the hinged version, so you can easily cope with all the work yourself. True, some variants of similar structures, having, for example, a mass of 100 or more kilograms, as well as work with creating a niche in the wall or installing glass doors, are more work for professionals.
And with the “coupe” option, everything is much simpler (see Installing the interior doors of the coupe). Choose sliding doors with or without a threshold, as well as with lower guide rollers - and proceed to work according to our recommendations.
Installation of a sliding door in the finished version, and not a complete set of products for parts or for individual elements of accessories, will be much easier, and the work is very different. Indeed, in the first case, the design will be completely assembled at the factory or in the workshop by the manufacturer.
So, start with the selection of the finished system. Further work is distributed as follows.
Top part
the upper part is fixed as follows:
- Door leaf (s) are placed next to the overlapping opening, directly against the wall. In this case, it is necessary to make a marking, having drawn a horizontal line on the wall along the top of the canvases using a pencil or a marker.

- It is worth making sure that the line is strictly horizontal, which is marked on the top of the canvases in both cases.. Further, the distance of 70 mm is measured from it and one more horizontal is drawn. The upper guide rail will be fastened here. Sliding doors mounting on hastily made markings do not accept, there will be distortions and disturbances during operation.
- To the resulting line above the top of the door leaf is attached a bar of 50 × 50 mm and is attached directly to the base on the screws. The length of the timber should be 2 times the width of the opening. The timber is pressed as tightly as possible to the base of the wall; if the base is not aligned, you need to use more screws to fasten. The horizontal fixing is checked by the building level.
- The guide rail is attached to the end of the fixed beam from the bottom. Для этого сначала определяется местонахождение крепежного отверстия по обеим сторонам направляющей лыжи: толщина створки двери делится на два, добавляется нужное расстояние от стены (до 3–5 мм) и отмечается точка крепления.Потом направляющая фиксируется саморезом. Та же операция проделывается с противоположной стороны рельса. Крепить необходимо неплотно, чтобы перед окончательной фиксацией «намертво» еще раз проверить зазор между стеной и створкой двери.Расстояние должно обеспечивать беспрепятственный, свободный ход створки, иначе sliding door installation придется несколько раз повторять. Очень важно соблюсти условие, чтобы направляющая была идеально прямо расположена независимо от того, какие неровности имеются на стане.После всех замеров и проверок направляющая фиксируется окончательно.

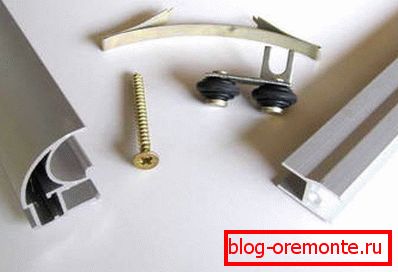
- After these actions, carriages are collected and tested. Bolts are screwed into rollers and carriages so that their caps slightly come out of the central hole of the carriage. All the carriages assembled in this way are driven into the guide, after which smoothness and freedom of movement in the forward direction is checked. It is not recommended to lubricate the guide. After that, from the edges of the guides are installed special limiters with rubber shock absorbers.
Lower groove
The lower groove is made as follows:
- The next stage of installation of the sliding system will be operations with the door leaf, with its lower groove. 15 mm retracts at the edges of the sash, in the middle of the end part, two holes are drilled on both sides with a diameter of 7 mm and a depth of 20 mm. Between them in the center of the end part (strictly!) A slot is cut for the bottom rail. with a depth of 18 mm. Its width should be larger than the lower rail about 2 mm. To cut a groove, you can use a parquet saw, drill or router. At home, such a groove is quite difficult to do, so you can apply a U-shaped profile or two slats.

- This is followed by mounting the mount on the carriagewhich are located on the door leaf. They are attached, retreating 2 mm to the side of the end of the sash, in the center of the canvas. They are mounted so that the cuts in the semicircle bracket, designed to attract nuts to the carriages, are turned towards the wall.
- Hanging door leaf. Consider that it will be difficult to do this work alone, you need to invite an assistant. The canvas is placed in the guide, the bolt on the right or left carriage is combined with the corresponding cutout on the bracket, the door is slightly lifted. brackets, and the bolt is inserted into the hole for fasteners. The brackets on the carriages are not tightened to the end. There is a lot of information and practical lessons about this online video tutorial.
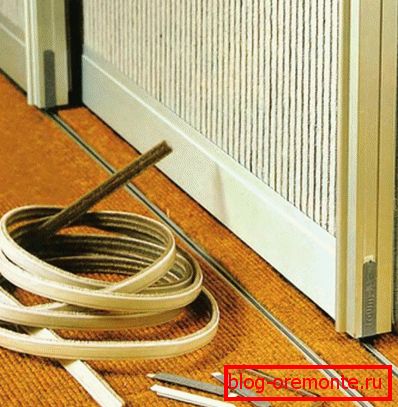
- The bottom edge of the doorframe is retracted from the wall., the lower guide rail is inserted into the finished slot, after which the door returns to its original horizontal position. The guide knife must be moved to the open position, as if the flap were open. The largest reach of the knife is marked directly on the floor, after which the necessary clearance is adjusted from the web to the wall (its size should not be more than 5 mm). After that, the web is removed from the top guide to secure the bottom.
- The groove in the bottom of the canvas is aligned with the rail, the door leaf is hung again. Between the sash and the floor, the gap is adjusted by tightening or loosening the adjusting bolts on the carriages. The optimal gap is 5 to 7 mm. Then the nuts are fixed tightly, while it is better to use two keys.
Pay attention to the horizontal position of the lower guide rail, even if the base is uneven. The distortion of the door during installation of the sliding system is fraught with its rapid failure.
Final stage

The final stage of all works will be the installation of decorative elements: trim, plinth and the like:
- The platbands are mounted on top of the upper rail, observing the interval from their lower edge to the upper end of the door leaf 5–10 mm. It is advisable to install folding ribs to ensure ease of user access to the carriages when necessary to adjust or dismantle the system.
- Usually, the plinth and platband are painted or matched in the finished version under the general color background, the color of the wall in the room or pasted over with a film or wallpaper.
- The final touch, the final composition - hanging handles (see. Handles for interior doors - how to choose the best) on the door leaf. Installation of sliding doors on this finished.