Installation of interior sliding doors - we do it ourselves
Today, one of the most popular decorating techniques has been the use of sliding doors in the interior. About how to make their own installation, and will be discussed in this article.
Sliding doors have become very popular in recent years, they are installed even where there is no need to save space. People are attracted by their functionality and ability to give an interior an elegant look and mobility. Therefore, today the installation of sliding doors for interior doors is a rather demanded service.
However, this work does not require any special knowledge, skills of using a construction tool or physical strength. You can install it yourself.
- 1 Types of sliding doors
- 2 What you need to provide for the device sliding doors
- 2.1 Preparation for installation
- 2.2 Installation instructions
Types of sliding doors
It may consist of one web, if you want to arrange a standard opening. For wide openings and the device of interior partitions are used multi-folding doors.
Moreover, both the sash and the middle ones can be movable, while the side flaps can be fixed in a fixed position. The choice of materials for manufacturing impresses with its diversity.
The most popular of them are:
- Solid wood
- Laminated MDF
- Laminated chipboard
- Strained glass
- The combination of these materials.
In addition, the surface of the canvas can be decorated with photo printing, carving, inlay, mirrors and other ways that allows you to translate into reality any design projects (see Interior door design).

Thus, to carry out the installation, you first need to choose the style and determine the dimensions (see Dimensions of interior doors: width, thickness, height) and design. And also decide whether the flaps will move along the existing walls or inside them, in a specially arranged niche.
The latter option is more practical and functional, but it requires a lot of labor costs for making false walls and installing a metal cassette in a niche.
What you need to provide for the device sliding doors
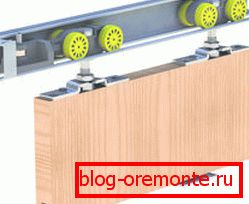
If you purchase the door itself separately from the sliding mechanism, be sure to consider the total weight of the door leaves. Based on this, the required minimum number of rollers is calculated - the main structural elements that bear the weight of the door and allow it to move easily.
On the canvas weighing 30-35 kg it is enough to install two rollers, and they will easily cope with their task. For heavier rollers, increase the number of rollers.
If you plan sliding interior doors - installation into a plasterboard partition - then at the stage of opening the device in the partition, lay a strong wooden timber over it, to which the guide will subsequently be attached.
Note! Direct installation should be done after all the rough work has been completed and the floor has been laid. In the case of false walls, a metal guide is installed in it before the plasterboard cladding.
Preparation for installation
Before buying a door, you need to decide on its size. To do this, measure the opening in length and width with the help of a tape measure and add 5-6 cm to the obtained values. If you cannot buy ready-made cloths of a given size, you can make them to order or cut them in a specialized workshop.
Attention! When the doors are not installed in the opening, but as a sliding partition in the room, the height of the canvas is calculated based on the height of the ceilings minus the thickness of the supporting beam and the sliding structure.
If sliding elements are purchased separately from the canvas, use the help of a specialist in their selection, since it is quite difficult to determine the required number of rollers by yourself.

You will need:
- Rail guide, the length of which should be equal to twice the width of the opening (or slightly more).
- Rollers with carriages.
- Stoppers (rubber shock absorbers) or plugs inserted into the ends of the guide.
- Anchor bolts for fastening to the wall of the carrier beam.
- Screws.
- Fittings - pens, locks.
All this can be purchased in a set or separately - in the construction markets and in large stores. In the same place, buy everything you need for the decorative finish of the opening: racks for the box, trim (see Installing the trim of interior doors: quickly and simply), dobora, finishing nails.
In addition, you will need a durable square timber 50x50 mm, the length of which is equal to the length of the metal rail guide.
And also a set of construction tools:
- Building level and plumb
- Roulette
- Screwdriver or drill
- Chisel (if there is a milling machine, a chisel is not needed)
It remains to verify the vertical position of the slopes of the opening, in order to begin the installation - interior sliding doors are ready for installation.
Installation instructions
Installation of sliding interior doors: video
Приобретая комплект раздвижных дверей, вы обязательно найдете в нем подробную пошаговую инструкцию с рисунками и описанием. Наша инструкция может понадобиться вам в случае раздельной покупки всех элементов конструкции. Изучите её, прежде чем приступать к работе, а если что-то окажется непонятным, про installation of sliding interior doors видео расскажет более подробно и доступно.
Since the design of sliding mechanisms differs from different manufacturers only by the type of roller elements and the profile of the guides, and the principle of operation is the same, it is possible to describe all the installation steps without any problems.

So:
- Measure the height of the canvas and lay it on the wall above the opening. From the marked point, move 7 centimeters up and draw a horizontal line using a long building level.
- Attach the bottom 50x50 mm to the drawn line with the bottom edge and screw it to the wall with anchor bolts, strictly observing its horizontal position. The beam must be positioned so that one of its ends is above the slope of the opening, to which the closed door will adjoin.
- Drill several mounting holes in the metal guide, the distance between which should be no more than 15-20 cm, and attach it to the lower end of the beam at a distance of 5-7 mm from the wall. This gap is necessary for free movement along the wall.
- Assemble the rollers by connecting them to the carriages, put them in the guide and make sure that they are free and silent. Close the ends of the plugs, which will serve as stoppers for rollers.
- At the upper end, install the brackets at regular intervals, the number of which should be equal to the number of carriages.
- Hang the canvas by connecting the carriages to the brackets to make sure that it moves effortlessly along the guide and does not touch the walls. Then move it to the extreme open position and mark on the floor the attachment point of the lower guide element, which may be in the form of a knife, a flag or a roller.
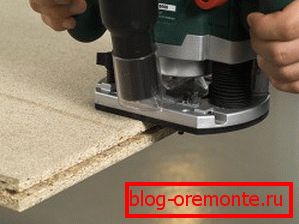
- Remove the canvas and use the router to make a full-length slot in its bottom end. The width and depth of the groove depends on the thickness and height of the lower leash - they should be a little more for free running.

In the absence of a milling machine, you can use a chisel, but it is very difficult to make an even, correct deepening with its help. Therefore, it is better to fix a decorative U-shaped profile on the lower end of the door or attach thin strips along its outer and inner edge.
- Secure the plumb line to the top rail to determine the exact position of the lower leash on the floor, after careful measurements, fasten it with screws to the floor with self-tapping screws.
- To install interior sliding doors - installation of which comes to the final stage - put them in a vertical position and put the groove on the lower leash. Only then re-fasten the canvas on the rollers. At this stage it is important to give the door a strictly vertical position in all planes. Do this by tightening and releasing the carriage adjustment bolts and constantly checking the position of the door by level.
- Install a handle, latch or lock (see Lock insert in the interior door).
We can say that you have completely completed the installation - sliding interior doors fell into place. It remains to close the carrying bar with a decorative box and you can stop there.
If you want to give the whole structure a more complete look, make a box to which the door will adjoin in the extreme open and closed position. Fix one rack to the wall close to the opening, and determine the location of the other by moving the door to the maximum open position. Together with the upper beam side racks should form a large letter P.
Install the frames along the perimeter of the construction, gluing them to the foam, liquid nails or nailing finishing nails. If after reading this manual, you still have questions on how to install the sliding doors - the video above will help you with this.