Installation of interior door trim: quick and easy
In this article you will find step by step instructions for installing interior door trim. You will also learn what they are and the rules for their installation.
Installation of platbands – это конечный этап установки всех видов дверей. Окончательный вид двери и всего помещения будет во многом зависеть именно от того, как будут установлены наличники.
The casing is designed to give the door frame a unique look and improve the overall interior design.
Please note that the adjacent surfaces of the room must be smooth and smooth on all sides of the doorway. Be sure to consider these requirements so that after installation no gaps appear. For a start, let's look at what they are.
Types of platbands
In form
For interior doors produced in three forms:
- Flat - they can be called "classics of the genre." Externally, they are neutral, have a simple look, but at the same time they look beautiful. Many prefer them.
- Rounded - similar to flat ones, but only their frontal part is rounded. This makes the casing unusual.
- Figured - the most elegant. Such a species may have a diverse form. It all depends on the desires of the customer. It will make the interior more attractive and unusual.
According to the material
Made of different materials.
We can distinguish the following:
- Wooden - made with the help of profile milling strips or cutting various patterns from solid wood. Most often for the manufacture of platbands use wood, spliced along the length. It is free from defects, unlike solid wood. Beautifully and semi-circular wooden. They are made from solid wood of the best quality. Carved trim decorate carvings.
- Plastic - made from polyurethane or polyvinyl chloride (extruded PVC).
- Metal - made from steel or aluminum.
- From composite materials - made of plywood or laminated MDF.
By way of installation
According to the method of installation, the frames are of two types:
- Overhead. Attach directly to the doorway.
- Telescopic. There is a small ledge ("wings" or "nose"), which is inserted into the longitudinal slots of the door frame.
It is worth choosing interior doors with telescopic platbands if the door frame has insignificant deviations from the vertical level along the wall surface. Such a platband will help mask these irregularities. To install the telescopic casing apply liquid nails.
Installation of platbands
Fasten them when the room is already stuck wallpaper or painted walls, and also installed interior doors without trim. If you install, and then glue the wallpaper, the junction can be very noticeable.
And it is very difficult to paint beautifully the walls near the installed platbands. If the walls need to be finished with ceramic tiles or plastic panels, then it is necessary to install them only after finishing the walls.
So:
- First you need to determine the length of the casing. This can be done based on the data in the table.

To correctly gash, you must first gauge the width of the casing. Then the same distance should be noted from the top.
Tip: on the casing, it is necessary to leave a margin for the height of the casing width.
The same must be done with the second. Be careful: you don’t need a copy of the first; on the second you also need to carefully measure the distance, as it may differ from the first.
- Then it is necessary to file down two measured side platbands. To do this, you will need a hacksaw or saw and miter box (carpenter tools in the form of a tray, designed for cutting boards at an angle). It is necessary to cut at an angle of 45 degrees. You can also gash jigsaw, but before that you need to draw a cutting line.

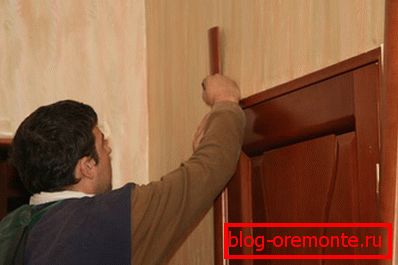
- Now two side platbands are ready for installation. Everyone should be nailed not closely to two nails - in the middle and below. By the way, you need to start installing from the side of opening the doors on you. The top must be left unattached.
- Now it is necessary to measure out and gash the third upper. For convenience, it is better to stand on a chair or stepladder. The top is applied to the side, slipping it under them. The bottom of the top should dock with the edges of the side. Do markup and gash in the same way as the first two.
- After that, it is necessary to remove the side and drill in the canvas of the three platbands and the door leaf recesses no more than 1.5 mm in diameter under the nail. Side nail on 5-6 nails, and the top - a couple of nails. In this way you installed on one side of the door.
Tip: if you mount on the screws, then you need to drill a hole for mounting, and then with a drill 8 or 6 to make a shallow hole in the cashing in, where to sink the cap of the screw. Screw the screws and close the holes with special covers. If the wall is flat, then you can mount on liquid nails.
- Then you need to fill the gap assembly foam between the wall and the box on the other side.
Please note that if you immediately fill the gap, when there are still interior doors without trim on both sides, almost all the foam will come out.
Close the door on the side where there are no platbands. Wedges are inserted into the slots between the box (see Interior doors with the box) and the door, the slots are sprinkled with water and filled with polyurethane foam in half the volume.
Через 3-4 часа можно снимать клинышки. Они нужны для того, чтобы interior doors without trim не перекосило. Через сутки можно обрезать пену и устанавливать наличники с другой стороны двери.
If the box is twisted a little, you can adjust it with the help of the screws that hold it. You can also cut a layer of foam along with a knife several times.