Installation dobor on the door for the beauty of the opening
Choosing interior doors, we want, in addition to practicality, they must also have a beautiful aesthetic appearance. Successfully selected elements and correctly performed installation of doors on the door will make the room more attractive and comfortable. The article considers the types of products, their features and methods of installation.
The need for additional staff

Door openings are designed to create beautiful door portals that will look better and richer. Dobora box when installing the door is required if there is a gap between the wall and the door frame.
In addition, structures are necessary for:
- Closing irregularities.
- Disguise slopes.
- Reinforce the entire doorway design.
- Preventing distortion of the door frame.

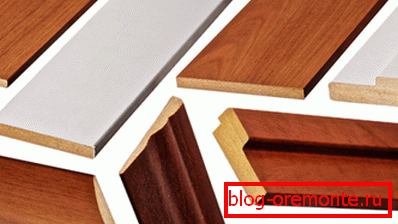
Types of products
Door openings are additional strips covering the wall in the opening, “adding” its thickness, which is not enough for the width of the box.

The main types of dobor are presented in the table:
| View dobor | Special features |
 | This is a strip of laminate or MDF, which has no facing edge. In this case, the installation of doors with dobor do-it-yourself must be done with the utmost care. A deviation of even two millimeters will open up the gray raw edge of the part. |
 | The butt end of the part is pre-closed, trimmed to its tone, with edgeband, which will make small blemishes invisible. The price of the edge is very small, it is glued quickly with the help of a conventional iron. This method protects MDF-plates from swelling under the influence of moisture, which is especially important for door blocks installed in bathrooms and kitchens. |
 | This is the most complicated construction of dobor. Its peculiarity is the presence of special grooves that allow installation without the use of screws and nails. In this case, the door dove perfectly with the box and door trim. The width of the element is governed by the depth of the groove. |
 | The peculiarity of the combined construction is the finishing + casing. In appearance, the product is a decorative corner with grooves of great depth. Doors with fittings of this type are installed only when facing by a small amount, up to 45 mm. |
The advantages of installing dobori are:
- High speed finishing the doorway.
- The room can quickly become aesthetically complete.
- The absence of moisture on wood and MDF, protects the structure from deformation, detachment of the outer layer of the finishing coating.
- The slats hide the joints of the wall with the box.
- When moving the sash, vibration on the duct leads to cracks on the plaster or wallpaper. Dobora mask this site, as in the photo.

Materials for dobor
In the manufacture of elements, most often used:
- Tree. This is an environmentally friendly material, but its disadvantage - may deteriorate due to adverse conditions arising during operation, which requires additional processing.

- Plastic. But for arranging the dobies, the usual cheap material will not work, it is necessary to choose high-strength plastic, better reinforced with metal.

- MDF. Due to the low mechanical strength and instability to moisture, such materials are used most often for arranging interior openings. Cracking of the planks is possible during installation, for example, when nailing. Therefore, you must first drill a mounting hole to install the fastener.
- DSP. It has a lower quality, but can be used to finish the inner door in the house, has a low cost.

Calculation of the number of elements
Before you count the door accessorie, you should get acquainted with their sizes, which correspond to the standards of door production.

Domestic manufacturers, for mass production, make doors of different widths, 2 meters in height, and European kits have a height of 2.1 meters. The platbands, respectively, have the same length.
At the same time, the width of the door pans can vary from 50 to 550 mm, and the thickness is selected according to the thickness of the groove present at the end of the main box. Quality finishing of MDF, solid wood, laminate, usually have a thickness of 10 mm.
Tip: If the width of the additional slot does not fit the required dimensions, when installing the door frame, it should be increased by milling.
Many private houses, built without compliance with standards and norms of construction work, have doorways that are very wide and high, which does not allow to pick up the box for the entire width and height.

Next, we consider the question of how to calculate an additional door, so that it does not have to be bought during the work.
For this:
- Determined by the presence in the door frame groove. When installing, the door goes inside, which will reduce its size.
- Set the tape measure to the extreme point of the door frame.
- The mark is the edge of the wall. Dimensions are checked in at least three places: left, top and right of the opening.
- The basis is taken the largest value.
Tip: In the presence of an old door, measurements should be made of the entire pier, with the existing box. Choosing the size of the door, from the resulting value you need to subtract the width of the new frame.
For example, for a pier wall 250 mm wide, and a door frame 75 mm wide, the installation must be set to a width of 175 mm. Standard fixing strip is suitable for a width of 200 mm. And when you install, you can cut off the excess.
With a very large width of the wall, it is better to use type-padded doors with a special docking lock to connect the elements.
Tip: It is necessary to choose the dimensions of door liners in accordance with the dimensions of the doorway, taking into account the color scheme and the texture of the door.
To better understand how to perform doorway measurements, it’s best to watch the video in this article.
Door opening technology

Installation of the door without the box, includes the following stages of work:
- Preparing the opening. Verify the verticality of the walls, doorways, measured in height and width. At the same time between the wall and the box, for the installation of doors there should be a gap of 10-15 mm.
- Assembly block for the door. On the canvas of the door, with the help of a square and a knife, departing from the top and bottom of 200 mm, the location of the hinges is marked. Then, with a chisel, the groove of the desired depth is selected under the loop. A door hinge is applied, and the holes for the screws are drilled.
- Build the box.
Tip: In the manufacture and storage of wooden racks boxes can be deformed. In this case, on the hinge side of the block, you should choose the most straight rack.
Then:
- Cut off at an angle of 45 ° top edges of the racks.
- At the loop stand, the location of the upper element is marked, departing from the cut 200 + 3 mm.
- The rack is led to the door, and the location of the bottom hinge is placed along the cut grooves.
- Grooves are cut in the box.
- At an angle of 45 ° cut the ends of the crossbar. At the same time between the vertical posts should get a size of 5 mm larger than the width of the canvas.
- From the door leaf to the floor there should be a gap of 10 mm.
- The box marks the installation of the hinge bottom.
- Loopback stand is trimmed, and through it - locking.
- The parts of the box are assembled into screws.
- Mounting unit. To mount it, wood screws are used: 4x50 mm or 4x75 mm. Further, the door is installed in the following sequence:
- In the vertical racks are drilled with a diameter of 4 mm in three holes. Two of the three holes are made in looping grooves to mask the screws, fixing the loop - the third is placed from the floor at a height of 1 meter.
- The holes in the lock rack are drilled. In this case, the average is placed under the strike plate of the castle.
- Holes are countersunk for drowning screws and installing a plug.
- The door frame is inserted into the opening, the loop stand is vertically aligned, and is fastened with screws.
- The door leaf is attached and fixed.
- The rack with a gap to a door to 4 mm fastens.
- Wooden spacers are installed between the posts and the wall on each side, 4-5 pieces.
- The gap is filled with foam.
Tip: To avoid getting foam on the details of the block, you need to use masking tape.
- Installed trim. To fix them, glue or nails are used.
- Crashes the lock.
At this point, installation of the door without the box is considered complete.
Installation dobor

Special installation instructions doborov doors, allows you to properly and accurately arrange the opening.
For this:
- Measurements are very accurately performed in accordance with the selected scheme.
Tip: For the right and left elements, vertical measurements should be performed separately. The inner line of the vertical bar should be measured along the box, the outer one - on the existing opening.
- The board acquired for the construction of the dobor is cut according to the measurements taken and the chosen scheme.
- To the assembled door frame, which can be installed or not, all additional parts are mounted.
- Mounting wedges are located between the surface of the wall and the door base extended by additional elements to align the structure in the opening.

- Spacing wedges are installed between the box bars and between the dobor.
- With at least two methods, all space is filled with foam.

- While the foam hardens, the assembly process is monitored. If necessary, adjustments are made.
- Installed trim.

- So you can expand and interior door blocks, and blocks of entrance doors. The difference is only in the width of the slats. At the front door, the width of the standard additional elements is usually not enough.
- They are assembled from several slats, which are interconnected by a splined joint or special adapters. When placing a hinge stand near a blank wall, the box can be expanded in both directions.
- If there is no wall, limiting the course of the canvas, and the door can open for 180 ?, the box is mounted flush with the outer plane of the opening. In this case, the holes are located on the side opposite to the opening / closing.
Who is interested in how to install the door with dobor, the video on the video will show the whole process in detail, with all the nuances, possible errors made during operation, and ways to eliminate them.