How to update the door: original ideas
How to update the old door is thought by many owners, because replacing the doors, even the interior ones, even the entrance ones, is not easy. When replacing the box, it is impossible not to damage the finish of the opening and preserve the integrity of the slopes.
And the price of a new door, even unpretentious, is not within everyone’s means. In this case, there is only one way out - updating the unpresentable old door: decor, original restoration.
And believe me, with the right approach, your “new old” door can become, as in the photo, the main decoration of the facade or serve as an accenting element for the interior. How to update the old door with their own hands, we consider today in detail.
Restoration of wooden linen
How to update interior doors inside, because in most cases they are made of wood or its derivatives, and for the decoration of wood there are, they say, a thousand and one ways. In principle, this is a simple job, and the video “Decor of old doors” will help to cope with it.
In our article you will also find a lot of useful information on this topic:
- What is the point to decorate the surface, which has potholes and scratches? In addition, the door leaf can be painted so many times that a thick layer of paint not only spoils the appearance, but also prevents it from closing normally.
- Most of the doors in houses built 50-60 years ago, made of solid wood. But why throw such a door into a landfill when it can be restored! So, the decoration of old doors begins with their reduction in the proper form. The method of restoration should be chosen in accordance with their initial state.

- Making a new door with your own hands is quite possible. To do this, you will need to purchase furniture wax in the store, solvent, clear varnish and a retouching pencil. Soldering iron and sandpaper, we think, there are in every home. You may also need a grinding machine and a blowtorch - it all depends on the area of paintwork that you have to shoot.
Note! If there is a thick layer of oil paint on the canvas, the solvent will not help here, and you will not be able to remove it with sandpaper. That's when the blowtorch is needed: with it, the paint surface heats up to swell, and then it is simply brushed off with a spatula.
- The main thing is to heat the paint evenly, without delaying the flame for a long time in one area. Doors, of course, must first be removed from the hinges, and having installed on convenient supports, dismantle the glass elements, if any. You also need to remove the locks and all accessories.

The decor of the old door with your own hands can be quite time-consuming, if you do not have a grinder. After all, if the paint needs to be removed over the entire area of the canvas, then the surface will have to be completely sanded: first with a large abrasive, then with a small abrasive.
And to do it manually, using sandpaper, is not so easy. But let's start with a simpler repair option.
Seal damage
Now consider how to update the door with your own hands with damage, because this happens quite often. Perhaps your door is not so old, but simply has some damage to the varnish and the canvas itself.
This happens most often. In this case, it is not necessary to remove the varnish completely - the surface is prepared for decorating by sanding damaged areas.
So:
- First, with the help of a solvent applied to a napkin, the impurities and dust are removed from the lacquered surface. Then a large sandpaper remove a layer of varnish on the damaged areas. After this treatment, the top layer of the coating will be erased and turn whitish.

- Do not be scared to fix it, and you will need a pencil for retouching. These pencils are sold in a set, like ordinary felt-tip pens, only as paint they contain stain. The colors of such pencils usually correspond to the wood scale.
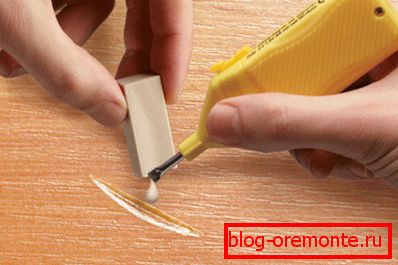
- A shade suitable for the restoration of a specific surface is simply selected along the line drawn on a white sheet of paper. All scratches are retouched, and then proceed to seal large potholes. There is already a pencil you do not have an assistant, but you need furniture wax. They melt it with an ordinary soldering iron, although you can also purchase a special heater that you see in the photo below.
- The deeper the pothole, the more wax is needed. In the depth of the recess, its color can be any, but the surface of the wax cork should be a tone lighter than the door itself. After sealing the pothole is also retouched with neat strokes, and the place of the former damage turns out to be well disguised. It is better to do this in daylight so that you can correctly assess the consistency of shades of a pencil, wax and the base color of the door.

- When not just a scratch is eliminated, but a more extensive area of damage is restored, it is possible, and even necessary, to use two pencils, with a dark and light shade, it is easier to imitate a woody drawing. After repairing the damage, the door remains to be coated with varnish. It is easiest to do this quickly and evenly by using an aerosol can.
This method of restoration is great for both wooden doors and veneer-wood webs, which are most often found in apartment buildings. Viewing a master class from a professional will help you better understand how the decor of old doors is done with your own hands.
Processing of solid wood
Now let's look at how to upgrade a wooden door. When we deal with a wooden deaf door, it can be restored and more dramatically, without picking up pencils for color, but completely changing the decorative coating.
It can be custom painted, covered with veneer, stick 3D-wallpaper or make interesting applications. There are quite a few options, but one thing is important for their implementation - before such a decor is implemented, the surface needs to be well prepared.

- On how to remove the old paint by hand, we have already spoken. But for those who have a grinding machine at their disposal, no blowtorch is needed. Changing the nozzles on the working surface of the machine, you can remove the paint and high-quality sanding the door leaf. Grinding will not only give a smooth surface, but also will open the pores of the wood.
This is important if you want to tint its surface so that the natural texture of the wood is visible. After polishing, it is necessary to putty over small gouges, knots and cracks in the canvas, after which the entire surface should be coated with a primer of a suitable purpose.
Only after this can we assume that the door leaf is prepared for further finishing.
Decoration options
A door made of natural wood can be decorated in various ways. You can, of course, just paint it with wood stain and cover it with fresh varnish.
For finishing wooden leafs, you can also use the methods used in interior design. It all depends on what kind of wood will be removed under paint.
So:
- If it is beech, walnut, alder, or, for example, ash, their texture should not be hidden under a layer of paint. These are valuable breeds, and they by nature have a beautiful pattern that you just need to emphasize, covering it with azure or patina. It will be very interesting to look, if the door has a panel construction.

- After sanding, a shield door made of birch or pine is easier to paste over with valuable wood veneer (see Veneered doors: what it is and how it is done), and then tint it. It’s quite possible to get the result you see in the picture above if the surface of the door is well prepared.
- The beauty of the veneer surface will leave few people indifferent, but today you will not surprise anyone with a woody pattern. In addition, it is the most expensive way to restore the door. Many homeowners prefer to make the original ordinary door, using non-standard techniques for this purpose.

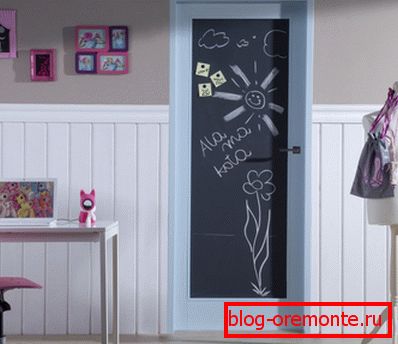
- This does not require any special knowledge, but rather a violent fantasy. So, deciding to restore one or more doors, it would be nice to have a competition between adults and even small inhabitants of the house for the best offer. Or maybe it makes sense to borrow a ready-made idea, for example, such as in the example we proposed. Piano keys on the interior door look interesting, is not it?
Such a design can be done by applying an artistic drawing, and it is good if someone from the household has such talents. Otherwise, it is much easier to search for wallpapers with a similar or other interesting pattern - do not hire the artist to decorate the door.
Decoupage technique
To decorate the door leaf, and any, not just wooden, you can use another, very popular way. This technique, which is called the beautiful French word "decoupage" (see How to make decoupage doors with their own hands). What it is? In fact, it is an appliqué, cut out of fabric, wallpaper and other roll materials, and pasted on a hard surface.
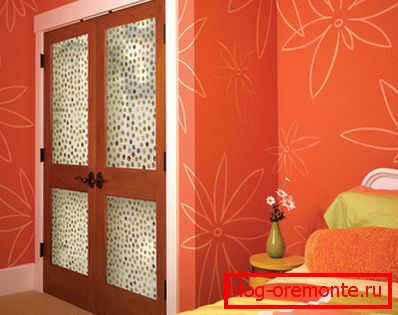
- The stores also sell ready-made cards for decoupage. Using this method, the door can be decorated in the same style with walls, curtains or cabinet furniture. Moreover, you can decorate not only the door itself, but also the wall around the perimeter of the opening.
- Another type of decoupage is stencilled drawing. To create it, it is enough to buy in a shop where goods for needlework are sold, a stencil of polymer film, and fill the picture on the canvas already painted with background paint. Several patterns around its perimeter, at eye level or around glass inserts, will transform the door like nothing else.

- If desired, with the help of applications and drawings you can even simulate an inlaid surface. The style and quality of the finish will depend on the materials used to make the decor - and, of course, on the time and money you intend to spend on it. By the way, you can also use ordinary interior stickers for decoration of the door (see Do-it-yourself door decoration: choice of options).
- If the door is in normal condition, that is, its surface does not require repair, the fabric can not even be removed from the hinges. In this case, it must be cleaned from dust, removed from the surface of a greasy film, covered with a primer and painted with paint, the shade of which should be the background for the appliqué.
- The door can also be decorated in the style of patchwork, using bright squares of fabric or wallpaper, pasted by analogy with a multi-colored patchwork quilt. A similar variant of decoupage can be applied to the insert. For example, earlier the door was glazed: the glass was broken or just its appearance does not match your interior.

- In this case, instead of glazing, you can make an excellent insert from a piece of plywood, decorated in one of these ways. And by the way, the decoupage technique is great for decorating glass itself - only its surface should not be corrugated.
The process of decorating depends on what materials you use for this. If these are decals or interior stickers, you need to be guided by the manufacturer's instructions.
Paper and fabric are glued on the PVA, the edges are sealed with a putty, treated with zero sandpaper and coated with varnish.
Conclusion
The door can be perfectly decorated by applying a geometric frame on it. It can be painted around the perimeter moldings, glued polyurethane frieze or mounted and painted contrasting figured slats.
They, by the way, can be filled throughout the entire area of the canvas. This design is great for smooth panel doors and looks very interesting.
As for the paint, then if you choose some unusual shade or use the texture option, the door will turn out smart and without any additional decors. How to upgrade the door there are many options, now the choice is yours.