How to put the front door - tips experienced
Regardless of which entrance door you choose - metal or wood, you can install it with your own hands. But it should be borne in mind that you take all the responsibility, and the company that sold you the door, removes it from the guarantee. If you have not changed your mind, but do not know how to deliver, read the advice of those who have done it more than once.
Before you put a new one, you need to get rid of the old one and prepare the opening. This is written in each article on installation, we will not repeat.
But we want to remind you that in the process of dismantling you may have to disconnect a bunch of wires and cables, and then reconnect them. Narrowing, widening or strengthening of the opening may be required (see How the door opening is strengthened), you also need to be prepared for this so that the installation does not stretch out indefinitely.
If this stage of work does not frighten you, let's start with the preparation of the necessary tools that will be required for installation.
- 1 Tools and consumables
- 2 Sequence of installation of a metal entrance door
- 3 Sequence of installation of a wooden entrance door
Tools and consumables
It:
- Puncher and rather long drillso that you can delve into the wall through the box.
- Socket wrench for tightening the anchor nuts. For convenience, it should also be with a long handle. You can use car keys with movable crossbars and interchangeable heads.
- Screwdrivers (set) for installation of accessories.
- High quality polyurethane foam. Do not save on it, because cheap foam behaves unpredictably, besides its consumption is greater than that of good foam.
- Building level. Needed in order to deliver correctly, without distortions.
- Heavy hammer for hammering anchors into the wall.
- Tape measure with a lock for measurements.
- Masking tape to protect the box when zapenivanii.
- Loop lubricant.
In addition to all of the above, you can’t be hindered by the help of a second person, as the metal doors are quite weighty, and it’s just easier to work together.

The sequence of installation of metal entrance door
So:
- Unpack the door immediately after its delivery and check its quality, as well as the presence and completeness of all mounting elements and accessories. After your installation, no claims will be accepted. If the accessories (locks, handles, hinges (see. Hinges for metal doors - the nuances of choice), door eye) are already installed on it, make sure that they work.
Attention! If you are forced to put the entrance doors yourself, with no experience in this matter, choose a door that is already mounted with a box. In this case, you do not have to weld or install hinges and locks.
- Once again, measure the opening and the box to make sure that the door is right for you, and there are technological gaps between the block and the walls of the opening, which should be 10-15 mm on each side.
- Install the box (or the entire unit, if it is complete) in the opening and secure with wedges.
- When hammering wedges and using the building level, achieve the correct, strictly vertical position of the loop stand. The crown should fit snugly to the outer wall.
Attention! Welded on the production of trim can be deformed when the door falls or improper installation, as they are made of thinner steel. Be careful.

- If mounting holes have already been drilled in the box or in the mounting plates welded to it, drill holes for the anchor bolts through the perforator. If there are no such holes, they will have to be made independently with a metal drill.
- Insert the anchor into the holes and drive them in, starting from the top and constantly checking the integrity of the vertical position of the box. Having finally made sure of this, tighten the anchor nuts.
- If the door assembly, in the same way, secure the lock rack.
- If the loops are not welded into place, now is the time to do it. Place the canvas in the box, laying between it and the shackle of the gasket, so that the gap is even throughout the perimeter, and mark the position of the loops.
Совет. Если вы не владеете сваркой, то put the front door лучше на скрытые петли. Но в этом случае вам потребуется просверлить отверстия под винты и нарезать для них резьбу.
- After hanging it on the hinges, fix the second vertical stand in the opening.
- Cover the box with masking tape, close and seal the gap between the wall and the box from the inside, starting from the bottom. It should dry for 24 hours, during which you should try to open the door less often and not leave it open.
Attention! Do not forget to close all technological openings in the box before filling.
If you managed to put the metal, then you can handle wooden without problems.
The sequence of installation of a wooden entrance door
Tools for installing a wooden entrance door (see How to install a wooden door) you will need the same as in the previous case.
So:
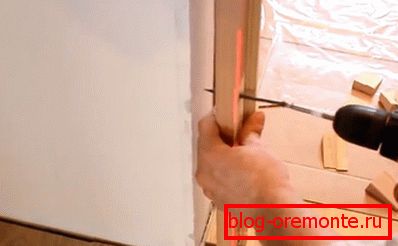
- Using the building level, draw a vertical line on the wall of the opening from one side and the other. Its position relative to the outer wall should be equal to half the width of the door frame.
- Connect the ends of the vertical lines with a horizontal line on the threshold and at the top of the opening, thus obtaining a mounting rectangle.
- Install the box in the opening so that the line drawn on the wall is visible in the center of all the mounting holes on the hinge side. Using a simple pencil, draw transverse lines in the center through the holes. You will have marks-crosses for drilling mounting holes in the wall. Repeat these steps on the other side.
- Remove the box, select a suitable drill and drill the holes using the punch, the depth of which should be one and a half to two centimeters more than the length of the anchor bolts.

- Insert the anchors into each hole, then reinstall the box in the opening, align the holes on the box with the holes in the wall and tighten the anchor bolts.
- If the door was not hinged beforehand, do it yourself, precisely marking their position on the door jamb and the end of the door and selecting recesses for the hinge cards.
- Install locks and handles (see. Handles for entrance doors, choose the most appropriate). To do this, you need to put the doors on the side of the castle side up and embed them in the lock, sinking into the body of the door. For more information about the inset of the castle in a wooden door, you will read in other articles of this resource. But usually all the door hardware is installed on the door by the manufacturer, you will only need to check its work.
- Before hinging the door, do not forget to grease them, and after installation adjust (see How to adjust the front door: take care of it correctly) so that the door can easily enter the porch.
- Cover the door and the box with film or protect with masking tape and fill the voids between it and the wall with building foam.
- When the foam dries, cut off with a sharp knife everything that has protruded beyond the wall, and install the frames. Carefully fit them under the doorway, cut off the corners with a hacksaw at 45 degrees and secure with finishing studs to the box.
Attention! Choosing trim, make sure that their width is sufficient to hide all visible cracks. If this turns out to be wrong, then the wall around the installed door needs to be plastered.
Как видите, чтобы entrance doors to put, нужно не только желание, но и определенные навыки такой работы, и наличие инструмента, и особенно точность и аккуратность. При несоблюдении всех правил установки или при ошибке в расчетах вы можете испортить дверь.
Therefore, with a lack of confidence in their abilities, it is better to rely on the experience of professionals.