How to make the slopes of the front door: we work
Immediately after installing the door, the question of slopes arises. In this article we will explain how to make slopes. If the installation of doors is most often ordered from professionals, the slopes are usually mounted by our own efforts, so this work is much easier.
Finishing begins, above all, with sealing the door box, both from the inside and the outside. Sealing the opening serves to preserve the heat of the apartment. Therefore, the sealing is usually started at the first stage.
Slopes from the outside
The slopes of the front door: how to make the work more understandable?
It is necessary to break it into stages:
- If the gap between the door frame and the wall was sealed with mounting foam, re-zaping should be performed if necessary. To check the clearance for blowing, you can use a lighter: close the door, and carry a burning lighter all over the profile. If the seam shows through somewhere, then the flame will clearly move, then the seam will need to be sealed.
- After solidification of the mounting foam, you need to cut it and begin to finish. In the event that the seams were sealed with cement, purges would most likely not occur. But if the gap between the wall and the door is not sealed at all, then this operation is best carried out solely with a mixture of cement on an adhesive base, but with mounting foam.
- So, after sealing the gap we close it up. Please note that the sealing of foam in the gap should be carried out with cement, and not with a putty or plaster.
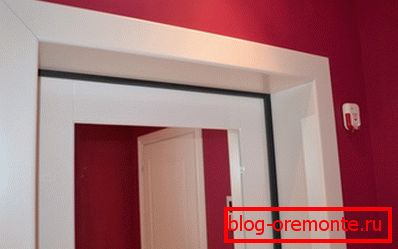
- After hardening of the cement mixture, installation of platbands is carried out. The selection of door frames is carried out according to the design and color of the door (see Design of interior doors). Fastening the trim is best done using special brackets. Platbands are not only decorative functions, but also cover the mounting gap, and therefore protect locks and mounting pins from breaking.
- Slopes on the outside are also sealed with cement.. First of all, you need to clean them from the old cover and debris. Next, you need to cover them with a layer of primer, and wait until it dries. After that, a layer of cement should be applied to level the walls. If there are irregularities on the surface of the wall, they need to be brought to zero.
- Painting. The simplest option for finishing the surface of external slopes is their painting. If there is a desire for more elegant solutions, it is possible to finish with plastic or laminate.
Finishing slopes from the inside
Before you make slopes on the front door, you need to decide what type of finishes you use. Among the most commonly used options are four types of materials: drywall, wood, plastic, plaster.
Plasterboard
It is used in cases when it is necessary to correct serious irregularities of the walls. With the help of this material, it is not necessary to level the wall itself by applying several layers of a leveling mixture onto it, to create a special frame in order to keep the mixture layer on the wall.

So:
- Before fixing the drywall on the wall, it is first cleaned and then primed qualitatively.
- During the drying of the primer, you need to measure the dimensions and start cutting plasterboard sheets. When carrying out measurements it is necessary to take into account that the doorway may have a bevel, and therefore it will be necessary to cut the sheets at an angle.
- After the cutting is done, you will need to attach the panels to the slopes to make sure that everything is done correctly.
- After the primer has dried, we begin the installation of gypsum panels for finishing the slopes (see Making door slopes of gypsum cardboard). You can fix the drywall in one of two ways: with a special adhesive on drywall or an anchor. It is recommended to use glue. Using glue, you put the drywall panels on the level.
The first side mounted gypsum panels, then the top. Glue for drywall can be applied as a whole layer, and cakes consistently through 10-15 cm.
In the wake of the strong fixing of drywall to the wall, you can begin to finish. In the decoration of drywall used putty, as well as perforated corners, in order to create a smooth angle in the slopes.
Остракуатривание
Simple and cheap method. Suitable for those who have decided not to particularly bother with them. The surface of the side walls is covered with plaster, and the slopes are prepared for further finishing.

To plaster a high level door slopes, you will need:
- masking tape;
- painting grid;
- finishing putty;
- sandpaper (zero);
- liquid primer;
- rope beacons;
- building level;
- Master OK;
- plaster;
- paint corner;
- construction mixer;
- putty knife;
- bucket;
- rule of
Stages of work:
- Starting the process it is necessary to clean the wall from the old plaster, dust and other debris.
- After this process the primer surface of the wall.
- Then, when the primer is dry, apply a plaster on the wall with a spatula. We need smooth corners, so we, as in the former case, use metal perforated corners (they are often called painting corners). To fix the corner, put a small layer of plaster on both sides of the corner. Then put a corner, and pressed with a spatula into the layer of plaster.
- Next line sanding walls in order to achieve evenness and smoothness of their surface.
- The final stage of finishing the door slopes is their painting.
The slopes of the front door how to make - video:
Plastic
The material is widely used for window slopes. However, in the decoration of the slopes of the door is rare. Most often used if the interior is also made of plastic. Otherwise, it is not particularly in harmony with the finishing materials of wood.
If you decide to make slopes from this material, then you need to do the following:
- Make the necessary measurements (see the dimensions of the entrance doors);
- cut into plastic panels. Despite the fact that plastic is easily cut with a knife, it is recommended to use a grinder or a jigsaw for cutting purposes, if possible, so that the edges are really even.
- Next is a test panel application. In case of need, size adjustment is made.
- We begin directly installation. First, we mount the side. Using metal screws, we fix the starting profile in plastic in the door box.
Then we fix the wooden rail to the edge of the wall using dowels. Be sure to check its evenness. Then to the rail fasten with brackets the side slopes of plastic.
Next on the bottom of the panels we put the plugs. We insert the panel into the starting profile, then into the side slope. Repeat the same with respect to the top.
Tip: After the installation of plastic panels, the seams need to be treated with mounting glue (silicone).
It should be noted, how to make slopes using plastic - two: using plastic conventional PVC sheets, and plastic sandwich panels. The difference between them is as follows: PVC plastic sheets are a regular plastic sheet about 5 mm wide, containing hollow partitions inside.
Sandwich panels, unlike conventional ones, have a three-layer structure: two sheets of plastic at the edges and a layer of insulation (see Insulation for doors: types and parameters). Thanks to the insulation, the sandwich panel becomes thicker, but this gives it significant heat-shielding functions. Therefore, if the budget allows, and you want to not only make beautiful slopes, but also to carry out insulation, use a sandwich panel.
Tree

The most popular finish option. The tree effectively fits into the design of the door and the interior of the room. As stated at the beginning of the article, the best material for them is wood. Visually, the slopes made of wood look much better than plastic or plastered.
The material most often used is laminate or MDF. The choice of material depends on the width of the slope opening and the insulation properties: if the goal is to insulate the opening of the slope, then it is better to use MDF boards, if the opening is too thin and the MDF board simply does not fit in it, you can use laminate for finishing.
Stages of work:
- Installation starts with sealing the seams of the door box with the wall.
- Then you need to cut off the remnants of foam, clean the wall and treat it with a primer.
- Next you need to decide what form they will be installed: located parallel to the wall, or slightly at an angle. Depending on the answer we mount the starting plates. If the slopes are designed parallel to the wall, the slats are mounted of equal thickness. If they are planned at an angle, then the rail, located right next to the door, needs to be made wider, and the second bar, the one near the corner, is thinner, in such proportion that the desired angle is obtained.
- Bearing rails must be fixed to the wall with dowels. The upper one is mounted first, since it is necessary to proceed from it, cutting the panels.
- Wooden fasten special glue or screws. Hats are hidden decorative caps. Further, in the same way, the sides are attached and a corner is glued along the perimeter.
- Sealing of seams is carried out with colorless silicone.