How to install a wooden door yourself
When there is no opportunity or desire to pay for the installation of wooden doors or wait for the master to arrive, you can do it yourself. The principle of installation of interior and entrance doors is quite simple, so it will not be difficult to cope with such work.
The wooden door is a fairly generalized concept. It can be an entrance or interior room, a hinged or sliding, serve as the entrance to the residential or utility room. Installation methods of doors may be similar, but may vary greatly depending on the design and purpose.
Door installation process
For example, the installation of wooden swing doors is fundamentally different from the installation of sliding doors. But the hinged interior door is mounted in exactly the same way as the entrance door, with the only difference that the entrance door should have a threshold.
Door installation
The front door is usually sold complete with a box. To install it, the opening is first cleaned to clean walls and freed from poorly adhering pieces of plaster.
Upon completion of the preparatory work, you can proceed to installation:
- Install the box in the opening, fix it with wooden wedges.
- Using the building level, install it in the correct position so that the threshold and the upper crossbar are located horizontally and the side racks vertically.
- Drill three holes in each rack in each rack so that marks on the walls of the opening are left.
- Remove the box and drill holes for fasteners in place of the markings.
Attention! If the walls are concrete, use a special drill for concrete or a hole drill whose diameter coincides with the diameter of the dowels.
- Drive dowels into the prepared holes in the wall and replace the box in place.
- Place the screws in the holes in the door frame and screw them into the dowels, but do not tighten them. This can be done after you once again check the orientation of the box vertically and horizontally and make sure that the diagonals match.

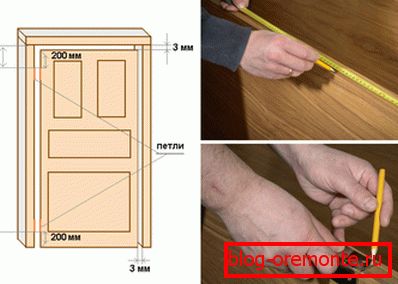
- Attach hinges to the end of the door leaf at a distance of 20–25 cm from the top and bottom edges and circle them with a pencil.
- Using a chisel, select the grooves for the hinges that match their thickness, and varnish them.
- Once again, attach the hinges into place, make the markup for the screws and drill holes for them with a thin drill. Then screw the hinges to the door leaf.
- Insert the door leaf into the box, placing a strip of packaging cardboard, hardboard or hardboard under the bottom end to mark the position of the hinges on the box.
- After preparing the recesses for the hinges, return the blade to its place and screw the hinges.

- The installation of the wooden entrance door is complete. It remains to plaster or zapenit technological gaps in the opening and install the trim.
Attention! Separate hinges are often placed on the front doors. In this case, a part of the hinge with a pin is mounted on the box, and on the door leaf - with a receiving hole for it.
Installing interior doors
Interior doors are often not supplied with a finished interior box, but with separate elements for its assembly.
In this case, the sequence of actions will be as follows:
- Put the door on the floor, and on the sides of it, place two long racks, putting a packing cardboard between them.
- Attach the transverse bar to the upper ends of the side posts., mark the desired length and cut it to size.
- With the help of the cloth saw off at 45 degrees the ends of the crossbar and the upper ends of the side racks. Connect them together with self-tapping screws, pre-drill holes for them with a drill of a smaller diameter.
- Insert the door leaf in the assembled boxput it on its side and, having inserted the hinges in the right place, mark their position simultaneously on the end of the canvas and the loopback rack of the box.
Further installation of wooden interior doors is carried out similarly to the installation of the entrance door.
Installation of doors in utility rooms
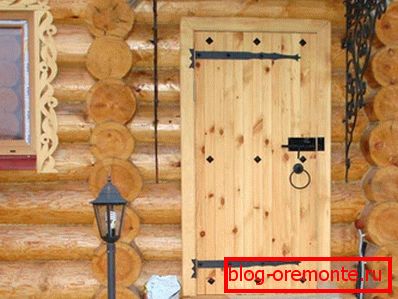
If you need to install a door to the barn, bath (see Wooden doors for the bath and their types) or other utility room, for this you can use the overhead hinge-arrows. In this case, the installation of wooden doors is facilitated by the fact that you do not have to choose grooves for them in the wood.
And since such doors are usually exposed to high humidity and as a result can swell, they will be easier to remove from the hinges and fit the size of the box.
Sliding door installation

On the one hand, installing a sliding wooden door is easier than hinged (see Installing hinged interior doors), since there is no need to precisely adjust the box to its dimensions. After all, such a door is not mounted in the opening, but in front of it. But at the same time, you will need to put all your diligence and care in order for the door to function normally, not to twist and not jam.
If we describe the process in general terms, the installation of a wooden sliding door looks like this:
- First, a horizontal bar is mounted at a height of about 7 cm above the doorwaywhose length is twice the width of the door.
- Then a metal guide of the same length is screwed to this bar from below. Moving mechanisms are inserted into it - carriages with rollers, and the ends of the guide are closed with travel stops.
- Metal braces are attached to the upper edge of the door.through which it will be connected to the rollers.
- In the lower end of the door along its entire length, a groove is selected for the lower roller.which will lock the door upright.
- The door is temporarily hinged into place by connecting brackets with carriages.
- To install the bottom roller, the door slightly deviates from the vertical., the roller is inserted into the groove and moves along it until it stops towards the opening of the sliding door. After marking its position on the plane, the door is removed again, and the conductor is screwed to the floor.
- The final installation of the door occurs in reverse order: at first, it fits onto the lower roller with a groove, and then fastens at the top.