How to close the doorway yourself
During the operation of buildings and individual premises, their owners often have the question: “How to properly seal the doorway?”. This is due to the need to eliminate, or transfer the doorway to another place.
The choice of material depends primarily on where it is located. If, as shown in the photo, the street entrance is sealed, then, if possible, you should use the same material from which the building was erected.
But in any case, it will be either a brick or wall blocks of concrete. Well, inside this task can be solved much easier by sewing a hole with drywall. Together with the video in this article, we will understand the intricacies of this work.
The elimination of the opening with a brick
When sealing openings, brick, as a constructive material, has undeniable advantages. With it, you can wall up the opening in the bearing outer and in the inner wall. Moreover, there is not much difference whether these walls will be brick or panel. Although we note that in panel houses rarely allowed to carry openings.
As for partitions, bricks are more often used for sealing openings in brick partitions. The reason is that the thickness of asbestos-cement, plaster, or gas-block construction does not always correspond to half of the brick. When the difference in thickness, drops are formed, which can create certain problems during plastering.
Selection of material for the thickness of the partition
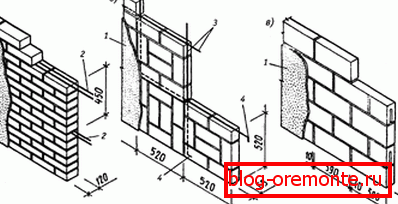
But there is almost always a way out - you just need to try to find the material that fits best across the width of the opening. The same brick, but only full-bodied, can be laid not flat, but on the edge, which is important for those cases when the partition has a minimum thickness (7.5-8 cm).
- As it looks, you can see in the picture below, and the difference in 1 cm can be easily removed by increasing the thickness of the plaster. If, say, the thickness of the partition is 9-10 cm, the brick can be taken not single, but one and a half, which has a height of 88 mm, and also put it on the edge.
- If the wall with the hole to be removed is plastered, then let the thickness of the patch be better than the thickness of the main structure. If the masonry will protrude beyond the plane of the wall, then in order to smooth it out you will have to spend more plaster on the entire wall, which would entail unnecessary costs.

- Before you seal the doorway with piecework masonry material, you need to properly prepare the base, and the end surface of the doorway. At the bottom of the base should be smooth, without a threshold or floor covering. Usually it is a concrete slab, on which it is desirable to lay a strip of roofing material under the first row of bricks.
- So that the new clutch could firmly bond with the old one, it is necessary to make notches on it. If the wall is brick, you can simply remove part of the mortar from the end seams, or even slightly knock down the corners of the bricks, so that you can get peculiar grooves. Then the dust is carefully removed, the surface is thoroughly moistened with water - and you can begin to seal the opening.
The laying is carried out in the usual way, with bandaging of seams. Some masters for reliability hammer into the seams of the old laying long nails so that their free end can be laid in the seams of the new laying. But by and large, this is not necessary.
Plasterboard fillings
When it comes to displacing the door, the owner of the room is most likely faced with the task of how to decorate the doorway, since neither strength nor other physical and technical properties of the structure are of great importance here. For internal redevelopment of premises, drywall is probably the best material.
In any case, to eliminate the opening in the partition using dry plaster, mounted on the frame of the profiles, much easier on their own - but the price of these consumables is low. We think that the instruction offered by us will help to solve this problem without any problems.
Frame and trim
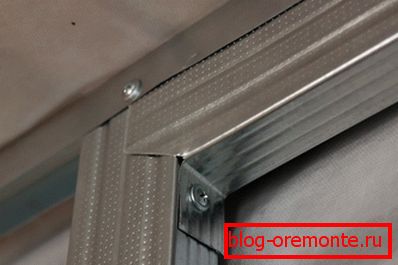
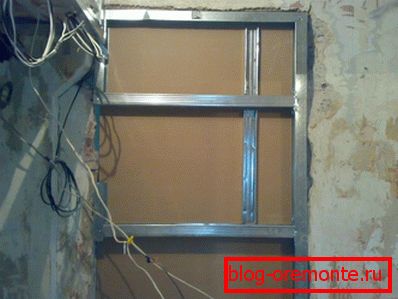
Considering the size of a standard aperture, four guides of a profile UD-28, three or four meters long can suffice. Mount it around the inner perimeter of the opening in two parallel rows. The profile is attached to the wall with a dowel-nails 6 * 40 mm, and among themselves - with screws with a press washer.
- Your task: to bring the surface of the embedment area flush with the surfaces of the existing wall. For this, the guides are set indented from the edge, taking into account the thickness of the gypsum plasterboard - a minimum of 12.5 mm.

- Then, across the opening, sections of the profile CD 27/60 are put, to which, in fact, a sheet of dry plaster will be attached. The distance between the crossbeams should be at least 60 cm. As a result, a kind of spatial frame is formed, which must be filled with any slab insulation, which will ensure the construction of sound insulation.
Note! It is better to cut the facing part of the aperture from a single sheet, but if you have pieces left, for example, after covering the walls of the previous room, it is possible to use them. The main thing to remember that they need to dock in those places where there are cross-beams.
Just keep in mind that if you do not have an edge planer, in order to remove the chamfer at an angle, you will not be able to get normal joints - after all, they need to be properly repaired.

- If you do not have any GKL residues, you will need to purchase two sheets 2.5 * 1.2 m in size, and cut out whole pieces of the opening from them. This is done with a knife with a reinforced blade. According to preliminary marking, the gypsum plasterboard shell is cut, and then the sheet is refracted. It remains only to cut the cardboard from the back side - and that's it.
- Next, plasterboard should be attached to the frame, and fasten the gypsum-metal screws with self-tapping screws, making fastenings every 20–25 cm. It is necessary to tighten them tightly, but without undue effort, so that the fasteners do not break through the shell and do not damage the sheet core. If the lining was going from pieces, then the next step is to seal the joints between them.
- To do this you will need a primer, putty and reinforcing paper tape.. After the seams are treated with a primer, they are half filled with a putty gypsum compound, and while it is still plastic, they press in the tape. In conclusion, the opening should be filled with the entire area - and it is ready for finishing (see Finishing the door opening: how and with what to do).

- Usually, the doorway, sealed with plasterboard, as well as the entire wall, is covered with wallpaperbut you can trim it and more interesting. For example, you can glue this section of the wall with photowall-paper with some interesting plot, and even frame it with the same casing as on the real door.
If the wall in which you want to seal the opening is thick enough, you can leave a recess in the opening. It turns out a niche that you can decorate as you like: the same wallpaper, fabric, decorative plaster, make the backlight.
One of the most successful examples of finishing the doorway, you see in the above example. So you can frame not only a sealed, but also a new opening, which will make the interior of the room unforgettable.