How to build a porch - professional instruction
В статье подробно разбираем последовательность действий при строительстве крыльца. Разбираем сложности процесса. Разбираем, how to build a porch to the house на даче и не только.
Deciding on a porch
The porch is the beginning of the house on the level with the facade, it is the face of the whole building, which gives the whole building a look and, as unique and beautiful, speaks of the prosperity and comfort of its owners. Consider several options cottage house.
There are many options, but first of all choose the material, it can be:
- wood (see How to build a wooden porch with your own hands - tips craftsman)
- metal
- brick
- concrete
It all depends on the desires of opportunities and preferences. But consider the option with a brick is a more common and preferred by many building material.
First of all, you need to decide what form the porch will be, it can be:
- oval
- semi
- semicircle
- rectangle and so on
It all depends on your imagination, in the end nothing is impossible. Maybe it is your extraordinary decision that will be embodied in a unique porch and will serve as a place of universal admiration and envy of your neighbor, just kidding.
In any case, it all depends on finances, and I will tell you how to build a porch and even save using acceptable alternative materials.
Markup
Мы выбрали материал brick (см. Крыльцо для дома из brickа). Здесь очень важно, обратить внимание на качество brickа что бы в последствии он у вас не рассыпался brick не должен быть слишком хрупким и рассыпаться в руках.

Совет: Народный метод проверки brickа — это бросить его плашмя на твёрдую поверхность, если он не разобьётся то в качестве сомневаться не приходиться, но бросать не с силой просто выпустить его из рук. Если какой-то разобьётся проверьте другие поддоны бывает что нарушена технология сушки brickного сырца в одной или нескольких партиях.
We start the layout of the future foundation (this is necessary!) Otherwise your porch in two years will begin to walk along different planes.
Although it is raining or snowing - the load on the ground is small, but the draft cannot be avoided without a foundation. The foundation gives sediment by squeezing out the soil, and here the weight of the structure and its shape primarily depend.
Here we see: the larger the support area, the greater the resistance. The markup depends on the individuality of the porch.
You do not need to immediately draw zigzags, first we beat off a rectangle into which the porch is supposed to enter:
- His first step we begin to consider is a step of a step of 300 mm, in our case there are 3 + overlap of 300 mm + a platform of 1 meter. Everything is just 0.3? 4 + 1 = 2.2 meters, this is the width, only the platform is not the same meter, and instead of one, we replace the meter with a two meter 0.3? 4 + 2 = 3.2
- We beat off from the wall where the door is the width and length we drive in pegs
- Then we beat off the diagonals from the wall to the peg, the distance should be the same.
Pay attention: If it does not converge where we push the peg inside a little more, we punch the length and width once more, the diagonals continue further.
Here you understand and remember that during the construction of your house the foundation was poured, you already know the type of soil and its ability to shrink. But just in case and as a reminder, I will talk about the types of soil and its features regarding construction.

Soil types
What are the main types of soil we know:
- Rocky (rocky) ground. The most reliable for the construction of houses and cottages is resistant to erosion and swelling, excellent stability and ability to join.
- Cartilage. A mixture of sand, clay, small stones and rubble. Reliable, poorly eroded by water, with the deepening possible installation of the foundation of a rather heavy structure.
- Sandy. Unstable soil, weak attachment under the load passes moisture.
- Clayey. Poor soil, the ability to compress, a large ability to erosion, has a high frost heave and has a large depth of freezing.
- Loamy. The location of the next sandy and clay soil. It has different properties from the content of sandy loam or loam.
Foundation
Pit under the foundation
We begin to dig from the pegs to the wall. I draw your attention to the fact that a correctly dug ditch under the foundation reduces costs when pouring concrete;
The depth of 300 mm is sufficient, because we have a stove and the degree of pressure on the soil increases the sediment will be minimal, it happens and there is always this normal. The only thing to consider is if there is a paving slab going from the porch, then the slab must be poured at once with a curly tile that would avoid working with a jackhammer and chipping concrete along the contour.
In this case, digging from the semicircles to the wall pad, this will be our so-shaped solid plate. How to mark the contours of the figure pit for the foundation described below.
Reinforcement (concrete work)
Filling and reinforcement, as I have already said, pressure on the ground is minimal, therefore, in order to save, it is permissible to apply the following available materials as reinforcement.
Calculation of pressure on the ground:
- Ground pressure is calculated using the formula P = F: S
- Where P = pressure
- F = force
- S = square
If pressure - P and area - S are known, force can be calculated by P x S. It is easy to make a calculation. I will give the figures for the rest of the matter.
And so concrete with the addition of rubble belongs to the class of heavy concrete - its mass ranges from 2300–2500 kg / cc. Where:
- crushed stone 1200-1300kg.
- sand 600-700kg.
- cement 250-400kg.
- water 170-200l.
То же самое, что и brick, вес одного brickа от 3,2 — 3,6 кг, вес 1 куба раствора песок-цемент 1500–1700кг. Можно использовать любую проволоку не менее 0,4 мм, душки от кроватей старые водопроводные трубы всё это связав между собою или, сварив, армировка не должна лежать на земле, а должна быть в середине будущей плиты.
Therefore:
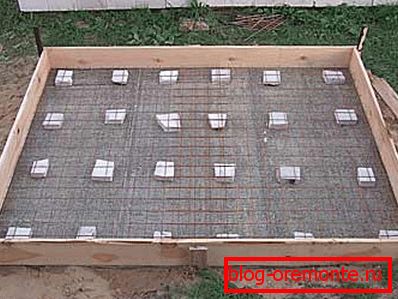
- We drive in the ground reinforcement (tubes, corners)
- We tie to them the entire structure raising 100-150 mm above the ground. If there are no old pieces of iron, then we use reinforcement having laid it along and across squares from 200 × 200 mm in size.
- We sprinkle a pillow with sand of 2-3 mm and proceed to pouring.
- Fill with concrete 1: 5, 1: 6 ratio 1: 3 ratio is suitable only for plaster and masonry sand-cement mixture.
Please note: There is a small subtlety here - this is not an industrial scale, but if you have vibroshoes from friends, it is better to use it. Well, if not, then an ordinary stick to seal the mixture, if you make the solution thinner then compacting it will fall exactly in level and do not put beacons.
While waiting
It is desirable that the concrete would stand at least a week, but the full set time of about 40 days - will have to suffer.
I recommend that the stove be watered daily with strong heat, so that no cracks form. Draw the future contour of the porch, draw a circle and a semicircle with the outer and inner arc as in the photo.
Advice: it’s simpler than the simple principle of an ordinary compass choose a point we tie a rope to a peg at the other end of the other peg and start drawing here to choose the diameter so that the semicircles are inside the rectangle and do not stand for its aisles.
The laying is carried out in accordance with SNiP 3-17-78 compliance with which provides the required strength and high quality work. Separate thickness of horizontal joints of 8–12 mm is allowed. Vertical from 2 mm to (10–14)
Tile
Putting up the steps will choose a tile.
In my case, I chose a clinker tile (see. Tile for a porch - we select wisely) - this material is very frost-resistant, retains its properties and appearance even at 300 defrosting and defrosting cycles. The tile should have a lower porosity and moisture absorption of no more than 3%, otherwise in the winter time the tile will simply begin to peel off.
Attention: When buying, be interested in the technology of its production and the properties of the tile in the heat and cold.
Railing
The optimum height is 900-1000 mm.
You can order forged ones, you can weld it yourself, using an iron strip of 20 × 2 mm, bending patterns from it with uncomplicated fixtures and having designed a good handrail. Fasten the railing with anchor bolts.
Shed
Now we will issue a shed (see Canopies over the porch with your own hands). He can both close the entire porch, and his half.
Material for him to choose is not difficult, here you can use:
- metalо-профильное покрытие
- metal tile
- onduin
- cellular polycarbonate (see Polycarbonate sheds over the porch - installation rules)
- the choice is great.
There is also a lot of room for fantasies for our canopy, there is no limitation in the figure version, different solutions and levels of complexity are possible.
Well, if you decide to surprise your neighbors, then you should try to arrange it beautifully (see. Making the porch is an indicator of your hospitality), then you need expert advice anyway. If you have no experience in this, it is better to entrust the masters, or at least take a master class and step-by-step video instructions on how to implement this project.
Porch in the country

Here the principle is the same as above.
Совет: лучше использовать concreteный монолит, однако это немного посложнее brickного каркаса ступенек.
Fill the original plate is the same, but then you need to put a formwork for each step and fill in all at once, after inserting the reinforcement for the bundle with the main steps. Well, we'll talk about this in more detail.
Monolith
As stated above, the concrete for the monolith will therefore repeat, I will not give advice on how to save. As you know the pressure on the monolith is minimal and apart from your weight on the concrete there will be nothing more pressure, so you can allow some deviations that will not at all reduce the quality of your porch, but only help save on material.
As you know, crushed stone goes as a filler, sand binder, we exclude crushed stone from our monolith. Everyone has plenty of empty bottles that are lying around and you can get rid of them by running them as a filler before breaking and adding them to the mixture.
Glass weighs less than crushed stone, thereby facilitating the construction of the porch.
You can also use:
- Stones
- pieces of iron,
- разбитые brickи
- in general - construction waste
As a filler, the main thing is not to overdo it, but to keep proportions. It is advisable to make the mortar thinner and not allow the adjacency of stones to the formwork, so that after removal you would only see concrete. Reinforcement is required.
Iron frame
Calculation of the number of steps, it is necessary to make the calculation of the standards that are listed above, but an individual approach is allowed, both to the step of the steps, and to its height. The only thing that would be more convenient for you is the main thing, design is not a problem. The porch of the steel frame is relevant if the basement is built as a basement and the first floor is higher than usual, as shown in the photo above.
The shape of the porch can be selected individually as a serpentine, plain, semicircle, etc. The frame is prepared separately welded and assembled already in finished form. The columns are concreted in fact here depends on the type of the flight of stairs from its length and the material, ie the thickness of the metal.
Если metal труба-квадрат тонкий (стоимость дешевле на рынке metalа), то способность к прогибам у такого лестничного марша составляет от 10–20% на метр погонный.
Such structures naturally require concrete columns as an additional support, which increases rigidity and stability, but the structure will be cheaper. Here, as always, parts cannot be welded, full welding of the whole structure is required.
With metal thick-walled simpler design is harder and you can do without props - it will withstand your weight calmly, but, again, it all depends on the length of the flight of stairs, it is better to put a prop.
Attention: Never take risks in such matters, never hope at random and never save.
Making any design it is always better to make up its drawing with calculations - this will simplify the task and ease the assembly and installation, will help not to be mistaken when preparing parts.


These photos show the phased construction of a porch made of a concrete frame and a canopy made of iron, forged elements, covered with metal tiles, the facade of the building is faced with metal siding.
Playground
As we understand, we will prepare the site:
Square rectangular 2? 3 m:
- Making markings for the foundation of columns.
- We beat off the ground on the ground. 2? 3 we mark in the corners on the opposite side of the wall the future place under the foundation is digging into the depth of 0.8 meters wide 1? 1 m - 2 holes.
- We reinforce the bottom of the pit (the reinforcement should not touch the ground, maximum 5-10 cm from the ground) in the very middle of the holes we drive into the ground (4 fixtures for each hole) with a minimum height of 1 meter and fill the platform.
Attention: Everything should be according to the technology here - saving is not appropriate here.
- We reinforce in the middle of the platform under the columns we associate with protruding reinforcement.
- Construct the formwork 0.5? 0.5 m. So what would be hammered rebar were exactly in the middle.
- We mark the formwork with a hydraulic level so that the two formwork are on the same plane.
Hydro level
Elastic transparent tube hose with a diameter of 0.5 to 10 mm. different lengths filled with water. The principle of operation is simple: water always shows the level.
Put a mark that we want to transfer. In this case, we have a formwork - we will align it to the ground level, that is, a padded area of 30 cm, pit 80 cm, which means the height of the formwork is 50 cm.
Here, the ground level is obtained with the hydraulic formwork to a direct note can not be noted. Let me explain, the points that are marked should not be located below the water level at the hydro level, we will go the other way.

Waterproofing process:
- We acquire 2 forms of bar 70 cm or more from the site, that exactly 0.5 meters are poured in the pit, and we put 1 meter on the bar that we have acquired.
- We take the hydro level, put up to 1 meter mark (2 people are needed to work with the hydro level) so that the water in the tube starts exactly at the mark
- At the other end, putting the tube to the bar, just hold and wait until the water stops (the water in the tube will rise and fall).
- When the water has stopped, put a mark on the second bar, on the water in the tube and from this mark with a tape measure mark 50 cm down. Here we have a level.
- We cut the formwork according to the marks. The reinforcement in the middle should protrude at least 20–30 cm from the formwork with 4 rods with 2 formwork.

- Fill concrete 1? 5 and wait until the next day,
- We extend another 2 meters of reinforcement to the protruding reinforcement by welding the formwork;
Для справки: Асбестовая труба — диаметр 400 мм, в продаже идёт 5 метров в длине диаметр 21 мм. Класс ВТ6 давление мПа 0,6 и 6 кгс/см2.ГОСТ 539–80. Асбестовая труба легче metalлической в 3 раза, не подлежит коррозии и устойчива к перепадам температур не промерзает и не пропускает влагу.

- From above we begin to pour concrete solution to the very top, the reinforcement must stick at least 10 cm.
- After the concrete has set, we remove the formwork from the pedestal and fill the pit with earth before our eyes, we must have the curbstone and the asbestos column on it.
Preparation and shading
Next, install a suspended formwork.

- Fastened to the wall beam 50? 100 anchor bolts 12? 120 or 150.
- On against the columns fasten the same beam on the same principle. As it shown on the picture.

- Then we fix the timber on the other side of the columns. As a result, you should have a structure as shown in the following figure.

How to build a beautiful porch? It is necessary to do everything according to the instructions if there is no experience, then consultation is better.
- Bars should be on the top level with a bar attached to the house.
- We arrange cross-bars along them along the entire length - this is the base of the formwork.
- Along the perimeter fasten vertical formwork.
- For structural rigidity, it is desirable to use T-beams as a frame.
- To do this, we pierce windows in the wall at least 10 cm deep. And at the level of the top of the columns we also pierce them.
- Insert the beams in the windows and on the column
- We also fix the beams from the column to the column,
- We look at the level and diagonal if everything is perfectly welded construction.
- In the joints on the columns associated with valves. Everything should be as shown.

Now we reinforce the whole area in 2 levels:
- The first level squared reinforcement is 10? 10,
- The second 20? 20 reinforcement should not lie on the formwork.
It is very important to connect the reinforcement with the wall.
Under the armature on the suspended formwork we place the film all the tension fasten with a stapler. Please pay attention to the fact that there are no bends (films cannot be avoided) as little as possible and press down with braces. The film must cover the base and the vertical formwork, but in no case the junction with the wall.
- We look, we expect where we will have a ladder mounted and the railing on the porch is welded to the fixtures. The photo below shows the mortgages.

- Fill all with concrete. It is advisable to use expanded clay - it will ease the design and reduce the pressure on the supports, reduce the draft of the structure. The photo shows mortgages for industrial purposes, they are half as much.
- Embedded, which are adjacent to the vertical formwork, we put it right next to it, so that when removing the formwork mortgages were in sight.
- After pouring, the concrete must be shed daily the first week after the next day and so on until 40 days before it fully sets and hardens.
We need not just to build a porch, but to make it beautiful and of high quality.
- We remove all formwork mounted for previously welded ladder.
- From above on mortgages we weld racks for the railing, again, you can choose any pattern by making it from strips as mentioned earlier.
- We arrange the tiles by plastering the sides of the slab; these places can be sealed with a colored tin of an U-shaped construction. The edges will hide under the tile and under the slab.
Porch made of wood
To make the basis of the porch longer it is desirable to make a small foundation:
- We arrange hydra-insulation to the foundation and fasten the power plate with anchor-bolts to the foundation.
- Now you can lay the base of the porch by adjusting the height of the substrate and the thickness of the wood, then these sidewalls will be closed with a facing bar.
- We will adjust the transverse bars to them we will fix the floor of the porch.
- Along the perimeter of the mauerlat must be level.

It is possible to use wooden piles best of hardwood in the place of the foundation. I would recommend a tree (shittim), an acacia from which the ark of the covenant was once made.
The tree, while raw, can be used if the nails dries out and does not score. Well withstand the load and staying in the ground for a long time retains its properties. Wooded houses from the frame of acacia stand for centuries. The main thing is to build the frame of the porch and steps (see Stairs for the porch: the original design of the main entrance), the rest is upholstered with a facing board.

- Boards are treated for mold, bark and refractory mixtures.
- After drying, primed and painted.
- Here you can leave a natural color to an amateur by treating and highlighting the properties of wood with a light stain.
There are many nuances in the construction, you can not tell everything in one article, each stage is worthy of separate attention. For a quality result and if you want to learn how to build a porch in the country or to the house, then you need to study everything, watch the video and then you'll be quite knowledgeable.