How to assemble the door frame without problems
When replacing the leaf of the interior door, you have to change the box, even if it is still quite suitable. The new door of the canvas simply will not look on the old frame, and it is not so easy to pick them up according to the texture and color.
In this regard, the question: “How to properly assemble the door frame” is very interesting for our readers - this is the most crucial stage of the installation. How this is done, you will learn from the material proposed below, and for clarity, check out the video in this article.
Assembling the box from the complete parts
When buying a door in the complete set, you are confronted with the fact that only the canvas corresponds to the size of the opening. The box has to be mounted and customized by hand - the manufacturer cannot assemble it in advance, as he does not know the exact size of the opening.
There are no hinges or handles on the doors either (see. Handles for interior doors - how to choose the best ones) and locks, because fittings are installed depending on the direction of door opening. The threshold, by the way, may not be, and the wall thickness may be such that it will be impossible to overlap it without additional strips. Therefore, before you assemble the interior door frame, all these nuances should be taken into account.
Docking parts
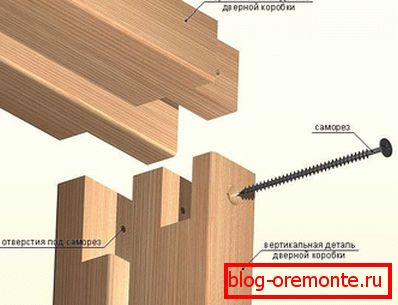
The main snag in assembling the door frame is to properly cut and connect between each other stand parts with a lintel. The crossbars and jambs have a profiled structure, and for an inexperienced person, the most difficult part may be to perform 45-degree gouges, and even more so - cutting grooves and grooves performed before joining parts.
If you type in the query line: “how to assemble the video door frame correctly”, you will find a lot of clips, with the help of which you will be able to clearly see what the masters are doing and how. As for the theoretical part of the work, you can read them by reading our article.

- To perform angular or straight gash, you can use the usual carpentry miter box, but if you have the opportunity to use a miter saw, the cut will be much more accurate and accurate. But to perform a spike connection, which is shown in the photo above, you need a hand mill.
- It should be noted that this option docking box parts is the most reliable. Pazogrebnevye joints are considered bezgvozdevymi, but for greater strength wizard additionally reinforce them with galvanized nails. The spikes are formed to the full thickness of the timber box, which certainly must be taken into account when performing the marking before cutting parts along the length.
Note! There is no big difference on which of the parts: vertical or horizontal, spikes will be cut, and on which grooves are chosen - the main thing is that the joint should be rigid.

But if you look at things realistically, we understand that the router is a professional tool, and it is unlikely that it will be found in any home. And even more so, very few people will want to painstakingly choose the grooves in the beam with a chisel. Therefore, home craftsmen choose more affordable options for the connection, preferring to dock the details of the box at an angle.
Assembly procedures
So, you have unpacked the "semi-finished product", from which you will need to assemble the finished product. It is important that all elements of the future box lay before you on a solid foundation in a single plane.
It is most convenient if it is a spacious workbench, but in the absence of it, you can lay them out on the floor, covered with cardboard or cellophane.
- The geometric contour of the door frame is determined only by the size of the canvas, which will be hung on it. The length of the vertical and horizontal elements of the box should correspond to the height and width of the door leaf. When cutting blanks, be sure to leave a margin of 5-7 mm. Otherwise, the door may simply not close, and the price of the damaged frame, which will have to be paid a second time, will increase the cost of the product by an order of magnitude.

- Washed down under 45 degrees, the box timber should be put so that its feigned part looked up. After connecting the sections of the jambs with the crossbar, you must first drill the holes and then screw the screws into them. To connect the two parts requires three screws: on the one hand twisted two along the edge, and on the other - one in the center. So it is easier to adjust the geometric proportions of the internal angle formed by the details of the box.
- If the door is without a threshold, the lower ends of the shoals are filed exactly, as they must rest on the floor. In order to fit the frame as accurately as possible to the aperture, before proceeding to its fastening to the walls, it is necessary to perform a fitting. The gap between the crossbar of the box and the hub door liner is eliminated by installation of plywood gaskets under the vertical elements.

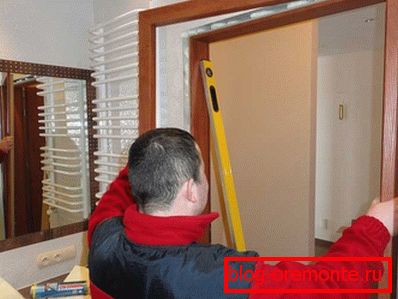
- The accuracy of the spatial position of the structure is checked by level. To do this, it is alternately applied first to the cross member, and then to the vertical parts of the box. Most often, it is fixed in the opening through the installation of wooden wedges, due to the thickness of which the position of the box can be slightly adjusted.
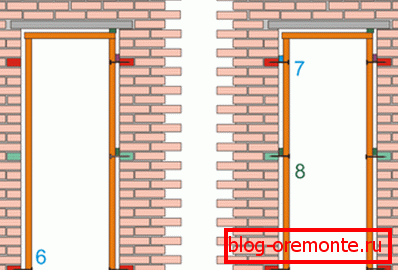
- Making sure that there are no deviations, the gaps along the contour of the box should be filled with mounting foam - and only when it dries can mechanical fastening be made. They fix the frame with screws to wooden plugs, which are usually installed on the sides of the opening for this purpose - in the picture below, these inserts are highlighted in a contrasting color.

- So that the attachment points are not visible, they are hidden under the hinges. The loops themselves will be installed after fixing the box, but the selection for them must be done in advance. If the door opening is in asbestos cement, or, for example, a plaster partition, there may be no mortgaged bars in it.
In this case, the box can be fastened directly into the thickness of the enclosing structure. But then as a fastener will have to use not screws, and long dowels, installed in the pot.
In general, each master carries out the fastening of the box in his own way: who uses only foam, who wedges and foam, who screws and foam. But in general, these methods are already outdated.
Fastening the box to the mounting kit
Today there is a more convenient mounting option, which is performed using the mounting kit. It is a set of screws with nuts, screws with dowels, brackets and washers.
Almost all of 6pcs, as the mount is made at six points, only screws and nuts - 12 pcs. In the singular, only a special-shaped wrench with which the nuts are tightened, as well as installation instructions.
- The most valuable advantage of this method of installation, we can assume the fact that the drill through the box is not required at all. The fastener is installed from the outside, in the gap between the frame contour and the pier, that is, it is hidden. Expose the box using such fasteners, you can most accurately - and, even in a non-standard opening.

- Fastenings of this type allow you to securely fix the door frame, eliminating sagging and other defects. At the same time such preparatory operations are excluded, such as preparing the surface of the floor, strengthening the wall and narrowing the opening. By the way, when using mounting kits, it does not matter what material the walls were erected from.
- The installation procedure in this case is as follows. After fitting the door frame, and checking the curvature level of the walls, mark points that are convenient for drilling holes in the walls, in which the dowels will be hammered, as well as on the outer perimeter of the box, where the brackets will be hung.
After the dowels and brackets are in their proper place, the box is fixed, hooking the grooves in the brackets to the heads of the screws. Next, a canvas is hung on the box, and then, with the help of nuts, they level the position of the door in the opening and fill the joints with foam. Everything takes about no more than 20 minutes for everything - while the front decorative cover of the box remains intact, and the fastener is completely hidden.