Do-it-yourself wrought gates
Today forging at the gate is the most prestigious and expensive pleasure. There is probably no person who does not want to use it in the decoration of the gate. But prevents the high cost of construction.
In this article we will explain how to make forged gates with your own hands. Step-by-step instructions for performing the work will be given. Video and photo elements you can find in the internet. But we will tell about their production below.
Training
Like all work, ours also requires preparation. I have to say right away that in order to make a product you must have at least a small concept about working with metal. Making wrought iron gates is a laborious process, and therefore the price of elements is quite high. Although everything is not so scary as it may seem at first glance
Tools and materials
We need a set of tools that are available in any household and something else:
- It will require a powerful vise, which is rigidly fixed. For example, to a workbench;
- It will be necessary and small yews. I for example used curved. You can apply any, but it is better that they are genuine, just a bend lever will be more and work will then be easier;
- Will require a semi-automatic or electric welding. If you choose the second option, then buy thin electrodes;
- Gaster. You can do without it, but it can facilitate the work;
Materials
To make forged gates, drawings should be made in advance and the amount of material calculated. (See also Gates - how to choose) When choosing frame elements, it is best to use a profile tube.
Do not forget, forging elements will significantly increase the weight of the product, so use a powerful material.
- Profiled tube;
- Sheet metal. Do not take less than one mm;
- Tetrahedron. It is required for the manufacture of the base of the peak. The best option is to take the fourteenth. Smaller size is easier to process, but it just does not look. Larger, extremely difficult to handle;
- Sheet metal with a thickness of five mm, it is required for the manufacture of the peak itself. You can take their quantity, add up, add 30% and you will receive the amount of this material.
Gate manufacturing
We start to make the gate forged drawings have and purchased the material. It is necessary to clarify one detail, all the elements after performing the bend and trimming from the installation base will increase slightly. This should be considered when fastening. If the material is strongly springy, it should be annealed, it is necessary to heat and allow it to cool in air and after that it will be easier to work with it.
Pillar installation
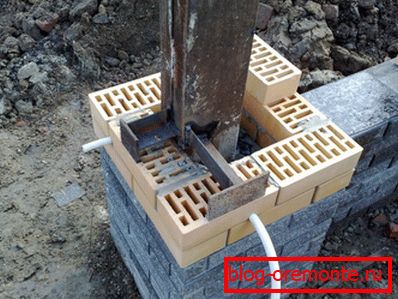
The structure will be mounted on poles. Which should be made powerful enough to eliminate sagging bollards. They are best done with a metal pipe and overlaid with face brick.

So:
- Mark up the installation points. In this case, we should not forget about the brick, which will be lined with metal pipe. Plus the thickness of the material. Making holes for the installation of pillars. Their depth must be at least one meter and the width of the structure itself is 10 cm;
- We insert the pillars and fall asleep rubble. Ramming When installing, we check the perpendicularity of the installation with a plumb line. If this work is not done correctly, then the sash will not be right;
Caution: Do not use material for a column thinner than 100 mm. In this case, it will not give the desired fastening rigidity. The folds in the process of time may sag. It is better to use a thick-walled tube.
- We make a solution of cement and sand in the ratio of 1: 3, the proportion applied to cement M300. In the dry mixture, add water and bring to a liquid state. For this better fit drill with a nozzle. There should be no lumps in the mixture and it should be homogeneous;
- We spill the crushed rubble. Check the perpendicularity of placement. If there are deviations, correct. We are waiting for solidification.
In order to brick a metal pillar, we make a solution, as described earlier, just bring it to the state of sour cream.
- Laying material is performed using a trowel. Each subsequent row must overlap the seam of the previous one. This will give the desired rigidity of the structure;
- At the height of the installation of the curtains should be welded tavern, with a thickness of at least 5 cm and release it through the seam. That we will have fastening points of the valves. If you have a very heavy construction, it can be mounted on three curtains;
- We are waiting for the seam to dry and make the jointing.
Making the sash
Далее будет рассказано, как сделать gate forged drawings которых уже есть, не прямоугольного типа, а фигурного. По типу снимка в начале страницы. Верх может быть сделан и ломаный и с радиусами. Все зависит от вашего выбора.
So:
- We start making wrought-iron gates by preparing the place where the work will be carried out. To do this, choose a flat platform with a size of more than the dimensions of the structure by two meters. We lay two channels with dimensions smaller than a product in dimensions of 20 cm. When laying, use the construction level, we need to make an ideal plane that is parallel to the ground. If we do not fulfill the conditions, we may have a propeller in a design that is rather difficult to fix;
- I repeat, we do not make a rectangular gate, but perform a radius at the top of the product or make a broken line. To do this, cut out from the profile of the rack with a length that is indicated in the drawing;
- Lay out the elements on the welding site. Check the angle with the right angle. We seize the joints by welding;
Attention: When laying the elements, the diagonal should be measured out. We should have a regular geometric shape. If this is not done, we will not get the right gate. To measure the diagonal, use a capron thread, with which you can make fairly accurate measurements.
- If the measurements show not compliance, then it is eliminated with a hammer. Weld bottom corners finally. We have a rectangle. The upper corners are welded in it, and the upper lintel is only stuck. We need it for fixing. Instead, it is immediately better to grab reinforcement, which will firmly fix the geometry of the product;
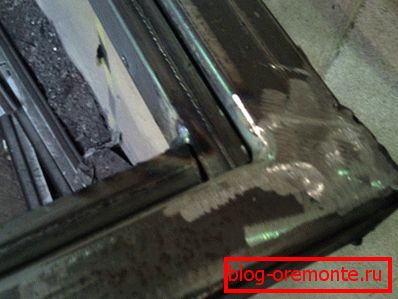
- We clean welding welds with the help of a grinder and a grinding wheel;

Attention: When welding, it is better to rigidly attach the frame elements to the channel bar using a clamp. When welding, the element heats up and leads it. The clamp will hold the material and will not let him go to the side. It can only be removed by the complete cooling of the junction point.
- Now we raise the frame of the leaf and lay it on a sheet of metal. On the inside we tack the profile pipe to the sheet of metal;
- If you want to make a broken line at the top, we do this. First, we draw it on a sheet of metal, which is above the size of the gate. We cut the profile to the desired size. We apply to the sheet and dock with the side profile, which is fixed finally. We capture the elements and sheet using a semi-automatic. We make cutting of a leaf by means of the Bulgarian and a cutting wheel. We fasten parts with clamps. We perform the final welding. We are waiting for complete cooling. Remove clamps. We cut off the reinforcement to fix the product. We clean welding welds with the help of a grinder. The door is ready. The upper part has the shape you drew;
Now let's make a radius at the top of the valves. Here, make it a little harder. It is impossible to execute separately two arcs of the top element symmetrically. If with a broken line you can just draw exactly the same size on the second flap, then when performing an arc, it will be difficult. We just need to make two blanks in this case.
- Put the prepared sash on a sheet and grab it, as in the first version;
- We measure the length of the upper plank and cut off the workpiece, only plus 30% to the desired length. This will go to the radius;
- If you want to perform a small radius. Then One end is fastened in a vice, which is rigidly fixed. We take a pipe of the order of one meter and with a diameter slightly larger from the profile and gradually with swaying movements we bend it. The second radius is done in the same way. Just try on it to the first periodically. That they turned out the same;
Caution: When you bend the profile. In no case can not make a dramatic effort. We need to make smooth movements in one direction.
If force is applied, the pipe can make not a bend, but a fracture. This should not be allowed.
- Attached to the top of the sash. Mark the level of trimming edges. We trim with the help of a grinder and a cutting wheel. We are applying. We catch. We look at the correctness of fastening. Cut the excess sheet. Fastened with clamps. Cook finally. We remove weld sags. We are waiting for cooling. Remove clamps. The door is ready.
Now consider how to make a large radius when it is not possible to achieve it using bending.
- Cut the workpiece with a size larger than 30%. On the one hand we make notches at an acute angle;
- We put the workpiece in a yew and clamp one edge;
- Gently press on the second edge and make the desired radius;
Caution: Bend should be done from two ends. Do not attempt to make a bending line in parts. Run the correct radius in this case will not work. Do not make a big cut.
Try on the workpiece, if necessary, the incision can always be increased. If you immediately make a big one, later you will have to brew and clean a lot, which is a lot of work.
- When the radius comes to the drawn line, we do everything as described above.
Make spikes
Almost all elements of forging used spikes. They are performed as follows.

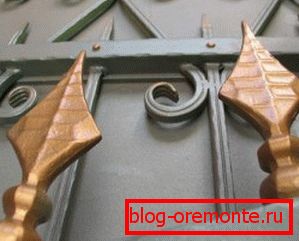
- To begin with, we determine the size of this element. After that, we take the overall dimensions and put them on a sheet with a thickness of 5 mm;
- We have turned out rectangles, which we cut out with the help of a grinder and a cutting wheel;
- If required, then we make the necessary radii on sandpaper;
- Now we need to give the element a three-dimensional look. To do this, with the help of a grinder and a grinding wheel, remove the angles under the desired slope and we will have a part that has volume. There is a second option, heat the workpiece with gas welding and then splash the edges with a hammer.
Attention: You make the heat to white, otherwise the material will flatten out poorly. When working, be sure to wear glasses and clothing made of tarpaulin.
Otherwise, sparks can hurt you. In no case do not cool the workpiece, otherwise you just harden the element. Let cools naturally.
Coiled rod
The lance is often attached to the tetra, on which there is a spiral. You can do it yourself. Let's look at this process step by step.

- Cut the tetrahedron of the desired size;
- Suppose we need to make a spiral on any part of the workpiece at a distance of 10 cm, or maybe two sections with a spiral, it does not matter the principle is the same. We put the risks on the workpiece with a distance of 10 cm;
- We clamp in a rigidly fixed vice along the line where the spiral will begin;
- We take yew curves and we clamp along the line of the end of the turns;
- Rotate the curved yews along the axis of the tetrahedron and make a spiral.
Attention: We count the number of complete turns, if this is not done, the elements will be non-symmetrical. Full turn, equal to one turn on the material.
- After that, remove the workpiece and trim it.
Perform elements with a radius
There are many radii in the forging elements with which various shapes are performed. For their manufacture using a tetrahedral workpiece or a circle. It all depends on the selected pattern.

- To perform radius figures, we will need to take a sheet metal with a thickness of at least 3 mm;
- Draw the desired picture on the sheet;
- When bending more than half a circle, the ring should be cut off from a pipe of such diameter with a height of about 20 mm;
- For non-full-diameter, any fittings with a length of 20 mm are suitable. This will be a column that is attached to the bend on a sheet of metal;
- Now we do this: In the figure where the extreme points of the bend are welded such elements. At the beginning of the pattern there should always be a ring out of the tube;
- We attach the tetrahedron to the first ring and grab it by welding. Begin to perform the bend, while pulling the workpiece by its free edge with one hand and gently tapping with a hammer on the place of bending with a hammer with the other hand. This we remove the voltage of the metal. And so we reach the next bend. We catch at the top point by welding and continue to bend.
Attention: Always take stock in a size larger than the pattern. It would be necessary for what to pull. If you pre-heat the element by gas welding, then it will generally bend like clay. Never take your time. Do uniform pressure.
The above methods can be used to make almost any shape. The main thing to think a little. Very few elements are made by pure forging. Most are done as previously. The main thing is to make elements at once on two doors and one pattern at a time. The price of the issue is not as high as it may seem at first glance. You can do everything.
End of work
After the forging elements are made, they should immediately be treated with an anti-corrosion liquid and allowed to dry. A white bloom will appear which should be removed with a piece of cloth.
So:
- On the doors make holes for fastening locks and curtains. It should be done immediately, after attaching the valves it will be more difficult to do. We do not make openings in the second flap for gate valves; this work must be carried out as an assembly;
- We take the curtains and weld them. It should be noted, use these elements only powerful, which are designed for the gate. It is better to choose a design with bearings. They will provide the desired smoothness of the course of the valves;

- You can take the base curtain and execute it as forged. To do this, on a sheet of metal draw the desired shape. Cut out using grinders. Cut off the edges and add volume. Welded to the base. Examples of forms are given below.
- Fasten the forging elements to the leaf, for this we use a semi-automatic. Making connections by point method. It will save time and material;
- We clean the welding weld. Completely degrease the sash. Apply a coat of primer. We paint;
- We hang the gates on the pillars;
- We make holes for clicking the lock on the second leaf.
Attention: Do not forget that there should be a gap of about 10 cm below the gate. This will ensure the normal operation of the structure in winter. Pay special attention to the places of welding, at these points corrosion appears the fastest. Apply anti-corrosion primer to surface treatment.
If you decide to automate the gate, then do not forget that this should be provided. (See Lifting gates) Make space for levers and cable routing. Do everything according to the instructions and the design will serve you for many years.