Do-it-yourself wooden gate - some practical tips
A beautiful wooden gate, made from beginning to end, will serve as a source of pride for the owner and an ornament for the house. Through it go every day. It is an integral part of the house.
In her appearance can draw conclusions about the owner. A beautiful, tastefully made, solid door will earn respect from guests and neighbors. Wickets come in various designs, designs, designs. Gate options are many. Selecting the door, you should take into account the fact that it will serve more than a dozen years.
Therefore, the selection of materials, design features play a role here. When the desire to make the door with his own hands becomes irresistible, the master will face a number of problems that he will try to solve on his own.One of them is the choice of material for the gate.
Wicket materials
Softwood lumber:
- Larch one of the best materials;
- Pine, spruce the most common, cheap, easy to handle;
- Cedar Great material, but quite expensive.
Hardwood lumber:
- Oak the most suitable, solid, durable, well polished and polished, has a beautiful texture;
- Alder, chestnut, ash, sycamore not common, but suitable for wickets;
- Beck It is not recommended to use, it is strongly subject to warping and cracking;
- Hardwood laminated veneer lumber Any suitable, this is the best option.
Tip: Timber should be taken ready, planed on a reysmusnom machine, dry, of equal thickness!
In the future, this will save you from problems with the layout of connections.
Wicket Tools

Making the gate itself of wood is not difficult if you have the necessary tools.
Here is a necessary minimum of tools to make a wood gate with your own hands:
- electric or manual drill,
- hacksaw or electric jigsaw,
- hammer,
- stameska,
- manual or electric plane,
- screwdriver or screwdriver
- water level
- rope,
- brush,
- carpenter pencil
- metal square.
- manual milling machine
How to choose the design of the gate

There are not many constructions of doors (see Which gates are better - we make a choice).
They are:
- lattice
- deaf
- with subcoal
- without the undercut
- wooden;
- wooden metal.
Простая решетчатая калитка without the undercut. как на рисунке 4, делается из широкого штакетника шириной 100 мм. Штакетник в такой калитке крепится двумя гвоздями или шурупами. Это делается для того чтобы ворота со временем не свисали.
How to make a wooden gate durable? The first step is to develop drawings. Selecting the appropriate option from the Internet is not so difficult. Options for connecting parts is not so much.
A lattice gate made of a picket fence allows you to see what is being done in the yard. Such wickets are called end-to-end. They are lightweight, durable, practical.
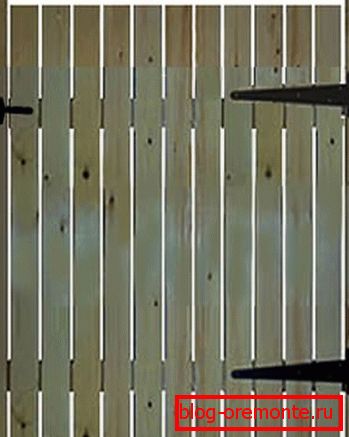
As can be seen from the picture, the gate consists of two supporting pillars dug into the ground. The depth of the pits depends on the depth of soil freezing in winter. How to find out the depth of soil freezing in your area? You must contact any architectural design office or search on the Internet.
The door frame consists of an upper and lower crossbar connected to a support and feigned rail. A strut is provided for stiffening the wicket frame. The frame is attached to the support pole with loops. In order that it was not opened by a gust of wind, a latch is provided.
There are two options for connecting the wicket frame:
- in spike,
- metal with toothed plates.
Spike connection most suitable

Such a glue connection is closed, durable. Mark and calculate the size of the spike and the groove is necessary so that the spike enters the groove with tension, that is, with difficulty.
It is necessary to glue wooden products with PVA glue. The wicket frame must be checked for geometric dimensions. The corners of the wicket frame should have 90 degrees. In addition to glue, such a connection is fixed with screws. Check the frame assembly can be measured by the diagonal. They should be equal to each other.
As for metal toothed plates, everything is simple. They are driven into wooden slats. Such a connection is made quickly, it is durable, can withstand heavy loads.
If there is a desire to make the gate more durable, they can be made of wooden-metal. In this case, the pillars and the frame of the door frame are made of metal, and the crate is made of wood. Such a gate is more durable than wooden. If necessary, the wooden crate can be changed.
Installation of a wooden gate

Before you install the wooden gate itself:
- It is necessary to mark the place of installation of the pillars.
- Before you install a wooden gate, it must be assembled on the ground to fasten with a picket fence, keeping the right angles, inserting a gasket 5-8 mm thick for the gap between the feigned rail of the harness and the feigned column.
- Installing a gate in the pitrice 2,3 with the help of the level, it is aligned vertically and horizontally in all planes.
- Strengthening sub-assemblies and concrete blocks, or tamped with rubble, gravel, ground mixture.
Sophisticated architectural forms
Is it possible to make such a gate a person who has never done anything like this? We will say yes, if you adhere to several conditions.
If you do not have detailed drawings of complex gates, do not even try to make it yourself. And without drawings nobody will make it to you. Develop a detailed drawing of the door and order all the complex curved shapes in the carpentry workshop.
This is especially true of the milling works that make racks, pillars, strips of a complex profile. It is quite possible to assemble a wicket of complicated shape from finished parts. To extend the service, the gate is first primed, then painted with several layers of enamels.
In between the drying of the layers of paint it is polished with sanding skins, covered with varnishes.
Accessories for wickets
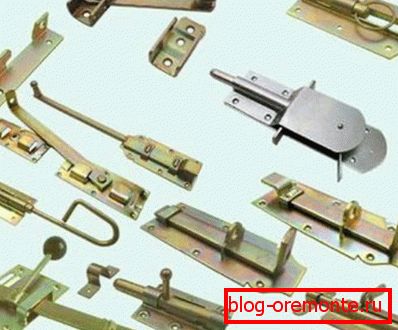
You will need to make the specification of all the parts, accessories so that during the work of something not to forget (see Installing the lock in the gate).
In the work you can come in handy:
- Automatic latch
- Manual latch
- Heck with ring
- Double-sided loop
- Actuator
- Cover constipation
- Patch loop
Decorating paints, enamels, varnishes
A gate made of wood with your own hands, made with love, will serve for a long time if you adhere to the technology when painting it (see also How to paint the gate correctly). Paints for finishing the gate must be taken for external work.
Paints, enamels and varnishes great variety. But coloring technology is not complicated. All parts before painting are treated with wood preservatives, primed with primer for wooden surfaces.
It is better to take a universal primer on wood and metal:
- glyptal,
- pentaphthalic,
- for opaque coatings.
Tip: Do not confuse primers and paints, they should be of the same type.
After priming the wicket is covered with two, three layers of paint, polished.
If the gate is varnished, the coating technology is completely different:
- Before varnishing the surface is polished, then moistened with water to lift the pile, and dried.
- After drying, grind and cover with caps.
- Then again polished and covered with several layers of waterproof varnish.
- Sand the surface until all the flaws are eliminated.

The best varnish to cover is yacht varnish. He is expensive, but worth it. A wooden gate with your own hands made will always please its creator when it passes through it.
How to make the door of wood durable? To do this, you need to know how to properly apply primers, putty, solvents, paints.
For reference: In order not to make mistakes there are compatibility tables of paints and varnishes.
Anyone who wants to make a wooden gate with his own hands for the realization and profit, should know the table of compatibility of paints and varnishes by heart. If you have learned everything, you can have a very beautiful gate.
A few tricks and tips
Coniferous wood is the most common, they are cheap, fairly durable. But the needles have flaws. It is soft and has resin passages and pockets. Do not take such boards to work. If, nevertheless, the resin hit the surface of the board, it must be removed with wood resin solvents.
Suitable for this:
- gasoline,
- acetone,
- ethanol,
- soda ash,
- caustic soda
- potash.
After applying the chemical and aging, it should be washed off with water. If the resin is not removed, the marriage is inevitable.
- Check measuring instrument. Pay special attention to the square. It may not be rectangular. It needs to be checked.
- Part marking. Always leave a seam allowance. Measure seven times and cut once.
- Connecting elements. Always use screws, screws, zinc-coated screeds. This will save you from rusty stains in the future.