Armored doors: do it yourself
Production of armored doors can now be found quite often. There are very different products here, even there are armored doors with a bullet-proof, and if you have money, you can even imagine armored glass doors.
Everything will depend on the volume of your wallet. Also, there are many types of finishes and videos in this article will help you choose exactly what fits your interior. Also, the installation instructions will be offered.
What attracts
What motivates us to armored doors at home? They are made not from armor, but from simple metal. Simply put locks (see Replacing locks in the metal door - as do the wizard) and hinges more powerful.
You can make metal doors yourself due to such reasons as:
- Efficiency design;
- The ability to apply their design skills;
- The specificity of the materials used;
- The desire to have a high quality product;
- Unique geometric conditions.
- The price of the product when doing work with your own hands will not be so high.
After all, if you want to get a beautiful and high-quality product, do it yourself. But you can’t call such work easy, you need certain skills and knowledge.
Yes, and the availability of tools at hand will help to cope with the task faster. The main thing is not to hurry and observe a certain order of assembly. We begin our work directly from studying the design of a metal door.
Metal door manufacturing
If you want to make armored glass doors, they will be made the same way. You just need to order bulletproof glass. After looking at the photo, you can choose the desired design and correctly measuring it will be possible to get to work. It is important not to rush and make the right measurements.
After all, the door is quite heavy and must be properly installed. If this is not done, then it can jam and its inaccessibility can turn against you.
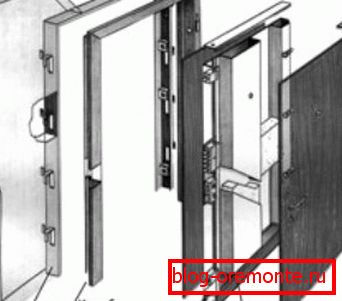
Metal door device
Before you make and install the door you need to install that refers to the structural components.
Here is a sample list:

- Metal carcass;
- Stiffening rib;
- Insulation layer;
- Mortise lock system;
- Cladding consisting of 2 mm metal sheets;
- Hinges (see hinges for metal doors - the nuances of choice);
- Box;
- Decorative upholstery;
- Accessories (peephole, door handles, hammers, etc.).
Attention: In order to strengthen the protection, it is necessary to install additional doors: a door porch, anti-pins and solid counter-removal.
- The canopy will help to close access to the crossbars, and consists of a lining on the front part of the canvas. It can be one, two and three levels. Pins exclude the possibility of removing the door with hinges.
- Counter crop increases resistance to power loads.
Then it is necessary to determine the size of the doorway and choose fasteners
Note: To determine the size of the doorway take the box and add to its width another 20 mm, and to a height of 10 mm. For example, the template size of the opening for a metal door will be 914/2090 mm.
So:
- The choice of fasteners can be different, whether it is a channel frame or stand, fixing the door box, or special fasteners for both sides of the opening.
- When mounting, the fasteners are buried inside the doorway by 25 mm for concrete walls and 40-50 mm for brick walls. The strength of the fastener ensures its installation at the top and bottom of the box.
Choosing the right materials, equipment and tools
From the materials we need: metal corner, steel sheet with a thickness of 1.5 mm, door hinges, fittings, plating, anchor bolts and construction foam.

So:
- The number of loops is chosen depending on their strength, as well as on the weight of the metal door.
- For plating use plywood, board or veneer, according to the presence and at your request.
- To the details of accessories, we choose locks for armored doors, door knobs and so on.
- From the tools we need: a drill, a welding machine, a grinder with a disk for cutting metal.
- From the equipment you will need a table for welding and goats to assemble the product.
- There are also armored doors with hidden hinges, you will need to think it over in advance and then purchase this material.
Completing of the work
In order to make a metal door in the first place it is necessary to make measurements.

Attention: Be sure to prepare a place for doing work. Here you will need a perfectly flat plane. The best welding table.
So:
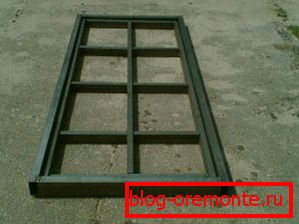
- After that, according to the chosen parameters, the corners are cut from metal. To check the corners of the future box, the corner is placed on a large welding table and the diagonal of the rectangle is measured.
- If all the parameters are accurate and the same, then we can safely proceed to the next stage - welding.
Note: For the manufacture of the box should take quite a powerful corner. Not less than 75 mm.
- The door frame is ready. The finished door frame is measured according to the internal space. In the process of measurement, it is necessary to take into account the gaps on each side of 0, 5-1 cm. Then it is necessary to cut an angle of 40? 25 cm for the door leaf. In the metal profile on the side where the lock will be installed, with the help of the grinder, you immediately need to make a slot at the level of the lock.
- In order to facilitate the process of further trimming the door to the profile, you must immediately drive in wooden slats of the required size.

- For the convenience of welding, it is recommended to weld the hinge profile to the door frame and to the hinges themselves. To ensure an exact match it is necessary to accurately measure the distances between the hinges on the door leaf and on the box. Compliance with this condition greatly facilitates the process of the door shed.
- Then you need to make sure that the box is installed parallel to the profile of the door leaf. And only after that, the remaining web profiles are installed and welded into the box.
- Now you can start welding a metal sheet. First, you need to measure the canvas so that on each side there is one centimeter left on the door knocks. On the side of the tie-in of the locks, 1.5 cm is left. A sheet of metal, cut to size, must be laid on a profile construction. For greater convenience, you first need to weld the loopback side in the inner cavity on the back side of the metal sheet, and then you can start welding around the perimeter of the web.
- To the reverse side of the canvas you need to weld a mock strip. If necessary, the door structure can be strengthened with stiffeners.
- The next step in the manufacture of the door is to clean the welds and paint the finished product. It is recommended to paint a metal door even in case of further finishing. Painting prevents rust.
- Now you can begin to insert locks. As a rule, in all modern doors install at least two locks. To do this, in a metal corner cut or drill a hole for the entrance bolt. Then in the door leaf it is necessary to form a hole to strengthen the lock itself. If desired, you can install a door peephole.
- After the door lock and peephole were in place, you can proceed to the decorative finish of the metal door. There are several ways to finish the door. One of the easiest ways is to paint the door. In addition, you can sheathe the door leaf with wood panels or slats. You can stick on the door PVC film, imitating the structure of the tree, or just sheathe the door with leatherette.
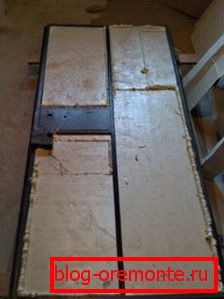
We install additional protection for metal door insulation. There are several ways to warm the door. The easiest is to use foam.
- So, in order to make the door warmer it is necessary to glue the foam onto the construction foam from the inside.
- The pieces of foam are interconnected, as well as stiffening ribs. If the installation door is external, then one foam is not enough. After all, by lowering the temperature the door will freeze exactly where the stiffeners are.

- As a rule, stiffeners are made of shaped tubes. Therefore, it is necessary to drill holes in the profile pipe, and fill the pipe with foam.
- Then glue on the entire surface of the door seal the desired thickness. It is through the plating that the heat and sound insulation of the entrance door can be improved.
- For facing the inside of the door, you can take plywood, MDF panels, wooden slats or other finishing materials.
Fastening of facing materials is carried out by decorative bolts for which holes are made in advance. You can also paste a decorative corner on the perimeter of the door. The outer side can be made the same way or paint, after removing the handles and lining.
The installation process of the metal door
Production of armored doors is done in a specific order:
- First we dismantle the old door. We remove the cloth from the loops, we saw off the vertical stand with a hacksaw or grinder, squeeze the box and completely remove it.
- Remove all traces of the presence of the boxFor this we clean the surface well.
- Then we attach the metal door to our doorway. and note its size, making vertical and horizontal marks, focusing on the construction level, retreating at the same time by 2-3 cm.
Attention: It is best to use a plumb when conducting perpendicular lines. With it, you can do everything most accurately.
- Then punch drilled holes needed along the marking line, at a distance of 3-4 cm from each other. Usually used in the punch drill for reinforced concrete slabs. If necessary, knock out the final contour of the opening with a chisel, then we clean it. Prepare the surface of the opening to install the door box.
- Now we insert the metal door into the opening., we align horizontally and vertically, if necessary, make fixation with wooden wedges. As a rule, strips and door handles to this stage of work are already installed in the door.
- We determine in advance in the box the attachment points with dowels.. We take for the beginning - the top of the box, from the hinge side. We drill the hole, insert the dowel, tighten the anchor screws, and the box is securely fixed.
- After fixing the door should move soft and free, do not touch anything. A properly installed door fits very tightly to the box, its locks and latches must be closed at all speeds, immediately work and do not seize. If necessary, re-adjust the door.
- Fill all voids between the box and the wall with construction foamafter pre-wetting the doorway. We need to wait until the foam is completely dry, only then proceed to the slopes.
- During work with slopes we close the door leaf with cellophaneIn order not to damage its surface.
Insulated door is ready for installation in the opening. Fix it with anchor bolts using mounting plates through the holes. Then blow the gaps between the box and the walls of the opening with foam. The final stage of mounting platbands.