Arched doors with their own hands: how to install
The topic of this article is the manufacture of arched doors, their installation and the subtleties of these processes. We will talk about the types of doors with arches, we note their types and features of each of the types. We also give recommendations on the independent production of the entrance door in the form of an arch from solid wood.
To date, arched openings of various shapes and styles are used in the construction and decoration of most premises. They are used both entrance and interior doors.
Types of arched openings
From the variety of doorways in the form of arches (see. Arches in the interior), you can make the following classification:
- Полуциркульные арки. They are the most common and are also divided into subspecies:
- Classic (semicircular) - they have an even radial shape.
- Ellipsoidal - are in the form of an elongated oval.
- Modern - have intricate shapes with different projections.
- Romantic - the shape is more like a rectangle, whose upper edges are slightly rounded.
- Подковообразные арки. They have the shape of a horseshoe. They can have not only a smooth semicircle, but also an elongated pointed top. Most often, openings of this type are used for decoration of premises in national styles.
- Gothic (lancet) arches. These structures have an elongated pointed shape, without smooth transitions.
What are arched doors
Arched doors have many varieties and are classified according to various factors: installation site, manufacturing material, structural features
Types of arched doors at the place of installation
There are two main categories:
- Interior doors arched - are located inside the residential and other types of premises. Most often made of wood and glazed. Stained glass compositions are often used to glaze such constructions (see Interior doors with a stained glass window: about beauty and individuality).
- Entrance doors in the form of arches - used mainly in the entrance groups of institutions: shops, organizations, shopping and entertainment centers. Made of plastic profile.
What are the doors made in the form of arches
Due to the complexity of manufacturing this type of door leaf, the type of material for their production is not very abundant:
- Plastic. This material is used to produce a profile, from which not only entrance doors are made, but also windows.
- Solid wood. Wooden door leaves in the form of arches are used for entrance groups in the private sector, as well as inside any type of premises.
Structural features of arched doors
Based on the characteristics of operation, complexity of installation and cost of the finished product, the following arched door structures can be distinguished:
- Cloths, repeating one to one contours of the opening. A feature of these doors is that their production takes a long time. They cost high enough. Such models are made of wood (see Manufacturing of wooden doors: a technological process), as arched plastic doors are made using a different technology.
- Standard canvases with an arched part fixed above them. These doors are somewhat cheaper, since the arcuate part of them is mounted separately and does not open together with the canvas. It is also possible to use not only swing, but also sliding options for paintings.
Note! The height of the opening for such doors should be large enough. It is calculated by the formula: F = 210cm + half the width of the opening.
- Single doors. They are usually used as interior, as well as entrance options for private houses and public spaces.
- Double doors. For wide openings it is advisable to use two doors. One of them can be fixed in the opening with a latch. Actual for entrance groups. At the same time, the “working” part of the door is often 2 times wider than the fixed one.
Making an arched door yourself
Despite the difficulty of making such canvases, it can be done. Now you will see for yourself. You and I will learn how to make entrance wooden arched doors.
It is better to order the boxed part by the sizes, and we will make a cloth the hands (see. The size of entrance doors).
We prepare everything you need
First you need to prepare a tool, boards and materials at hand.
We need it:
- Jigsaw with wood files.
- Electric milling cutter with two types of cutters: disc (for grooves) and cylindrical.
- The grinder with a skin of different granularity. Best of all - tape.
- Boards, 5 centimeters thick.
- Wedges of wood.
- Two small bars and 4 screws on the tree. The length of the screws should be 30mm more than the thickness of the bars.
- Joiner's waterproof glue. You can pva.
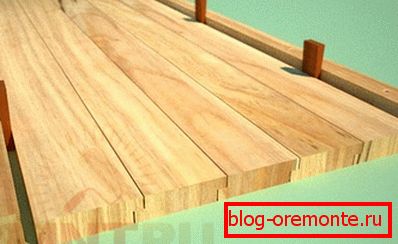
We make the workpiece for the arch of the canvas
To manufacture the arched part of the door leaf, we first need to measure the finishing width of the opening. That is, from the total width we subtract the thickness of the “box” part and the gap of 2 mm between the door and the opening (box).
After that we perform the following work:
- In order for the arch to turn out beautiful, its radius must be made equal to half the width of the doorway. Based on the width of the prepared boards, we calculate how many pieces they need. Boards will be placed horizontally.
Note! Before you make an arched door you need to choose well-dried boards. As if they are raw, the canvas will warp over time.
- Now, using an electric router, we make grooves for tighter connection. To do this, take a disk-slot groove. The grooves are done with such a view that the protruding part was about half the thickness of the board. That is - 2.5 millimeters. Similarly with the internal groove.
- Next, remove the dust from the entire surface of the grooves and apply carpentry glue to them. After that, we connect all the boards and leave them to dry.
Note! In order for gluing to happen better, you need to take a board and attach pre-prepared bars to it with self-tapping screws. The distance between the bars should be 10–20 mm greater than the width of the glued blank. Lay the workpiece between the bars and disintegrate it with wedges.
Cut a semicircle from the workpiece
For this operation, we recall the experience of assembling drywall arches.
We use one of two options for delineating the arched shape:
- If the arch has an even semicircle. We note at the bottom of the blank center. Then take a pencil and tie it with a non-stick thread. Cut the thread exactly the length of the arch radius. We attach one end of the thread to the mark and outline a semicircle with a pencil.
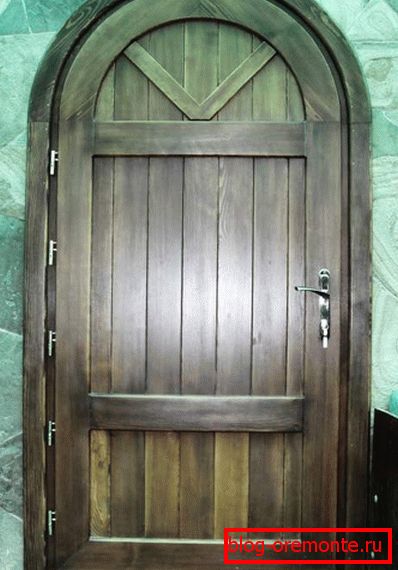
- If the shape of the arch (as in the photo) has an elongated semicircular or pointed shape, then use a different method. For delineating the boundaries of the contour of the bend is very convenient to use a long metal ruler. We also mark the middle and draw a line from it strictly vertically to the length of the arch radius. Next, we place the ruler on the edge and bend it so that with one edge it touches the radius mark, and the other coincides with the edge of the workpiece. After that, draw a pencil line. From the second side we are doing the same steps.
Note! Make sure that you get a symmetrical figure of an arched notch.

Next, take a jigsaw and carefully cut the workpiece on the markup. After that, we take the grinding machine with the largest sandpaper and process the surface of our arched door on both sides. After that we repeat grinding with a smaller abrasive.
Now the most beautiful part of our door is ready. Interroom doors of arch type can be decorated with the same elements. However, it is worth considering that for the interior will be more elegant glazed arches. And their production requires carpentry skills.
Finish door leaf
Now we have to do the rest of the door. It will be assembled on the same principle as the previous part. The only difference is that the boards will be arranged not horizontally, but vertically.
It is also necessary to provide a horizontal part on the very bottom of the canvas. This will prolong the life of the door.
As a result, our door leaf will consist of 3 parts:
- Horizontal bottom cross member.
- Shield of vertical boards.
- Upper cross bar. She - the arched part.
After all 3 parts of the door are ready, we connect them using the tenon method. To do this, we mill the appropriate operations and plant all 3 parts on glue. Do not forget to prop the canvas with wedges.
The final stage is the treatment of the entire surface of the door with a protective agent and a finishing coating. To do this, "Pinotex" or any other protection for the tree.
If the door is constantly on the sunny side, then it is not recommended to cover it with laminating coatings. In this case, it is better to use ordinary clear varnish for outdoor work.