Arch from the drywall with your own hands - step by step
When you want to get rid of the door, but do not want to leave the door frame in the opening, the best way out of the situation will be a drywall arch, which is not as difficult to make as it seems.
You will succeed if you follow our instructions exactly. The process of making a drywall arch may differ slightly depending on the thickness of the opening or the material of the walls.
For example, if you build a plasterboard partition wall, in which the arch will be located, the frame for it is made simultaneously with the partition frame. If you need to change the old doorway, the arch can remain the same height (you only need to round the corners), and it can become higher if you remove part of the wall above the opening.
Finally, the interior arches of plasterboard can be arranged in a solid wall, for which you need to cut down the opening in it of the size and width you need. At the same time, it is not necessary to take care that the edges of the opening are smooth - they will disappear behind the newly erected structure.
- 1 Types of drywall arches
- 2 Materials and tools
- 3 Arch Installation Instructions
- 3.1 Preparation of the archway opening
- 3.2 Pattern blanks
- 3.3 Manufacturing frame
- 3.4 Installation of the arch
- 3.5 Arch decoration
Types of drywall arches

Drywall - a very convenient material for the device of complex structures, including rounded shape. It is easily cut and mounted, and when wetted it can take a curved shape.
The smooth surface of the drywall makes it much easier, and sometimes does not require puttying. In addition, the low weight of drywall makes it easy to cope with its installation without assistance.
Thanks to these properties, drywall arches can be made of any, the most bizarre form - narrow and wide, smooth and pointed, correct and irregular. In the figure below, the arch is decorated with through decorative openings and shelves.
Even such a complex structure can be made independently, but for this you need at least some experience with plasterboard (see Making an arch out of plasterboard). Therefore, let us begin with a small one — a device of an ordinary semicircular arch in a doorway increased in height.
Materials and tools
Would need:
- Drywall you need two types: wall, 12 mm thick, and thinner arched, 6.5 mm thick.
- For the manufacture of the frame you need to purchase two types of guides of U-shaped profiles: rack profile 60? 27 mm for straight elements and guide profile 28? 27 mm to create the contour of the arch.
- Reinforced arched corners necessary to strengthen the edge of the arch.
- Self tapping screws. They also need two types: short screws for metal (the so-called "seeds") and special screws for fixing drywall. In addition, to fix the frame on the walls, you will need nylon dowels and screws on the tree.
The number of materials is calculated based on the size of the arch. A set of necessary tools is also better prepared immediately, so as not to look for them at the right moment.
You will definitely need:
- Screwdriver or drill with a bat.
- Scissors for metal.
- Wallpaper or ordinary sharp knife.
- Roulette and pencil.
- Jigsaw.
- Level.
- The puncher with a drill.
Before learning how to mount an arch by video, read the instructions below.
Arch Installation Instructions
Preparation of the opening under the arch
Having drawn a sketch of the arch with the desired dimensions, prepare the opening, expanding it if necessary and making it higher. The top of the opening for the convenience of work is best done straight.
Pattern blanks
We proceed directly to how to build a drywall arch:
- Measure the width of the opening and its height from the top point to the end of the arch of the arch.
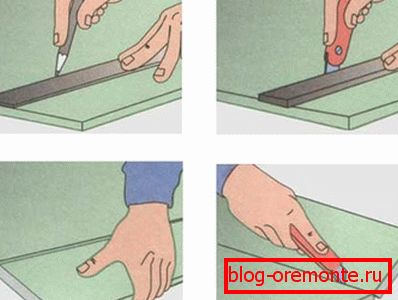
- Cut out of plasterboard two identical rectangular pieces of the desired size. This is done simply:
- Attach a long level or straight rail to the drawn line and slide along it with a wallpaper knife with strong pressure.
- You need to cut through the top layer of cardboard.
- Then break the sheet along the cut, fold it and cut the cardboard from the back side.
- Place one of the blanks on the floor and draw a vertical axis on it. Retreating a centimeter from the bottom edge of the workpiece, screw the screw on the axis line and tie a string with a loop on the other end to it. Insert a pencil into the loop.
- Winding the string on a pencil, determine the desired radius of the future arch. In our case, it will be equal to half the width of the workpiece.

- Lightly tighten the string, draw a semicircle with a pencil.
Council If the opening is narrow, the semicircular arch can be too steep and cause problems with the installation of the end part. In such cases, it is better to increase the radius and give the arch of the arch a flatter appearance.
- With an electric fretsaw cut along the markings an arch, trying not to break the sharp lower corners. Instead of a jigsaw, you can use a hacksaw for metal.
- Place the finished blank on the second piece of drywall, align and align the edges and draw the outlines of the arch, using the blank as a piece. Cut a semicircle from the second piece.
Manufacturing frame
To fix the arch in the opening, it is necessary to make the frame of the rack metal profiles. To do this, use metal scissors to cut the profile according to the size of the blank - you should have four vertical elements equal to the height of the blank and two horizontal elements equal to its width.
For vertical posts, cut stiffeners in the lower part of the stiffener at an angle so that they do not protrude beyond the plasterboard contours. Attach the profile to the walls of the opening, retreating 1.4–1.5 cm inland on both sides, leaving room for drywall and considering the thickness of the reinforcing corner.

When deciding how to make an arch from drywall, assess the condition and thickness of the walls in which it will be arranged. This is necessary in order to choose the method of fastening the frame.
In concrete and brick walls, it is best to drill a hole with a perforator with a 6 mm drill every 20–30 cm to a depth of 5 cm, and insert nylon dowels into them. In them the metal frame will be fastened with screws on a tree.
How the assembled frame should look like can be seen in the picture above. But on it the thickness of the opening is very small, so one contour was enough.
If the wall is thicker, the frame is fixed at the inner and outer edges of the opening. It will visually show how to make a drywall arch - the video you will find on this page.
Arch mounting
We turn directly to the installation of the elements of the arch cut out of the plasterboard on the frame. They are screwed with self-tapping screws for metal of 3.2 25 25 mm and lightly embedded in the sheet.
It is necessary to act with care, so as not to break the drywall. The distance between the screws is 10–12 centimeters.
Attention! If the distance from the top of the arch to the top of the opening is very large, the frame should be strengthened by screwing the transverse profile.
The front part of the arch is ready, now you can do the trim of its end part.

So:
- Accurately measure the length of the arch of the arch, put this size on the guide profile 28? 27 and cut it with scissors for metal.
- To bend a profile, use the same scissors along its entire length to make cuts on the edges every 6–7 cm. Prepare a second profile in the same way.
- Place the curved profile from the inside along the radius edge of the drywall. It should be tightened with the same screws on the metal from the drywall side.
- Finishing to fasten both profiles, measure the distance between their outer and inner edges. They will be required for making lintels. First cut a piece of rack profile to a larger size, and then shorten stiffeners on both sides. Tighten the lintels to the arch with "seeds", as shown in the picture. The distance between them should be 10-15 cm.

- Measure the thickness of the arch on the outside. The length of the vault is already known to you. For these sizes, cut a long strip of arched drywall.
- To bend the plasterboard, you can make transverse cuts along the inner cardboard side of the strip and gently break it along them. But it is better to proceed otherwise. Wet the workpiece with water, having previously made a perforation on it with a needle roller or any sharp object. Let the plaster sink for a while, and then carefully shape the desired shape, using the previously cut semicircles as a template.
- When the drywall strip takes the desired shape, screw it into place, twisting the screws every 6-7 cm.
The work is almost complete. Thus, you can make any partitions and arches of drywall, embodying the most daring design ideas. But the finished arch must also be prepared for subsequent finishing, plastering the joints with the walls and strengthening the edges.
Arch decoration
So:
- Before starting plastering work, make sure that the edges of the arch are even. If this is not the case, cut off the protruding patches of dry plaster with a knife or a plane.
- First you need to smooth the joint between the ends of the arched vault and the wall using a special mixture.
- The next step is to seal large recesses on the walls.
- Then a reinforcing corner is fastened along the edges of the roof.
- And putty the entire surface. Do not forget to coat with a mixture of grooves from the caps of the screws.
- After the mixture dries, all irregularities are smoothed with sandpaper, and then a layer of finishing putty is applied.
- Before painting, pasting wallpaper or another type of decorative finish (see Arch decoration), the arch should be sanded again with fine sandpaper and ground.