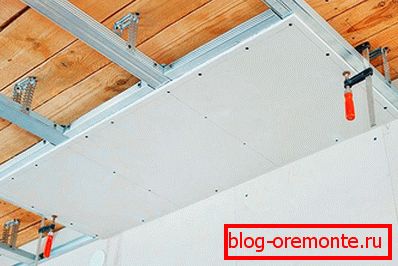
Two-level plasterboard ceiling itself
One of the most important stages of modern repair is the finishing of the ceiling. This means not just his whitewashing, but more complex work. These include the following processes:
- plaster ceiling;
- simple putty;
- suspended ceiling device.
I want to talk about the last type of repair separately and in more detail. Suspended ceilings are different, however, everyone has a common thing - a frame made of metal profiles and sheeting with sheet material (plasterboard) or cloth (stretch).
In turn, the frame structure, regardless of the type of finish, are divided into:
- single level;
- two-level.
Less common and more levels. Is it possible to make a two-level ceiling of gypsum itself or not? Of course you can, if you find out how. Such ceilings have recently become increasingly popular, with their help you can decorate even the most ordinary room.
Preparatory work

It is worth noting that before you start making the ceiling, it would be better to finish all the dirty work in the room by completing the floor screed and plastering the walls. However, with such works as wallpapering, laying laminate or linoleum flooring it is better to wait until the ceiling works are completed. If the work is carried out in a private house, you should make sure that the roof does not leak anywhere. Otherwise, the finished ceiling may be exposed to moisture and deteriorate.
Before starting work, it is necessary to decide what kind of ceiling will be made in the room: what the shape will be, and how many levels it will consist of. After that, it is best to transfer all ideas to a sheet of paper. Some people seek the help of specialists to develop a project of a multi-tiered ceiling for a particular room.
Note! It is important that the humidity in the room is no more than 75% and the room temperature is maintained for at least 15–16 ?. These are the optimal conditions for repairs in general, and especially for the ceiling installation.
Laying out the walls before installing the ceiling

How to make a suspended two-level ceiling of drywall at home? For example, consider the ceiling with two levels, located at a distance of 10 cm from each other.
Levels are built in order, first the first, and then the second. Before installation it is necessary to make a markup:
- Measure all four sides of the ceiling;
- Measure and mark all projected levels on the ceiling.
After the layout is done, the resulting data is applied to a piece of paper with a drawn room map. Then, using this data, you can buy the required number of profiles, sheets of drywall and fasteners.
Note! The first level is considered the highest. In the event that one level is added to the finished ceiling, it becomes the second, and the native foundation (for example, concrete slabs) becomes the first.
Mounting frame for ceiling

The multi-level ceiling is sheathed with gypsum plasterboard, so it is necessary to create a frame. It is recruited from metal profiles connected to each other.
The frame must begin to collect from the wall. To it with the help of d-bolts O 6 mm the guide profile UD is fastened (in which CD profiles going along and along the room are fixed). In order to accurately mark this profile, it is necessary, before beginning the installation of the frame, to draw one flat horizontal line along all the walls, the beginning of which in this case must necessarily coincide with its end. That is how the installation of two-level ceilings begins.
Note! To draw a line on the wall, you must have a laser level and a pencil. If there is no such level, you can take the water level and make a mark on the corner of each wall, and then on them, using a tipping cord, mark the line of attachment of the frame.

To the profile attached along the perimeter, you can begin to mount the CD profile. It is mounted in steps of 0.6 m and will be carrying for drywall. The edges of this profile are inserted into the guide so that their ends all the way into it. Now this connection needs to be fixed with small self-tapping screws, which are often called "fleas".
For two-level ceilings, the load-bearing profiles must be fixed more thoroughly, since the weight of the whole structure will be considerable, which means that it needs to be strengthened so that the new ceiling can withstand the load. This will require special suspensions. They can be in the form of:
- spokes, which can adjust the height of the suspended ceiling;
- fasteners, bent in the shape of the letter "P".
 Suspensions are attached to the ceiling every half meter for a more secure fit. To accurately understand exactly where they should be located to consolidate the profile, you can proceed as follows. Knowing the step with which the profiles will be positioned (it depends on the width of the gypsum board and, as a rule, is equal to half of this value), on the ceiling, rows of fastenings are marked with the same chop cord.
 For the crosswise connection of the profile parts, special crabs are used.
When the load-bearing profiles of the first level are recruited, mortgages (53.5 cm long) connecting the longitudinal rows between them are collected between them, and 100 mm sections are cut to connect the two levels and fix the drywall pieces to this side wall.
Note! If the ceiling chandelier is mounted, it is also necessary to think out additional fasteners for it, otherwise it can pull down the plasterboard ceiling.
Laying communications

Before you start plastering levels with plasterboard, it is necessary to carry out all the required communications - most often it is electrical wiring, sometimes ventilation, less often low-current alarm wires of windows or balcony doors.
As for the wiring voltage of 220 V, it must be tightened into the corrugation. All existing connections need to be made outside the ceiling, since if the places of the twists are oxidized, or you need to add an additional cable, you will have to disassemble the ceiling. In the wall below the ceiling should knock a hole under the junction box with a lid, cover it there with alabaster and putty flush with the wall.
The cable in a corrugation fastens to the old basis. You can not leave it hanging just like that, otherwise during the mounting of drywall to the profile you can get a screw into the cable. To fix the corrugation (or several at once), you can use several options:
- Drill a hole in the ceiling and plug a dowel O 6 mm into it with a screw, on which wire of corrugation or a piece of hard aluminum wire is screwed. This is done so that two equal pieces with a total length of about 15 cm leave the screw.
- With the help of the same screw, a special bracket is fastened, which is tightened around the corrugations. It can be made independently of a piece of tin, and then compressed around the cable with pliers.
- So the wiring will be securely attached and will not cause any problems later. Do not forget that you need to leave pins for chandeliers or LED bulbs. If you plan to connect power to them before the completion of the work, the cable ends must be separated and insulated to avoid short circuits.
Fastening sheets to the first level
Sheets need to be fixed not flush, one to one, but with an offset of half a sheet. The first row always begins with a whole sheet. If the height of the room is considerable, you can use a special T-shaped device for raising the sheets upward, similar to a mop with a long handle (by the way, a mop will also work). In this case, the two drywall lift with scaffolding or table to the ceiling. After that, one of the workers supports him with this device, and the second with a screwdriver secures the sheet onto the profile frame with self-tapping screws.
Note! In order not to waste the drywall and not to close the entire area of the first level, in advance, before installation, it is necessary to mark the borders of the second level on the supporting profiles.
In order to mark the border of the second level of a rectangular shape, you need not so much. Design distances are measured from the walls, and a framework is built on them. If the shape of this level is round, you should do so - the room is divided by lines equally along and across. The resulting intersection of these lines will be the center of the room. There the screw is twisted, the wire with the second screw or nail is twisted on it. It turns out a kind of compass, which is held and the circle of the second level. Scratched line need to circle a marker or construction pencil. The main thing is not to make a mistake in the length of the radius.
When fixing the drywall on the first level, it should be wound around the edges of the frame for the second tier approximately 7 cm, so that no voids are visible at the corners of the structure. The first level is sheathed first, then the second. In the course of fixing in gypsum sheets, you need to carefully cut out small round holes with a stationery knife to bring out the lighting cable.
Ceiling finish

When all levels are sheathed with plasterboard, a self-adhesive mounting grid is applied to the seams and corners, after which the entire surface is primed and puttyed. When the putty dries, the ceiling can be re-primed and painted with water-based paint using a roller. The completion of the work is the installation of LED lamps or chandeliers on embedded parts.
Video
This video shows the installation process of the second level of the gypsum ceiling: