Rack ceiling itself
Non-standard interior is a fashionable trend of this millennium, therefore everything connected with the unique design of the room has unprecedented demand. Creating unique interiors, experienced designers began to resort to an interesting solution, focusing on the ceiling and its decoration.
Rack ceilings are a modern alternative to suspension and tension structures. They become every day more and more popular, gaining the trust of consumers with high quality, durability and other characteristics. In this article, we will tell you how to make a slatted ceiling with your own hands, as well as demonstrate the video instruction.

The advantages of such suspension systems can be added to the ease of installation and ease of construction. In addition, it is easy to hide all communications in rack ceilings or install a lighting device of any type.
In the production of rack systems use the best aluminum, which is covered with special substances. The structure on which the slats will be held also undergoes the corresponding processing.
Varieties

Rack systems of panels can be divided according to the type of installation into two types - closed structures and open. The first type of suspension system consists of a frame (metal) on which aluminum panels are subsequently fixed at a certain distance. The gap resulting from these actions is closed by special inter-rim inserts, which can even be painted in a different color.

Open ceiling systems are virtually indistinguishable from the previous type. Their only difference is that there are no additional inserts between the slats, as a result of which the whole structure is well ventilated and prevents condensate from accumulating, as it happens in closed systems.

Note! Substandard materials or materials without proper processing will have a shorter service life than the same high-quality products.
Calculation of materials

Here are a few simple rules, under which the rack ceiling will be properly installed and securely fastened. The calculation of the number of spotlights, which we will insert into the design, is carried out individually.
- The total length of the wall corner is calculated by summing the lengths of the walls. Depending on the dimensions of the room, there may be unused scraps of the wall corner, therefore material overruns are possible. This must be considered in advance.
- The maximum allowable distance between two adjacent tires should not exceed 1.2 m.
- Universal suspensions должны быть установлены не ближе 0,3 м друг от друга.
- On the wall corner a special rail should lie almost close to the neighboring elements. A minimum clearance of 3–5 mm is allowed.
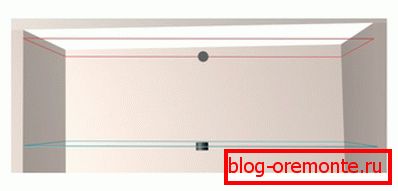
Note! First, it is recommended to draw the room on paper, observing all proportions, and the view in the drawing should be on top. Without a detailed scheme, you will not learn how to make a slatted ceiling.

It is recommended to indicate on the scheme:
- Lighting devices and their exact location.
- Places in which universal suspensions will be fixed.
- Installation locations of load-bearing tires and exact distances between each of them.
- Width
- Height.

It is recommended to fix dowel-nails to fasten each element of the metal frame to the wall. In terms of size, fasteners 6 by 40 mm are best suited, the number of which is calculated as simply as the materials. Fastening of the wall corner dowel-nails is carried out in increments of 35–40 mm, and universal suspensions are mounted on one fastening element.
Instruments

Before you mount the slatted ceiling, you must assemble the tools that you may need in the process.
- Crowns for metal. The diameter of these products is selected in accordance with the size of the lighting devices.
- The laser level, which can be successfully replaced and water.
- Hammer.
- Bulgarian, in the absence of which you can take a hacksaw for metal.
- Rule
- Level 1.5 m.
- Several special 6 mm drills if you have to work with concrete or other hard materials.
- Yardstick.
- Puncher and drill to it.
- Pencil.
- Ruler.
Markup
To install the slatted ceiling without any hitch, before starting the process it is necessary to make a layout of all the elements, which we did when drawing the scheme. Adjustable mounts allow you to lower the ceiling of the rails to any convenient height. In this design it is very easy to mount spotlights.
The installation of lighting devices requires that the ceiling be lowered to their height.
Note! When installing the structure, it is necessary to leave a gap of 1 cm, which is provided in the technical documentation.
Using a ruler and a pencil, leave a mark of the location of the future structure, starting from the main overlap. Now, using the level, it is necessary to note the working plane in which the rack system will be located. At the last preparatory stage, we connect all the marks we left with a solid line.
Note! If the walls are tiled, then it is best to mount the slatted ceiling so that you do not have to drill holes in the tile joint, as there is a high probability of damaging the material.
Installation of the wall profile
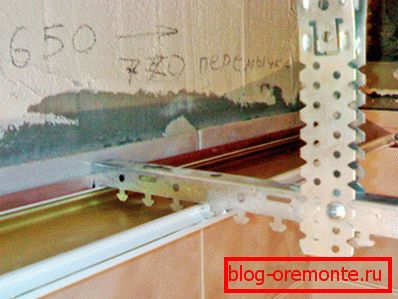
We take the wall profile and in the central part of its vertical shelf make notes with a pencil. The approximate distance between future holes is 35–40 cm. Now we drill on the marks with a drill. We attach the profile to the wall and align it with the drawn line. Through the holes in the product mark the place under the dowel.

Drilling holes must be a special drill designed for concrete structures. When the hole is ready, insert a plastic dowel there, then fix the profile with screws.
Universal suspensions

We again need a ruler and a pencil. Right along the base we draw several parallel lines at a distance of 1.2 m from each other - these are the so-called axis of stringers. It is recommended when drawing on the ceiling to draw on the preliminary drawing, which we did at the very beginning. We mark the places where the suspensions will be fixed along the entire length of the planned lines with a step of 0.3 m.
For drilling holes using special drills. Insert the dowels into the finished holes and carefully hammer them in with a hammer. It is necessary to fix suspensions with self-tapping screws inserted into the dowels.
Universal hanger - a needle with a loop and another with a hook, on which a universal tire is hung. These two elements are fastened to each other with a rigid springy strap, which allows you to adjust the height of the structure. For fixing the suspension using a dowel-nail, which is threaded through a loop and driven into the base.
Profile fixing

The stringer must be fixed with holes for special hooks. The profile can be easily shortened by a grinder to the desired size using discs with a thickness of 1–1.2 mm. Panels can also be reduced in the same way. Focusing on the drawing, we make several wide holes for spotlights with crowns. Reiki we start in special grooves and snap into place.
Final stage

We insert special inserts into the empty space between the slats. That's so easy and with minimal cost, we installed the rack system in the room. Moreover, there we were still able to build spotlights, which are now very popular and look very stylish.
Video
We offer you a video about the installation of the rack ceiling: