Pvc ceiling
Recently, the ceilings often began to get rid of plastic panels. They look beautiful, easy to assemble and affordable. The main thing is to follow the instructions and carefully handle the material. Then we will talk about how to make the ceiling of PVC panels with your own hands.
The advantages of PVC panels

- High resistance to moisture. This big plus gives the chance to apply panels in rooms with a different microclimate. They are well suited for installation in toilets and bathrooms.
- They are easy to care for. You can occasionally wipe the ceiling material with a damp cloth, this will be enough to completely remove dirt. Dust can be wiped with a dry cloth.
- Panels are versatile to use. Especially graceful panels from famous brands look great in bedrooms. Cheaper materials can trim the ceilings in the kitchen and in the hallway. Look good plastic panels on the loggias. As already mentioned, plastic panels can be mounted in the bathroom and toilet.
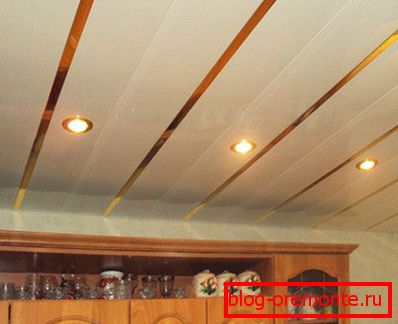
- The design of PVC panels easily hides the real state of the ceiling, even if its surface is unsightly. Under the plastic without any problems hiding workers communications, which are pipes and electrical wiring. On the plastic ceiling looks good spot lighting. No less elegant look other lamps.
Variety of finishing panels

Now, in many hardware stores you can buy PVC panels. The variety of materials offered is quite high. Heavy and rigid products are suitable for wall cladding. Lighter and brittle panels are used for ceiling cladding. The latest materials should be handled with care. A light impact on them with your hand or tools is enough to leave a dent in the panel.
PVC panels are diverse in their characteristics. They differ in color, size and texture. Often the surface of products is treated in such a way that they resemble natural materials. Imitation in marble or wood is in demand. Some panels visually create the impression that the ceiling is sheathed with clapboard. Other materials at a quick glance look like a single whole, and their installation is not much different from the installation of other types of PVC ceiling panels.

Plastic panels vary in appearance. They can be:
- glossy;
- matte - this type of material is more affordable;
- different colors or with a pattern applied to the surface.

Patterned panels are manufactured using a thermal film from which the image is transferred to the product. This method is often found because it is quite cheap. In another embodiment, a printing press is used directly, the color resolution of which allows the application of a color range that imitates any material with different colors and shades. Regardless of all these nuances, the most important thing is that the panels purchased are of high quality.
Determination of the quality of plastic panels
- First, a visual inspection of the item of purchase is carried out - the quality of the surface, the accuracy of the geometric contours, the proportionality of the figure shown, the evenness of the contours are assessed. In quality products should be absent: the displacement of the elements of the pattern, uneven lines, distortion in any direction, the unevenness of the surface.
- Special attention should be paid to the stiffeners, which are made inward, and during installation should not go to the front side.
- Stiffening ribs on the inside give panels strength. With the same dimensions of the panels, you need to select products with stiffeners, of which the maximum number is on the surface.
- In addition to the design you need to pay attention to the thickness of the product. This is especially true not so much stiffeners, as the front wall of the panel. It should be strong and thick.
- It will be necessary to try to connect several PVC panels together on the spot and check how they will look on the ceiling. The connection should be easy and perfect, there should be no gap between the panels. All panels that are of high quality are easily interconnected, while the assembly is carried out without any traces.
- Before purchasing a product, you can test it for strength. The seller, engaged in the sale of high-quality goods, will not be afraid to conduct such a test. This factor plays a huge role. For testing, you can apply force to the panels for the possibility of their deformation. If the product quality, integrity will not suffer. If there is a deformation, it will be minimal, and there is not even a question of a crack. The deformation that results will not interfere with the full connection between the elements of the future ceiling.
- In addition to the strength test, bending panel testing will be equally important. You need to pick up a corner of the product you like and bend it in opposite directions several times. If with this testing PVC remained holistic, this indicates the high quality of the material. If the panel is cracked, which is unacceptable, it means that the product is of poor quality and it is undesirable to buy it, since there is a surplus of chalk in it. Such material may break during installation and during operation it must be treated with extreme care.
Calculation of the number of parts

To quickly and efficiently make a ceiling of PVC panels, you first need to calculate the material and fasteners, and determine their number. This will allow to approach the work from the point of view of economy.
- You must first measure the length and width of the sides, multiply the values between each other and determine the surface area of the ceiling. The resulting number is divided into the area of a single product, which is written on the package with panels. The resulting value is multiplied by a factor of 1.2, which determines the amount of material that must be removed as a result of trimming.
- After that, the turn comes to counting the number of profiles that will be used during installation. The ceiling plan is drawn in a convenient for perception scale with dimensions applied to the drawing. Draw lines parallel to one side and between each other. Along these lines, markup is made for fixing profiles. From practice it is known that the most suitable distance between profiles located in parallel is about 0.55 m. Taking into account the data of the calculation, it is determined how much profile will be needed for installation work.
- In order to build a profile along the ceiling contour, you need to buy a UD profile that is distinguished by its rigidity. If the ceiling area is large, then cross strips are used, for which a lightweight CD profile is taken.
- Profiles and panels need to be fixed on the ceiling. This will require fasteners, the amount of which must be calculated. Fasteners are needed at two stages of work. First, fix profiles to the ceiling. At 1 m profile is used 2 dowels. Then fasteners will be required to fasten the PVC panels to the profiles. For this work, self-tapping screws are needed in the amount of 2 pcs. on 1 m product. Screws should be with wide caps.
- Often around the perimeter of the ceiling is mounted plinth made of plastic. He looks good and hides the gap. Since the baseboards are sold in lengths of 3 m, to determine their number, the ceiling perimeter is divided by 3. The resulting number is rounded up.
Installation of PVC panels on the ceiling

The ceiling lining with PVC panels runs in a certain order.
- Armed with a mounting level, a markup of the line is made for fixing the UD profile along the entire ceiling contour with respect to the horizontal surface. From the ceiling, the indentation should be up to 0.1 m, sometimes this limit is exceeded. At the same time, evenness of the surface and dimensions of the luminaires are of great importance.
- Along the perimeter of the room, the profiles are carefully fixed to the walls. Slots and voids are unacceptable. To the fixed profiles UD, which stretch along the entire contour of the area, the CD profile is placed, placed in the transverse direction. Plastic panels are fixed on it.
- After that, a plastic L-type profile is attached to the bars placed around the perimeter of the room. At the same time, self-tapping screws are used.
- Before installing the panels on the profiles, under the ceiling hide all communications that will be hidden. Wires and pipes are laid, as well as holes in the panels where the spotlights are installed.
- Installation of plastic products starts from the wall and continues in the opposite direction. They are cut with a hacksaw for metal so that the length of the panels corresponds to the size of the ceiling.
- The initial panel is carefully joined to an already attached L-type profile and fixed with screws along the entire length. The rest of the material is carefully attached to each other and attached to the profile.
- If you plan to install plastic baseboards on the edges of the ceiling, then you need to carefully install the edges of the installed products in the L-type slats from the walls.
- The last panel is the hardest to install. The remaining distance to the wall determines the width of the panel, so it has to be customized.
Video
The video below demonstrates how to install the ceiling from PVC panels correctly.
A photo