Putty ceiling itself
Before you finally finish the ceiling with paint, wallpaper or other materials, its surface must be putty. This applies to both conventional w / w ceiling and plasterboard surfaces. Next, we will tell you how to properly putty the ceiling, so that later it can be easily carried out facing.
Preparatory work

Ceiling puttying begins with the removal of the previous coating. It is necessary to get rid of already unsuitable paint, whitewash and plaster irregularities.
- Places in which dark spots formed by dampness and fungus appear, are carefully processed. If old plaster or putty exfoliates, it is removed with a wide trowel. Plasters that hold tight are first lightly treated with a hammer, after which the weakened layer is removed in the same way. In addition to the main layers, dust and dirt are removed.
- Now in the market of building materials many means are offered, having applied which, it is possible to get rid of old paint easily. At 1 m? surface consumed 0.5 liters of special composition. It is applied to the ceiling with a roller or a wide brush, and after half an hour the paint is quickly and completely removed.
- The wallpapers themselves are removed easily, but often there is a putty under them, which also needs to be removed, as it doesn’t hold well. If you ignore it and putty on such a surface, then in a day or two the new layer will begin to peel off. This can happen even at the stage of painting the ceiling.
- If there are cracks in the ceiling, they are enlarged with a spatula or other suitable tool and then puttied. Irregularities in the form of projections up to 20 mm are repulsed by a chisel or hammer. If the differences in the ceiling are more than 50 mm, the use of gypsum boards will be the best way out.
Note! On water-based paint before removal, you can walk with an aqueous solution of iodine. Whitewashing is easily removed with a brush moistened with water.
Getting rid of the fungus
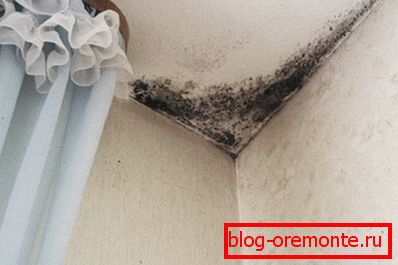
Often under the layer of paint find a place fungal colonies, to get rid of which is difficult, but possible. They can be recognized by brown-green spots that do not add to the ceiling attractiveness. Usually they live in rooms that are constantly in the damp. Before you putty putty, you need to get rid of this problem.
- To get rid of the fungus, you can purchase effective tools specifically designed for this purpose. German and Finnish compositions differ in quality, which both have an acceptable cost and are significantly better than Russian ones. This is not surprising, since from the time of the USSR they fought with the fungus with copper sulfate, which, oddly enough, also affects these colonies.
- The remedy for mold and mildew is sold in spray cans that need to be sprayed onto the stain to be removed and wait half an hour. It is believed that during this time the subject of trouble must perish. Indeed, if the colonies of mold and mildew did not take on alarming proportions, and they did not have time to take root deeply, the efforts made with the help of special means should yield a result.
- Even if there is no fungus, it is advisable to take preventive measures. Paints with a variety of antifungal additives are now offered. In the case of spots of large size, colonies are burned by gas welding. In the extreme case, concrete is hollowed out to a certain place, after which the void is sealed and ground stone is stilled.
Ceiling primer

After cleaning the ceiling you need to check it for horizontal. For this, a plumb line is lowered from the ceiling in each corner to the floor or a water level check is carried out. If you get a non-horizontal surface, the ceiling is aligned.
- Using a primer on the ceiling creates a layer that would adhere tightly to the surface. This helps the putty mix to adhere securely to the primer, which is absorbed into the leveled surface.
- Primer наносится на потолок малярным валиком с целью глубокого проникновения. Для удобства можно применить телескопическую ручку. В местах, к которым трудно добраться, используется кисточка. Такими местами считаются углы и стыки, которые обрабатывать нужно особенно тщательно. Primer также оберегает потолок от образования грибка и плесени.
- After the primer has been absorbed, any possible chips and cracks, seams and voids are puttied. This applies a special mesh, which reinforced seams. This technique will allow in the future to prevent the formation of cracks. After drying, the puttied areas are sanded with coarse sandpaper and re-primed.

Acrylic primer is considered one of the best. It can not be saved, because with an insufficient amount of primer, putty and paint can peel off. After drying the first layer, it is desirable to repeat the setting.
Ceiling treatment starting putty

To apply starting putty on the ceiling, you need the following tools: an acceptable capacity, a set of spatulas for 40, 100, 250 and 450 mm and a drill with a mixer attachment. In addition, you need to purchase a nylon reinforcing mesh with a hole size of 2x2 mm. It will well seal the putty, which will not crack.
- Starting putty divorced to the consistency of thick cream. Then, with her narrow spatula, all holes are sealed. After the first portion has dried, the entire surface is treated with a starter putty.
- The mixture is collected from the tank with a 100 mm spatula and gradually transferred to the same 450 mm thin layer. Then a strip is applied to the ceiling, the width of which will be equal to the size of the grid.
- The length of the grid strip should match the width of the ceiling. It is applied to the applied primer, pressed against drowning. After that the mix is put with the pallet.
- The thickness of the layer of putty is brought to 5 mm. It is inexpedient to spread thicker - it is better to add it in the right places after the material dries. You do not need to fill the net completely - a 5 cm wide strip should remain on the edge. In this place a grid overlap will form with the second strip, which is superimposed in turn. Then the mixture closes the second strip. And so the process is repeated until the surface is completely covered with the starting putty.
- Depending on the microclimate of the room, the first layer is allowed to dry for about 8 hours. What putty next? After drying, a layer of 2 mm is applied. Putty is stretched across the surface, it is desirable to ensure that there are no streaks from the tool. Starting putty should dry for about a day to achieve the desired type.
- At the end of the resulting flaws are removed with a metal mesh or sandpaper. In case of a bad result after the first approach, the procedure for applying the starting putty can be repeated. Work also needs to be finished by drying and grinding.
Note! For grinding work, use protective goggles, a respirator or gauze bandage. This will help prevent dust from entering the eyes and lungs from the ceiling.
Finishing the ceiling putty

Finishing putty should always be thinner than the starting one. It is applied with a large trowel with a clamp to the ceiling, while the putty should lie on the blade of the tool in the entire width. Finishing putty is prepared according to the instructions on the package and should be like thick cream.
- With a 100 mm spatula, the mixture is collected from the tank, transferred gradually to a 450 mm tool and applied to the ceiling surface. The thickness of the layer of putty should be up to 1 mm. The mixture is applied behind pipes and other hard-to-reach places with a 40 mm spatula.
- The spatula is effective at work, if you hold the tool at an angle of 70 ?. The smaller the angle, the more likely it is to apply a thin layer that leaves no traces behind it. The excess mixture is removed with the same tool.
- To prepare the ceiling for painting, you need to apply acrylic putty, which is implemented in plastic buckets. Layer thickness - up to 1 mm.
- In this case, the spatula must be held at an angle of 80?, While there will be no bands left. To putty on the edges did not have time to dry, you need to move the tool quickly enough. If necessary, you can re-apply another thin layer, while the ceiling is perfectly smooth and even. Grinding in this case is almost not required.
After the ceiling is dry, it will need to be sanded. Do this job better in the evening with a flashlight in hand. With this method, all defects that can be corrected by grinding are clearly visible. The ceiling surface is rubbed with fine-grained emery paper attached to the grater. This tool you need to walk around the ceiling. After this monotonous work, all the dust formed is vacuumed.
Plasterboard ceiling

Putty plasterboard ceiling with his own hands is different from other types of surface treatment. Since the gypsum ceiling has a flat surface, putty work is greatly simplified.
But still putty on such material has its own nuances:
- Particular attention when priming the surface should be given to the seams;
- Putty exposed pits from the caps of the screws. Having a spatula on the screws, you can check whether they are well screwed. If necessary, the screws are screwed and then puttied;
- Preparation of seams from the short side of the sheet. Starting putty seals up the joint, paint grid is applied and retraction is carried out with a spatula. Then this place is completely puttied and leveled;
- The seams are sanded, the holes from the screws are puttied;
- Conducted full finishing putty of the entire ceiling.
Grinding and grouting is carried out in the same way as before, but it is considered that the finishing layer of the gypsum ceiling putty is quite thin.