Mounting the adhesive ceiling itself
Glue ceiling, as one of the varieties of finishing works, is gaining wide popularity. Any decorative covering which keeps on a ceiling thanks to glue mixes, is called a glue ceiling. If you have decided on the design and building materials, you can install the glue ceiling with your own hands. How to do it?
First, let's look at what is a glue ceiling coating. Rectangular and square sheets of polystyrene foam (polystyrene) or polyurethane imitate different types of wood, stone surface, mother of pearl and plaster molding. These sheets can be glued to any surface: concrete, brick, chipboard, drywall.

The most common sheet dimensions are 50–50 cm. The calculation is rather simple. The package is 8 plates, a total area of 2 m2. The material is quite simple to transport and install, because it is very light and neat. The plates covered with a polymeric film are not afraid of moisture. This is especially convenient in rooms of high pollution. For example, such a plate, glued to the kitchen, you can wipe with a damp cloth.
Advantages of glue ceiling

There are several main advantages of this type of ceiling decoration.
- Reasonable prices. Taking into account the self-installation, sheets of glue ceiling have no competitors.
- Easy installation. Even a newbie can handle this easy job. In terms of the necessary tools and effort, the adhesive ceiling, again, is beyond competition.
- Masking defects. One of the main advantages of the glue ceiling is that it can hide any bumps, dents and dents under an elegant layer of attractive material.
- Sound and heat insulation. Styrofoam is known for its heat-shielding function. In addition, it dampens sound vibrations.
- Saved ceiling height. Glue ceiling does not reduce the height of the ceiling, so it can be used in different homes and rooms, even with low ceiling ceilings.
Surface preparation

Prepare immediately a spatula, a brush, a sponge to remove unwanted glue and a knife, if you have to adjust the plate to the desired size. How to glue ceilings?
Before installing the ceiling tiles, the ceiling itself must be cleaned of old traces of finishing materials. If necessary, putty irregularities. After that the primer is applied. The surface can be primed with polyvinyl acetate glue. If in the corners of the room you notice a fungus, be sure to treat it with an antiseptic primer. Then proceed to the layout of the ceiling with the help of roulette. Ways gluing are diagonal and straight. Given the size of the tile, mark on the ceiling, starting from the center, the lines on which the adhesive tile will be located. If necessary, the tile can be cut with a construction knife.
Gluing tiles

Now we take a special ceiling glue and apply it in small drops around the perimeter of the slab with an interval of 8–10 cm.
Note! An alternative to special glue can serve as liquid nails, acrylic putty or regular PVA.
You can start gluing panels either from the center or from the corner of the room. But central mounting seems to be the most convenient. The starting point can serve as a chandelier. Having pasted the first tile, the rest are fixed along the lines in parallel rows drawn from wall to wall. Glue ceiling plates can anyone, including one who does not deal with the construction. In the photo you can see how the finished glued ceiling looks.
Note! If the joints are pre-filled and treated with acrylic or silicone water-based paint, the joints will disappear and the ceiling will take a uniform surface. Someone prefers to leave the seams and not in a hurry to make them in the minus. This is a matter of personal preference and taste.
Types of ceiling tiles
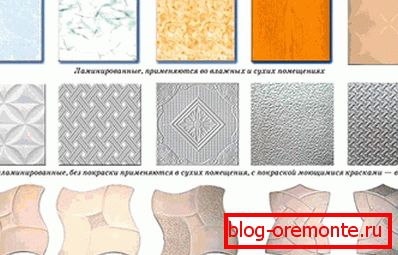
Ceiling tiles are divided into three categories, each of which passes its own manufacturing technology.
Polystyrene injection tile is produced by pressing at high temperature. This type of plate has a huge range of reliefs and colors. Product thickness - 9-14 mm.
Stamped tiles are also made of polystyrene - the material is inexpensive and practical. Special equipment is used to stamp sheets with a thickness of 6–8 mm at high temperatures.
Extruded tiles from the same polystyrene are coated with laminated film. A smooth surface can be monochromatic or with the application of various textures. Such products are highly durable. Plate takes the same form after clicking on it with your finger. It is slightly curved around the edges, which makes installation more convenient. For durability has no analogues.
Installation of ceiling plinths

Along the perimeter of the room under the ceiling itself you need to place special baseboards that hide the gaps between the slabs and walls. These baseboards are made of polystyrene or polyurethane, and may have different textures and shades. Installation of the plinth is allowed both before the wallpaper, and after.

In order to avoid problems with the docking, it is important to cut the baseboard carefully, and, most importantly, smoothly. You can use a block with a hacksaw or a sharp edge knife.
Note! When buying ceiling strips, it is worth taking a few meters more, since they sometimes break during installation.
Successful repair depends largely on careful planning. So think and decide which type of adhesive boards will suit you the most. Make sure that you have everything at hand and proceed to the interesting and responsible business - the installation of adhesive ceiling!
A photo


Video
After watching this video, you will see how you can hide ceiling irregularities with ceiling tiles: