How to raise the ceiling in the house
To heat a room in which the ceiling is low is much easier. This technique is often used in old houses. But this was not the only reason; another problem was the lack of modern technologies for the procurement of building materials. Often, when performing repair work, the owners are interested in how to raise the ceiling in the house with the least loss.
Why is the ceiling low

In order to qualitatively approach the work on increasing the level of ceilings, it is important to know two more reasons why ceilings are low:
- inattentive approach when choosing logs;
- building shrinkage;
- uneven load distribution;
- the house was originally designed incorrectly.
During the purchase of building materials it is better to do it with your own tape measure. So you will be able to verify compliance with the stated size. Often, for the sake of economy or the desire to earn more, and sometimes simply because of negligence, the overall width can be underestimated by a centimeter, which can result in 15 or even 20 cm when assembling a common structure.
Note! In the case when the building was built of timber or profiled logs, or without a foundation, it can cause significant shrinkage. In the case of rounded logs, this value can reach 10–15 cm. It happens that builders do not take this moment into account and do not make a stock, which subsequently leads to unpleasant consequences.
When designing a house, you need to properly approach the distribution of the load on the support beams and walls. In this case, the whole building will form a monolithic frame. It is important that all the material is from the same batch, then there will be a high probability that all the boards will behave the same.
Ways of lifting

In most cases, the ceiling level can be raised without disassembling the roof. In other situations, it can not do without. Here are ways that are often used:
- Floor lowering. This option will not be feasible in all situations. If the house is completely without a foundation or it is not deeply buried, this can lead to partial or complete destruction of the building. When applying this method, it is also necessary to analyze how high the windows will be. They may have to be moved to a lower level.
- Changing the way of plating. Often used method. Suitable in most cases. With the right approach, you can get a beautifully decorated ceiling.
- Beam replacement. It can be implemented in the case when the ceiling beams are not bearing and the rafters of the roof are not fixed to them.
- The rise of the whole building. Will be relevant in a wooden house, when the whole building forms a monolithic ligation of the beam and can be raised without the consequences of skewing or destruction of the walls.
- Roof lift. A very not recommended way, but, nevertheless, can be carried out at observance of all rules.
Note! No two buildings are completely identical. This means that it is worthwhile to approach the matter, analyzing general principles, and not standard solutions.
Preparatory work

Before you choose one of the methods listed above, you must perform an inspection of the main components in a private house:
- Carefully inspect the foundation. Assess how deeply it is buried in the ground. Is it a tape, or is it just a mound of cobblestones.
- Assess the condition of the walls. If they are made of wood, knock them out to see if the bars have rotted in the middle.
- Climb up to the attic. Look at what method the ceiling was made. Whether under-rafter beams (girders) were involved at the same time or were the ceiling be laid separately.
- Check how securely the roofing deck is fixed.
Note! If possible, before starting work, draw and paint the course of action on a sheet of paper. This will give the opportunity to best analyze all the advantages and difficulties.
We lower the floor level

If, after inspection, you have concluded that the foundation has high strength and is made soundly, then you can go this way.
- If the house is made of logs, then this means that the lags are fixed between the first and second crowns. The main task will be to lower them directly to the foundation or slightly lower. In this way we will manage to win about 20 cm.
- We release our premises from all the furniture and clean it.
- With the help of the nail puller we remove the boards that form the floor covering. Do not rush to throw them away. If they are oak or just in good condition, it can still be useful.

- Rate the state of the lag. See if they are provided for the basics only in this room or have a sequel to the next.
- Cut logs with a hacksaw, saber or chain saw. Be careful, nails can sometimes come across.
- We seal the gaps and openings that remained in the walls after removing the bars.
- We examine and clean out the space that has become available.
- We transfer boards to a lower level. For this, if necessary, it is important to make openings under the slats in the crown. After they are inserted and fixed (you can use metal corners).
- If the floor was not insulated, then in the presence of space from the bottom, it is possible to fill the perpendicular strips on which the mineral wool is laid (it will need to be covered with a film) or expanded polystyrene.
- If the floorboards were in good condition, they can be used again to sew up the floor. After that, everything will need to be cleaned, primed and painted.

If operations are not performed in a house from a bar, then after removing the floor covering, you may have to go deeper into the ground in order to achieve the desired result.
- When performing such actions, you lose a significant layer, which served as insulation. Now you need to compensate for this. Sampling should be made taking into account that a layer of insulation will be laid. It will consist of waterproofing, expanded clay and, possibly, of expanded polystyrene. From above it is better to fill the screed.
- Do not forget that the walls were exposed and the appearance of cold bridges is possible. To compensate for them, you can lay waterproofing and damper tape even before completing the layer of insulation of the floor. It should go above the future screed. Her excess is cut off with a knife.
Changing the filing method
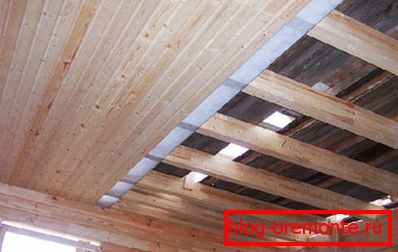
If, having been in the attic, you noticed that the ceiling consists of boards that are stuffed on the lower part of the beams, this is simply the perfect option, which is easiest to fix.
- It is better to vacate the room completely, not trying to cover the furniture, because it can still be accidentally damaged.
- Remove all decorative trim from the ceiling.
- We remove the layer of boards and insulation, which may be present there.
- If the boards are in good condition, they can be reused.
- Inspect the state of the beams. They can be cleaned and covered with antiseptic, if required.
- We transfer the hemmed boards from the bottom of the beams to the top. So we win about 20 cm of space. But the overlap design will now be visible.
- If the surface of the floor slabs has an unpresentable appearance and the coating does not help with the stain, then you can go the other way. Using wooden clapboard or drywall, sew them and paint them in the color of the tree.
- Further finishing works are performed.
Beam replacement
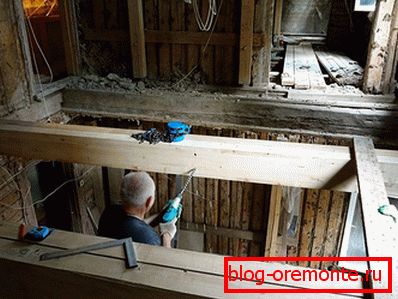
Typically, when building houses for the ceiling, individual ceiling beams are laid that are not connected to the roof structure. If this is the case in your case, then you can do the following:
- We clean the space of the attic and remove all the trim from the ceiling.
- We descend back into the room and make props for the existing ceiling beams. They can be tied to the puffs (cross bars of farms). Before performing this operation, it is very important to correctly calculate the maximum weighted weight.
- After the beam has been fixed, it can be cut with a saber or chainsaw. When both ends are released, it simply falls to the ground.
- So do with each of the crossbars.
- After the ceiling space will be freed, you can raise the floor with logs.
- Binding ceiling plating is carried out to the beams of farms. Thus, you can raise the ceiling by several tens of centimeters.
- If this was not enough, then you can do it differently. With the right approach, there is the advantage of transferring puffs. Before you cut the old, made new ones, which are located a little higher. The whole structure is fixed and, if necessary, additional braces and struts are added. Next, hem the ceiling to the new beams.
The rise of the whole building

Before you use this method, it is best to have several jacks. Their carrying capacity must be from 5 tons. In a simultaneous rise there is a danger of losing the reference point, therefore it is important to consider preventing horizontal displacement.
- Determine how high you want to raise the building.
- Divide this value by 5 cm - that’s how much better to lift in one go. It is possible for a smaller height, but not for a greater one.
- Make props according to the number of approaches.
- Identify the pivot points for the jacks.
- Before starting work, once again make sure that the walls are well ligated and the roof is fixed.
- The rise must be performed simultaneously.
- As soon as the next wedge is enclosed, it is necessary to fix it to the previous one with the help of self-tapping screws, so that they do not separate.
- After reaching the desired height, the jacks are weakened and everything remains on the props.
- Now you can add a few crowns in the resulting space. Instead of crowns, you can pour the foundation at the planned level.
- Further carried out hydro and thermal insulation. The building rises a little again, the supports are removed, after which it sits on the place intended for it.
Note! Before performing all operations, calculate the mass at home. For this you need to multiply the volume of the material by its density. The volume is obtained by multiplying the width, by the length and height, then the values for each wall are plus and added to the approximate weight of the roof.
Roof lift

This option can be carried out in the event that the supporting part of the roof is in close to perfect condition.
- Determine how high you want to raise the roof.
- Calculate the total weight of the roof structure.
- Now you need to strengthen the perimeter. For this purpose, a channel of series not lower than 14U is used. From it is necessary to build a frame that will link the entire structure.
- The base is fixed to the timber using screws with a diameter of at least 10 mm and a length of at least 10 cm.
- If necessary, throw extra crossbeams between trusses.
- Now you need to completely disassemble the ceiling to install the supporting legs.
- The supporting legs are made of a cruciform base. To do this, use channel 12U. Four vertical strips of the same material are welded to the base. The distance between them should be such that the jack fits inside. They are connected using perpendicular crossbars. Additionally mounted braces.
- Stands are located in the ground control points. Lifting is carried out with a single jack in 5 cm increments.
- When the roof is raised to the desired height, additional rims are installed in the case of a wooden structure or armored poured.
- Once the support for the roof is ready, it can be installed in the right place.
Note! Do work only in calm weather, because there is a danger of collapse due to gusts of wind.
This article is intended to give a basic idea of possible solutions to problems. In each particular situation, their own difficulties arise and unique ideas are born. Share your decisions in the comments. We always welcome new offers!
Video
This video shows how to lift a private house: