How to make a suspended ceiling from the drywall yourself
Suspended construction - a versatile and practical option for finishing the ceiling. It can be mounted in any room, regardless of the level of humidity. A creative approach to the installation of a suspended ceiling and construction experience makes it possible to create a multi-level design of the original form. But even the usual single-level frame with plasterboard plasterboard hides the defects of the main ceiling, allows you to hide communications, wiring and ventilation elements, place lights. Reducing the height of the ceiling reduces heating costs, and the thermal insulation layer keeps the room warm.
If you have the skills of construction work, then quickly figure out how to make a suspended ceiling with drywall. Beginners in this issue will have more difficult, but the desire and a good helper will cope with the task.

What is needed to install a suspended ceiling? It:
- powerful drill or hammer drill;
- laser or water level;
- screwdriver;
- scissors for metal;
- roulette;
- whipping cord;
- assembly knife.
Materials for mounting structures

The basis of suspended ceilings is metal, less often wooden, frame. To build it you need to purchase:
- Galvanized steel profile guide UD, having a length of 3 and 4 m, thickness of metal up to 0.6 mm.
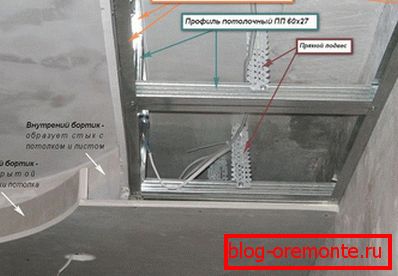
- Ceiling-rack bearing CD profile, produced in 3 and 4 m long, its width is 6 cm, the thickness of the steel base is 0.4 ± 0.6 mm.
- CD profile connectors: corner, longitudinal, single-level (crab), direct hanger, screws and dowels.
- Sheets of drywall. The type of material - normal or moisture resistant, is selected depending on the purpose of the room and the level of humidity in it.
Note! Professional installers recommend buying all the materials for the frame of one manufacturer, then they are optimal in size.
Markup

Installation of the structure begins with the marking of the walls and ceiling. In one of the corners mark the first point, lowering it by the value of the future ceiling. Using the water level, make a mark on the opposite wall. This instrument consists of two vessels filled with water and connected by a tube. It accurately shows the horizontal plane, it is enough to raise its parts and set the same water level on the scale drawn. On it, the marks are transferred to the wall and connected by a chopping cord. Accurately drawn horizontal line will allow to fasten the profile correctly and to avoid difficulties with mounting the structure.
Note! On the ceiling, it is necessary to determine the attachment points of the suspensions and the ceiling profile. Lines are marked at a distance of 60 cm, for the first profile from the wall 25 cm is deposited.
Frame assembly
The guide profile is attached to the drawn strip with dowels. Holes for them are pierced with a perforator in the walls and in a metal profile. The fixing pitch is 30 cm, in the corners it is reduced to 10 cm. The galvanized guide profile is installed on all walls. The ceiling profile will be inserted into it.
Direct suspensions are mounted at the intersection of lines marking the location of the CD profile. They are screwed with two or three dowels, it depends on the expected load.
The perforated sides are bent at a 90 degree angle. The CD profile is inserted into the opposite guide profiles UD. If the smallest side of the room exceeds 4 m, then the supporting profile is spliced with longitudinal connectors, in this place you can install a suspension to enhance reliability. In small rooms, the profile must be cut into pieces. It is easily cut with special scissors for metal. To align all the CDs in the same plane under them, they pull a strong thread as a guide. The profile is screwed to the suspensions from two sides by self-tapping screws. The remaining parts of the plates are folded to the sides.

After fixing all suspensions, the installation of transverse frame parts is performed. To do this, you need connectors "crabs", which snap into the CD profile at a distance of 50 cm from one another. Antennae connector bent on the longitudinal profile and transverse parts, the connection occurs with screws. Jumpers must be attached to the main profile at right angles. After tightening all the joints with screws, we get a ready frame with a cellular structure, to which you can fasten sheets of drywall.
Ceiling cladding

Plasterboard ceiling construction is not designed for extra weight. Heavy fixtures or air conditioners cannot be attached to it. Before sewing the ceiling, it is necessary to make a fixture for the chandelier, which is installed on the ceiling. At this stage, the laying of insulation, wiring for spotlights.
Sheets of drywall are laid so that their edge is located in the center of the carrier profile CD. Fastening the web to the frame should occur along the entire perimeter and in the middle, where the metal profile passes. Neighboring sheets divide the carrier profile shelf in half. Work is carried out with the help of a screwdriver, screwing the screws at a distance of 20? 25 cm from each other. To ensure the entry of the screw to the same depth, not exceeding 1 mm, you need to install on the tool the nozzle-stop. The drywall is cut into pieces of the desired size with an installation knife.
After fixing all the sheets of drywall cut out the holes for the lamps. An ideal round shape is obtained when working with a special nozzle on a drill. The next step in facing the ceiling - priming the surface. After the putty begins. The finishing is started from the joints and screwing points of the screws, a mesh is applied to the layer of putty for a more durable joint. Dove dry, applied layer, perform plastering of the entire ceiling. The finished surface is cleaned with sandpaper. The suspended ceiling is ready for finishing decoration.
Note! For a room with normal humidity, they use ordinary drywall, the use of moisture resistant will not give any advantages, on the contrary, it will make the structure heavier.
Installing a suspended structure requires accuracy, rigorous measurements and adherence to technology. Acting on the plan and responsible attitude to the reliability of fastening and compliance with the desired level, you will collect an excellent suspended ceiling.
We also want to invite you to familiarize yourself with the articles that describe the technology for the production of plasterboard ceilings:
- How to fix drywall to the ceiling.
- Suspended ceiling drywall do it yourself.
A photo


Video
In this video is a do-it-yourself installation guide for plasterboard ceilings: