How to make a frame for the ceiling
Renovating a house is fraught with difficulties, for example, when it comes to the ceiling. In this case, those who want to make a false ceiling, think how to make a frame for the ceiling. After all, how work was done on the device frame, will depend on how high the ceiling itself will be. If you assemble the frame for the ceiling incorrectly, over time, drywall on it may begin to crack or sag under its own weight.
It is necessary to take into account the fact that anyone can assemble a frame, having the most necessary skills and observing a number of rules. What are these skills and rules? Now we will take a closer look at the article.
Frame installation requirements

In fact, the structure on which drywall will be mounted can be made from just two types of building materials. As a rule, it can be wooden bars or a more common and convenient metal profile. Why does a profile have an advantage over a bar?
- First, it is lighter, hence the future construction will be lighter.
- Secondly, the metal profile is assembled much faster than the frame of the rails.
- And the last thing to note is the relatively low price of the profile compared to wood. Therefore, below will be considered a framework of metal profiles as more convenient and profitable.
Note! Wooden building materials after some time may succumb to deformation, if they will get moisture.

If you still decide to use wooden bars for the frame, then you need to purchase products of size 40? 40 or 50? 50 that have been pretreated with antiseptics. If the antiseptic treatment was not performed in the woodworking workshop, then it will have to be done independently by purchasing wood impregnation. However, even after all this, the wood frame may eventually fail, and cracks will appear on it.
In order to make it easier to understand how the frame is assembled for a plasterboard ceiling from a metal profile, consider the variant of a single-level ceiling. To carry out the installation of such a framework, you will need the following building materials:
- Guide profile (size 2.7? 2.8 cm).
- Ceiling profile (6? 2.7 cm).
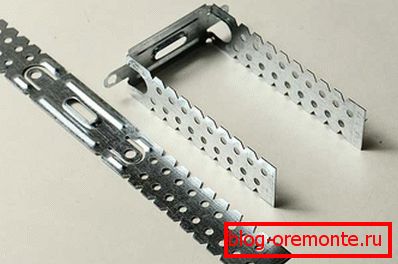
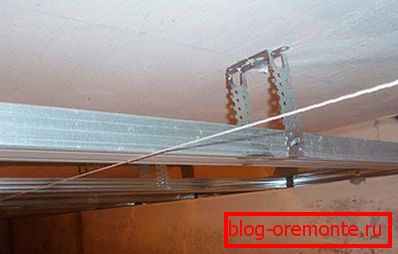
- Suspension straight.
- Crabs that connect the profile, located on the same level.
- Several boxes with screws for metal - the so-called "fleas" (small length).
From the tools, the following items are useful:
- punch (you can use a hammer drill), so that you can mount the profile to the wall and suspensions to the base of the old ceiling;
- impact screwdriver on batteries or powered by 220;
- roulette 5 m (can and 10 m);
- construction level of 2–2.5 m, necessary for the frame to be smooth.

How to calculate how much profile will be needed to create a frame? The length of one guide profile is equal to 3 m. We consider the perimeter of the room (the length and width, doubled). Then, the resulting value is divided by the length of the profile, the resulting figure is rounded up to an integer value. It would not be superfluous to add one profile "in reserve".
With profiles for the ceiling, the situation is not as simple as with guides. Here, another formula is useful for accurate calculations - the width of the ceiling is divided by 62.5 cm (half the width of the gypsum plasterboard) - so you can find out the number of longitudinal sheets. The length is calculated in a similar way. That is, for example, for a room with a width of 4 m and a length of 6 m, you will need 6.4 m of profile in width and 9.6 m of profile in length. In general, we have a 16 m profile. Therefore, you need to purchase 6 pieces of three-meter profiles for a room with the dimensions indicated above.

The number of suspensions is calculated on the basis of the total length of the suspensions (in the example above it is 16 m), which is divided into a step of suspensions (50–60 cm can be taken) with a step of 50–60 cm. frame and just calculate how many joints are obtained. You will also need special connectors for profile joints.
Mounting the frame

Ceiling frame installation всегда начинают с крепления к стене направляющих профилей. Обычно их высота от потолка должна быть не более 10 см. Если старый потолок неровен, то лучше на него не ориентироваться, а воспользоваться строительным или лазерным уровнем. Сделав кривой каркас, можно будет всю дальнейшую работу считать проделанной зря.
The guides are attached with dowels 6? 40. To do this, first on the wall draw a mark that will mark the bottom of the frame strictly on the level. Then apply a profile to it. While one person holds him firmly, the second right through the profile drills a hole in the wall. When the holes are ready, the profile is removed, plastic dowels are inserted into the wall, the profile is reapplied, and then fixed with screws, twisting or hammering them. The pitch between the holes is approximately 80 cm, not more.
Note! Twisted self-tapping screws keep in a wall better, than hammered. At the same time, if a dowel-nail was used, it will not physically be possible to twist it.
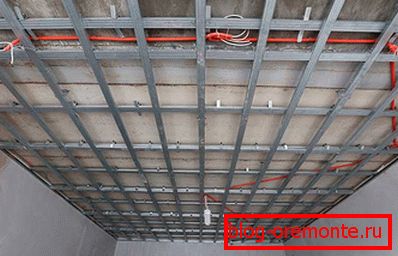
Suspensions are attached to the ceiling, on which longitudinal profiles will be supported. If the old base is concrete, then there are no problems. If the suspensions are attached to the wooden ceiling, then you need to look for durable beams, to which you can securely attach the suspension. When all suspensions are hanging, begin the installation of longitudinal and transverse profiles. At the joints of profiles, running along and across the room, use crabs, which fix the profile with screws.

The assembled structure must be checked for rigidity, and then check whether all the joints are securely fixed and firmly. If you find questionable places better to strengthen them. Then a lighting cable is conducted across the ceiling (the number of wires depends on how many switches will turn on the light, and whether there is grounding in the house or not). All wiring must be laid in corrugation or metal hose and fixed under the ceiling, without touching the frame. When this stage of work is completed, drywall is fastened to the ceiling, after which its further finishing is carried out.
More details on how to make a frame for the ceiling can be on the video.
Video
This video shows how to make a drywall ceiling frame. In the course of the action the master gives practical advice: