How to level the ceiling with drywall
Uneven surfaces in the apartment - what could be worse? Is that clogged sewers or constantly burning electrical wiring. All this requires serious repair, but unlike electricians and sewers, which are not visible to the eye, the ceiling must be made especially perfectly and evenly. Let's see how to level the ceiling with drywall with your own hands, and why is this option one of the most popular?
Preparation before installation

How to start repairing the ceiling? First of all, the ceiling should be inspected to find out if there are any serious irregularities, how large they are, whether cracks, damage to the old plaster, and so on are observed.
Note! Before the repair you need to remove all the furniture from the room. It can also be covered with old rags, and on the floor, if it was not planned to be repaired, it is better to lay sheets of cardboard.
Be careful, falling off the plaster can be traumatic. Great, by the way, the probability that if its layer falls on the finished plasterboard structure, the suspended ceiling will not stand.
Before installation, if you live in a private house or on the upper floor of a multi-storey building, you must check the condition of the roof. Roofs in such houses can leak, which in the rainy season will lead to an incredible dampness in the house, and even to the flooding of the neighbors below (if there are any).
The solution to both problems is the following. If the roof leaks - it is worth patching up. Somehow to replace the cracked coating (for example, old asbestos sheets), or to cover the roofing with ruberoid and resin. In the case, if the old ceiling is covered in cracks, or the lagged plaster falls off from the wooden shingles, it is necessary to cover the cracks with a solution of glue-cement, and remove everything that hangs at the top. In such works, the use of a respirator and gloves is mandatory. Sometimes the helmet does not hurt.
Measurement

Now you need to measure all sides of the room. All measurements are carried out under the ceiling of the room - so the ceiling can be leveled more precisely with drywall. Measurements are carried out with an accuracy of 2-3 mm. For this purpose, you will need a tape measure, a blank sheet of paper with a pre-drawn scheme of the room and a pencil or pen. If the room is long, it is better to carry out measurements together. In the case when the ceiling is high and you have to climb a ladder or stool, it is necessary to observe safety precautions so as not to fall.
Need to measure all four sides of the room. Why is that? It often happens that two parallel walls can differ in length by 2–3 cm, sometimes even 5 cm. Therefore, it is impossible to make calculations by measuring only one side in length and width, there is a chance to slightly err with the final results.
How much need drywall

How to calculate the amount of drywall? There are two options:
- Use the construction calculator.
- Calculate everything yourself.
The most popular sizes of standard gypsum plasterboard are 1.2–2.5 m, i.e. area of one sheet 3 m2. Divide the area of the room on the area of one sheet of drywall and find out the number of sheets. In the end, round the result to a whole number and buy the material with a small margin.
This is how the number of drywall sheets per single-level ceiling is calculated. If it is multi-level and figured, the consumption of drywall rises.
Calculation of profiles for the frame

It will take 2 types of profile - guide, UD, and carrier, CD. Everything is simple with the guide - its length is equal to the perimeter of the room. Consider this example. Assume that you need to install a gypsum ceiling in a narrow corridor 4 m long and 1.5 m wide. We get the following perimeter of the room:
P = (4 + 1.5)? 2 = 11 m
The length of one profile is 4 m, so you will need 2 pcs. 4 m, and 1 three-meter, which will need to be cut in half (as mentioned above, you need to make sure that the opposite walls are equal in length, for this you need to measure each wall separately).
The bearing profile is calculated on the basis of how the drywall will be fixed. One condition - one sheet fastens on three (directing and 2 bearing) profiles. In this case, the extreme profile comes under the first sheet only half. The next sheet is attached to the second half of the profile and another 2 lanes, and so on. The width of the sheet also includes profiles, but no longer solid, but small sections between the bearing strips. To make it easier to calculate how many meters of the CD you need, you can draw on a piece of sheet attachment scheme and estimate on it how many pieces of metal profiles to buy. This scheme is still needed during installation.
Mounting the frame
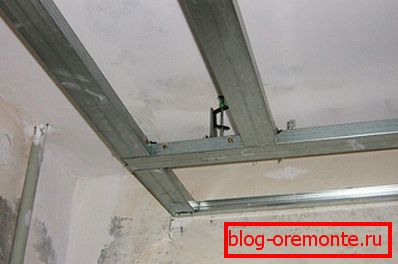
Actually, plasterboard sheets can be attached directly to the ceiling. But this option is very primitive. It will hide the cracks, but does not even align the ceiling, but only repeat its shape. Therefore, you need to make a frame.
On one of the walls mark the point where you plan to mount the frame. It can be located at a distance of 5-10 cm from the main ceiling. If the ceilings are too high and the room is narrow, it is better to lower the plasterboard structure just below. Focusing on the mark on the wall using a laser (water) level, you need to draw one continuous line around the perimeter. It will be attached to the main profile.
The guide profile is mounted on the wall with the help of self-tapping screws with a diameter of 6 mm and a length of 60 mm. Mounting pitch is usually taken around 35–50 cm.
If the walls are concrete, then it is necessary to drill holes in the profile, attach it to the mark line and draw points for drilling. Then a perforator and a 6 mm drill make shallow holes for dowels.
Note! For drilling concrete, you need to use drills with pointy tips - the usual ones are quickly erased, as they are designed to work with bricks and blocks. It would not hurt to determine in advance with a special device whether there is an armature or an electrical wiring in the wall. If any of this is present, then the fastening of the profiles must be moved higher or lower.
When the main profile is fixed, suspensions for carrier profiles are installed. They usually look like adjustable needles or metal stripes that are bent in the shape of the letter “P”. To properly fix them on the ceiling, you need to take the frame mounting scheme, which was drawn earlier. Along it, lines are marked on the ceiling where profiles will be fixed, and suspensions are fixed in half a meter.
When this stage of the work is completed, it is possible to fix the supporting profiles and attach them to the suspensions. Thanks to such a clever design of the ceiling, it is possible to avoid sagging the ceiling and cracking the drywall. If the ceiling is two-tier, one level with another will be joined by pieces of a CD profile 10 cm long (at your discretion) - this is the width between the tiers.
Bearing profile is inserted into the main end-to-end and fastened with screws. To do this, apply small screws, called among the builders "fleas" because of its small size. Their thread is designed for cutting thin metal, so they are easy to twist with a drill with a bat or a cordless screwdriver.
Note! If it is necessary to connect two longitudinal profiles, special fasteners are used - crabs. They are also applicable for places where the profile crosswise. Therefore, when buying building materials it will be useful to calculate all the joints and buy the right amount of crabs.
At the assembly stage of the frame, you should also conduct all the electrical wiring necessary for high-quality lighting and bring the cable to the places where the lighting devices are supposed to be. All wiring should be laid in a corrugation or metal hose and fastened to the ceiling so that it does not sag. Usually they leave a reserve of cable so that it is enough to connect to the chandelier. The ends of the wires are cleaned and insulated, and the wire is wound into a small coil so as not to interfere with work.
Mounting sheets

Now you can recruit sheets. They should be carefully lifted, drywall is fragile and may break. Attach them to the profile can be self-tapping screws for metal about 2.5 cm long. The fastening step is about 5–7 cm.
Note! If the screw is scrolling in the sheet, it is likely that it did not get into the profile or it was damaged. Then you need to close the other side. If the screw is not twisted, you need to either twist it completely, so that the cap does not stick out, or remove it.
If possible, it is better to fasten the sheets with the offset of the next row on the half-sheet. This reduces the likelihood of cracks in the ceiling. If a two-level ceiling is assembled, the first level is always sheathed first. How this is done, you can see in the video.
If somewhere the sheet does not fit, you need to carefully trim its edges or angle. There should be practically no seams between drywall, otherwise they will be difficult to cover up, and cracks will always appear in these places.
Note! You need to be careful with adjusting the sheet and cutting off unnecessary parts from it. Otherwise, undesirable gaps will appear or the excess part will be cut off from the sheet.
In the course of attaching the sheets, you need to make neat holes for the output cable lighting. The hole is marked on the sheet when it is not yet secured. Then on the mark it is cut, and the sheet is mounted. The wire is shown in the slot along with the corrugation.
Surface finish

After the last screw is twisted, the seams in the plasterboard sheets left over from them are coated with a putty. The reinforcing self-adhesive mesh is applied on the seams. After that, the entire ceiling is primed and puttyed with a thin layer of finishing putty once or twice.
When the putty layer dries, the ceiling can be completely primed and painted with water-based paint. Color is usually chosen classic - white, but sometimes there are other colors. After the paint has dried, you can install chandeliers or lamps on the ceiling.
Video
This video details how to make a plasterboard ceiling: