How to install a suspended ceiling
To date, the market of building materials offers many materials that can be beautifully trim the surface of the ceiling. Stretch ceiling is considered one of the most prestigious options. Then we will talk about how to install a suspended ceiling with your own hands.
Preparatory work

Since the work will be done on its own, the design parameters of the canvas will also have to be determined without outside help. To do this yourself have to make drawings. First of all, it will be necessary to accurately measure the lengths of the walls at their upper point (more precisely, under the ceiling) with the help of a tape measure. Electronic roulette will allow you to make measurements yourself. When working with a conventional tape measure, you will have to look for an assistant — he will have to hold the other end of the retractable ruler.
Note! Measurement errors are unacceptable, as they may make work as difficult as possible in the future.
- You should know how to get started on installing a stretch ceiling. To simplify work on a piece of paper of a convenient format, you need to draw a floor plan. The plan should put the location of the door. The starting side, from which it is necessary to make a start during the measuring work, will be the left from the entrance to the room. In order not to get confused in the drawing, it is better to mark each corner with a number.
- Then the turn comes to measurement from a corner which is to the left of doors. As already noted, the length must be measured along the line connecting the wall to the ceiling. You can, of course, not to climb up, measure the length at a lower or middle level, but this will be unprofessional, since the walls are not perfectly flat and vertical, and the real difference in measurements can be several centimeters.
- In this way, the lengths of all sides of the wall between the corners are measured. In addition, it is necessary to measure the distance diagonally between the first and third corners, between the second and fourth corners. All dimensions that are needed in the work, you need to put on the drawing.

If the decision is made to use a staple baguette, then the canvas should be bought with a margin. If you plan to install a PVC film with a harpoon, the dimensions must be accurate, because otherwise the process of stretching the material will be complicated. In a version with a bead, the fabric of the stretch ceiling is adjusted. The film with a harpoon can not be adjusted. The disadvantage of this material is that the removal and installation of the film are somewhat problematic. These features should be considered when choosing a mounting method.
To determine the number of meters of film, you need to measure the perimeter of the room as described above.

To fix the baguette you need to outline the contours on the walls. First, determine the angle in the room that is located lowest. Then from the surface of the ceiling retreat a certain distance, and on the wall make a mark with a pencil. The distance is determined independently, the surface of the ceiling should not create interference. On the other hand, you should not underestimate it either.
Based on the intended serif, in other corners of the room do the same using a laser or water level. To draw a straight line from the mark to the mark, you can use the finished upholstery thread. The thread is applied to basting, tension and release. As a result, a flat line remains on the wall along which the baguette will be installed.
Baguette installation

- Before installing the stretch ceiling, you need to attach baguettes to the walls. This operation must be done from the corners. Using a hacksaw, a cut is made in the middle of the product from the back side (the front side of the product must remain intact, if hooked with a hacksaw, the baguette may crack the damaged area during bending). Then the baguette gradually bends and gives the required angle.
- Corners can still be made using the method of washing on a piece of paper with subsequent adjustment, if required, but this is a long and laborious work, as there are some nuances in it. Of course, you need to choose the method yourself.
- Then, along the length of the baguette, holes are made at the distance of 0.1 m with an electric drill. The apertures of the holes from the bends and the corners should be 0.08 m. If the object of drilling is made of plastic or aluminum, a metal drill is used. Then the baguette is applied to the wall with orientation to the line that was applied beforehand and through the finished holes the walls are drilled to a certain depth. Dowel-nails are screwed into these places, into which screws are screwed. When screwing the screws you need to be careful that the plastic does not burst.
- After mounting the baguette processed joints. Sharp plastic edges are cut with a knife, and aluminum are processed with a file. Baguettes from the front side are fastened with scotch tape. This will protect the sheet from damage.

A photo демонстрирует, как правильно устанавливать багеты под натяжной потолок.

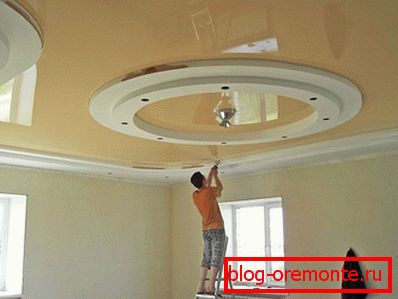
Mounting of the canvas

- Mounting of the canvas натяжного потолка начинается с прогрева пленки. Тепловая установка должна быть на определенном расстоянии от материала, иначе можно повредить его. Прогрев пленки производится при температуре 60 °С.
- Then comes the turn of the installation film. Fixing the canvas according to the rules begins with the corners. The spatula is not mounted cloth, and the harpoon, which is fixed in the baguette grooves. In the case of a staple version, the film is put in a baguette and, depending on the technique, is fixed with a wedge or staple.
- When the corners are fixed, the turn comes to mounting the film in the middle sections. Having fixed the film in the middle, it is necessary to continue the installation of the free web with a spatula along the length to the corners. Following this principle of work, the material should be fixed around the entire contour of the ceiling.
- If during work irregularities are formed, they can be corrected with a heat gun. With a harpoon mount, the mounting of the film is completed on this; with a staple mounting, the excess web is cut off.

The main thing is not to forget to hang the lighting fixture.
A photo

Video
The following video demonstrates the installation process of a stretch two-level ceiling: